Odin3 makes it easy for Samsung users to update their Galaxy phone or tablet, downgrade firmware, fix a boot loop, or install a custom recovery. Odin is Samsung’s official portable flash tool for Windows that can push firmware binaries with .tar or .tar.md5 extension. Below, you can download the latest Odin v3.14.1 and v3.14.4 to flash Samsung firmware binaries (BL, AP, CP, and CSC). We’ve also explained all technical terms related to Odin so you can use the tool like a pro.
Samsung Odin is available only for PCs and is compatible with Windows XP, Windows 7/8/10/11. If you are a macOS or Linux user, you can use an Odin alternative called Heimdall or Odin4, which works via the Linux Terminal. There is another great alternative called the Freya for Windows.
Download Samsung Odin v3.14.1 & 3.14.4
Odin v3.14.1.zip (latest stable release)
Odin v3.14.4.zip (latest)
The latest Odin works with Android 15 (One UI 7), Android 14 (One UI 6), and older versions of Samsung firmware. If you own a Samsung Galaxy S25, S24, S23, S22, S21, or any other Galaxy device released after 2019, you should use Odin3 v3.14.1 or Odin3 v3.14.4.
| Software Name | Odin3 v3.14 |
| Release Year | 2022 |
| Supported File Formats | *.bin, *.img, *.lz4, *.tar, & *tar.md5 |
| Supported Devices | All Samsung Galaxy phones and tablets running One UI |
| OS Compatibility | Windows 7/8/8.1/10/11 (32 and 64-bit) |
Samsung Odin Detailed Cheat Sheet
Here is a complete cheat sheet of everything you need to know about using Odin.
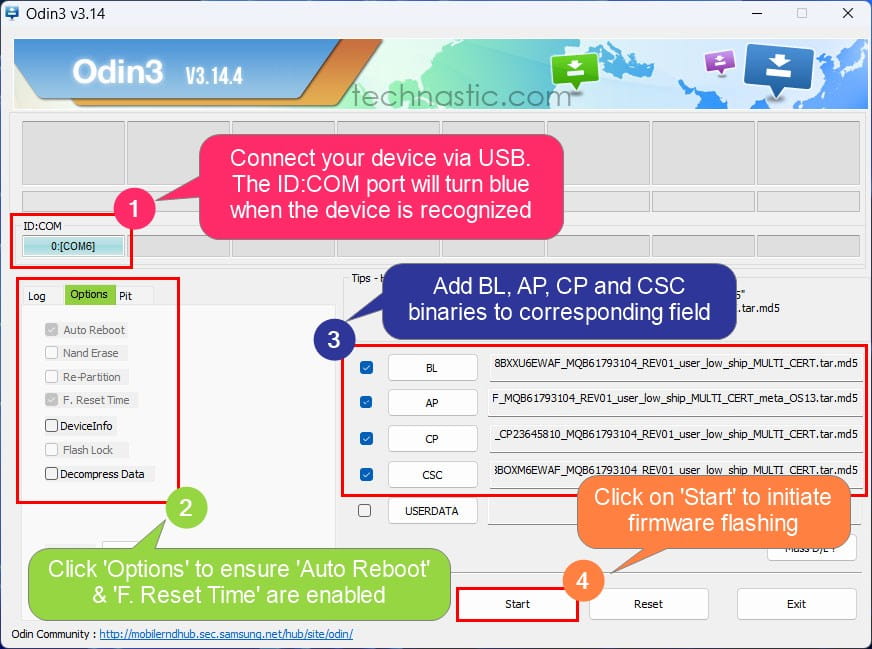
Quick Steps to Flash Firmware
- Install the latest Samsung USB driver.
- Use one of these Samsung firmware downloaders to download the latest firmware and extract the zip file.
- Boot your phone or tablet into the Download mode.
- Connect your phone to a Windows PC.
- Click the BL, AP, CP, and CSC buttons and add the corresponding binaries from the firmware folder.
- Click the Start button.
Follow the visual presentation of Samsung firmware installation steps shown in the screenshot below.
Samsung Odin Explained
When you launch Samsung Odin, you’ll be greeted by the Odin window and will see a variety of buttons with options like BL, AP, CP, CSC, UserData, and PIT. If you are unfamiliar with these terms, I have explained them below.
| Odin Option | Function |
|---|---|
| The Boxes | Odin has 2 rows of 8 rectangular boxes. The big boxes in the top row show the status of the flashing progress of different firmware components. The progress bars below them display the installation progress. |
| ID:COM | USB Serial COM ports that get highlighted when Odin detects a Samsung device. |
| Mass D/L | By clicking on the Mass D/L option located right above the Exit button, you can enable 72 more COM Ports. Odin can handle 80 Samsung phones or tablets at the same time. |
| Auto Reboot | This option is enabled by default and is found under the Options tab in Odin. If enabled, it will reboot your device when the firmware flash is complete. However, due to bootloader encryption on most Samsung devices, you may need to disable ‘Auto Reboot‘ before flashing TWRP or any custom recovery. |
| NAND Erase | Performing a NAND erase in Odin will wipe everything on your Samsung device, including the OS. |
| Re-Partition | It is used to re-partition Samsung devices to their default state by flashing a PIT file with the firmware. |
| F. Reset Time | Reset the firmware flash timer on your device. |
| BL | Add a bootloader file to Odin. |
| AP | It is used to add the AP component and custom recovery images. The full form of AP is Android Processor. |
| CP | CP, or Core Processor, is used to add the Modem file. |
| CSC | Samsung CSC (Country Specific Code) determines the customizations related to a geographical location, APN settings, carrier branding, etc. |
| PIT | Use this option to add the Samsung PIT file. The Partition Information Table contains device storage partition tables, partition names, block sizes, block counts, and other technical stuff. |
| UserData | This option is used to flash a backup of your phone’s data. |
| Start | Click this button to initiate the firmware installation. |
| Log | This field in Odin displays the log of events. |
Odin3.ini Configuration Explained
Upon extracting the Odin.zip, you’ll find 2-5 files inside.
- Odin3.ini
- Odin3 v3.x.x.exe
- 1 or 2 DLL (Dynamic Link Library) files
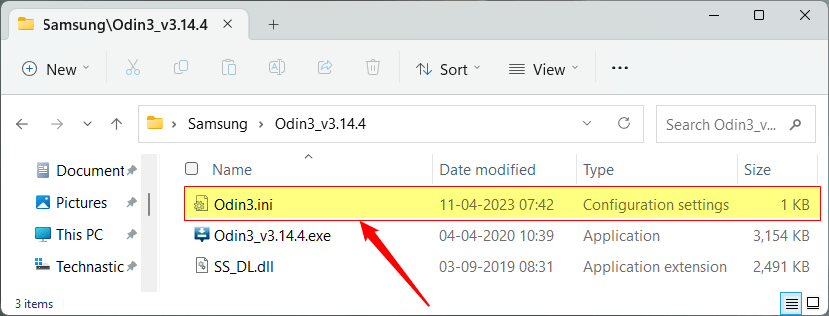
The .ini file is a text file that contains the configuration settings for the Odin flash tool. It’s editable, and you can customize Odin by changing the values.
The Odin3.ini has several labels (highlighted in blue). Under each label, you’ll find flags (highlighted in green).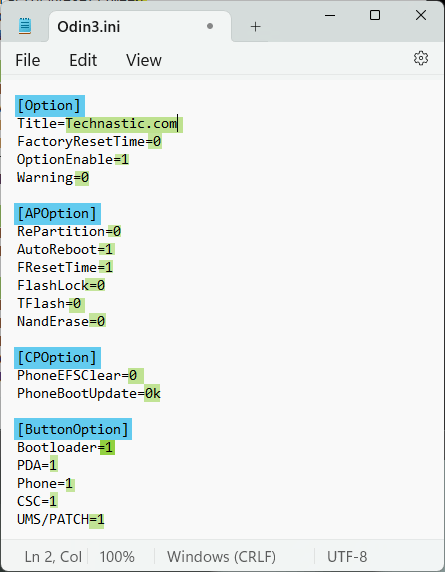
Below, I have explained each label and flag found in the .ini file for the latest Odin. You can enable or disable any flag by setting its value to ‘0‘ or ‘1‘. (0= disable, 1= enable).
- Label
[Option]Title: You can customize this with any text. For example, if you replace ‘Odin’ with ‘Technastic’, the text will display next to the Odin3 header.FactoryResetTime: Changing its value does nothing.OptionEnable: If you change its value to ‘1‘, the items under Odin’s Options tab will be disabled and greyed out.Warning: When you launch Odin, a warning pop-up will appear. You can disable the warning by setting the value to ‘0‘.
- Label
[APOption]RePartition: This option is used to re-partition a Samsung phone using a PIT file. By setting its value to ‘1‘, you can turn on this option in Odin.AutoReboot: Set its value to ‘0‘ to prevent your phone from rebooting automatically after the firmware is flashed.FResetTime: You can change its value to ‘0‘ or ‘1‘ to disable or enable the factory reset timer while flashing firmware.FlashLock: When enabled, this flag tells the software to unlock firmware flashing so the device can be programmed again.TFlash: Unknown flag.NandErase: Setting its value to ‘1‘ enables the option to wipe the NAND memory on your Samsung device.
- Label
[CPOption]PhoneEFSClear: EFS clearing is a deprecated feature.PhoneBootUpdate: By setting its value to ‘1‘, you can enable the bootloader update. By default, the value is: PhoneBootUpdate=0k.
- Label
[ButtonOption]: The value for the following button options is set to ‘1‘ by default. If you want to disable any button, change its value to ‘0‘.Bootloader: Enable or disable the BL button.PDA: Enable or disable the AP button.Phone: Enable or disable the CP buttonCSC: Enable or disable the CSC button.UMS/PATCH: Enable or disable the UserData button.
Odin Keyboard Shortcuts
Below are some useful keyboard shortcuts for Odin that you may find interesting.
- Alt + S ➡ Add the BL firmware binary
- Alt + P ➡ Add the AP firmware binary
- Alt + M ➡ Add the CP firmware binary
- Alt + C ➡ Add the CSC firmware binary
- Alt + S ➡ Start flashing
- Alt + R ➡ Reset Odin
- Alt + E ➡ Exit Odin
Now that you have the latest Samsung Odin and a complete understanding of its options and uses, it’s time to grab the official firmware files using the Bifrost firmware download tool for Windows, macOS, Linux, and Android.