Samsung firmware contains a partition information table. However, you can also flash the PIT manually using Odin to repartition your Samsung Galaxy phone. It’s not safe to flash the PIT for one variant of the same phone model on some other variant. Therefore, you must download the correct file for your Samsung device’s exact model. Instead of downloading it from forums or random websites, you should extract PIT from Samsung firmware itself or use Freya.
Having the correct PIT file for your Samsung Galaxy device is imperative to repartition it without messing things up. For example, if you own a Samsung Galaxy S25 Ultra and mistakenly install the PIT meant for Galaxy S25 or S24 Plus, you may end up with a flashing error or a boot loop. Suppose you own the unlocked Galaxy S23 Ultra (SM-S918B/DS), you must not install the PIT file meant for variants like SM-S918N (Korea), SM-S918U (AT&T, TMO, Verizon, etc.), etc.
What is a PIT File?
A Partition Information Table, or PIT, is a table or map containing all information about the firmware components. Odin requires a suitable PIT to get the following information:
- Block count
- Block size
- Device type
- Flash filename
- FOTA file name
- Hexadecimal
- Partition name
- Update attribute
Besides, the PIT file contains more properties, identifiers, or flags to guide Odin as it installs the firmware. Its basic function is to give key instructions to Odin about how much space (block size and count) it has to allocate to different partitions while flashing firmware to your Galaxy device. Different Samsung firmware versions may require different partition layouts.
If you extract all firmware binaries with .tar.md5 extension, you’ll find the following .img and .bin files with .lz4 encryption.
- MODEMST1: nvrebuild1.bin
- MODEMST2: nvrebuild2.bin
- PERSIST: persist.img
- EFS: efs.img
- PARAM param.bin
- SEC_EFS: sec_efs.img
- STEADY: steady.bin
- DQMDBG: dqmdbg.img
- APNHLOS: NON-HLOS.bin
- VBMETA_SYSTEM: vbmeta_system.img
- METADATA: metadata.img
- MODEM: modem.bin
- BOOT: boot.img
- INIT_BOOT: init_boot.img
- RECOVERY: recovery.img
- VENDOR_BOOT: vendor_boot.img
- VM-BOOTSYS: vm-bootsys.img
- SUPER: super.img
- PRISM: prism.img
- OPTICS: optics.img
- CACHE: cache.img
- CARRIER: carrier.img
- OMR: omr.img
- SPU: spu.img
- DTBO: dtbo.img
- CORE_NHLOS_A: Core_NON-HLOS.bin
- USERDATA: userdata.img
- SGPT0: sgpt0.img
- APDP: apdp.mbn
- PGPT1: pgpt1.img
- SGPT1: sgpt1.img
- XBL_B: xbl.elf
- PGPT2: pgpt2.img
- SGPT2: sgpt2.img
- PGPT3: pgpt3.img
- SGPT3: sgpt3.img
- TZ: tz.mbn
- AOP: aop.mbn
- DEVCFG: devcfg.mbn
- VBMETA: vbmeta.img
- VK: vaultkeeper.mbn
- HDM: tz_hdm.mbn
- TZ_KG: tz_kg.mbn
- UEFI: uefi.elf
- PGPT4: pgpt4.img
- SGPT4: sgpt4.img
- PGPT5: pgpt5.img
- SGPT5: sgpt5.img
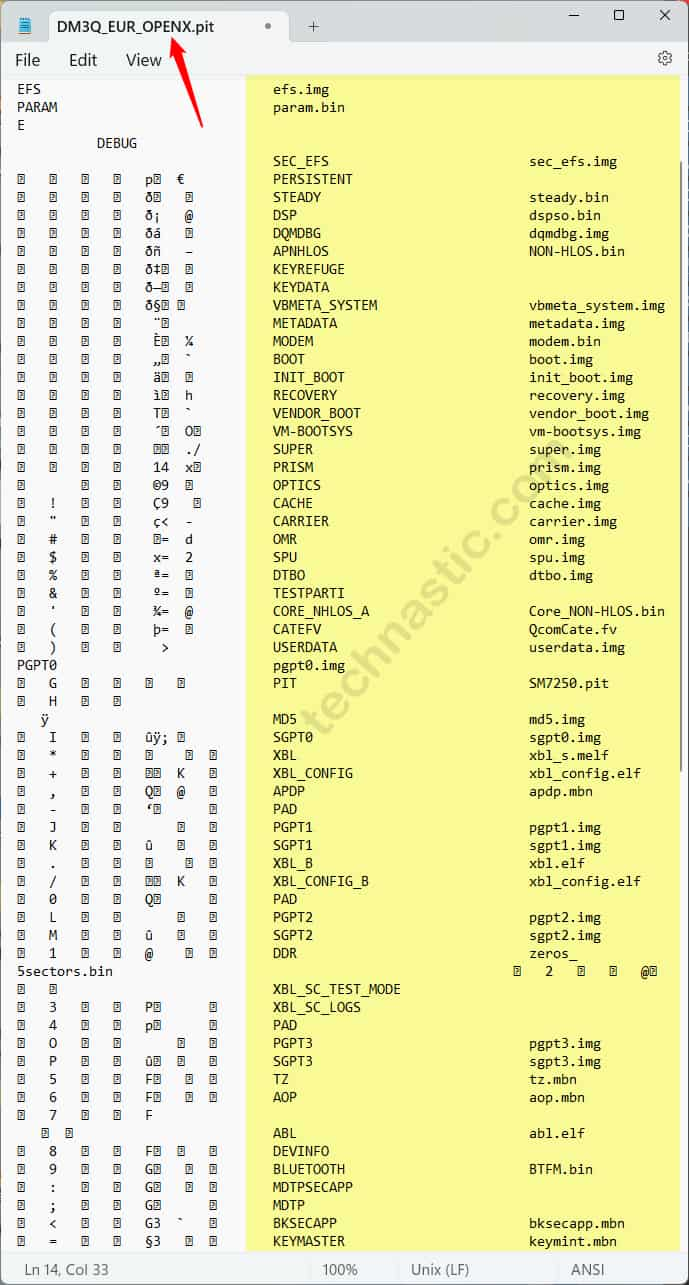
You can see the contents of a PIT file by opening it with Notepad.

When to Flash a PIT File?
There are various reasons why you might need a PIT file for your Samsung device.
- ‘Hidden.img‘ error while flashing firmware in Odin.
- Odin requires a Partition Information Table to map and allocate different partitions on your device. In case the firmware you are installing doesn’t have an appropriate PIT, the installation may get stuck on the “Get PIT for mapping” error in Odin.
- If you get the “Invalid EXT4 image” error in Odin, a correct PIT file can help you flash the firmware successfully.
- If you want to NAND erase your Samsung smartphone or Galaxy Tab, you can re-partition your device using a PIT.
- The partitions on your device may get messed up while installing the stock ROM. You are supposed to flash a PIT to fix things.
- If your Samsung device is stuck in a boot loop or not getting past the Samsung logo, flashing PIT should fix the issue.
- A wrong PIT file may mess up your device’s internal storage. That’s to say, if your Galaxy device has 512GB of internal storage, you may only be able to see and use 256 or 128 GB of storage space.
Steps to Flash PIT with Odin
Warning: All data on your Samsung device’s internal storage will be wiped, and all settings will be reset to default.
Follow the steps below to flash the PIT file with the Samsung firmware file with Odin or Freya Flash Tool.
- Download the firmware binries files (BL, AP, CP, CSC, and Home CSC) for your Samsung device.
- Boot your Samsung phone or tablet into Download or Odin Mode.
- Launch the Samsung Odin on your computer.
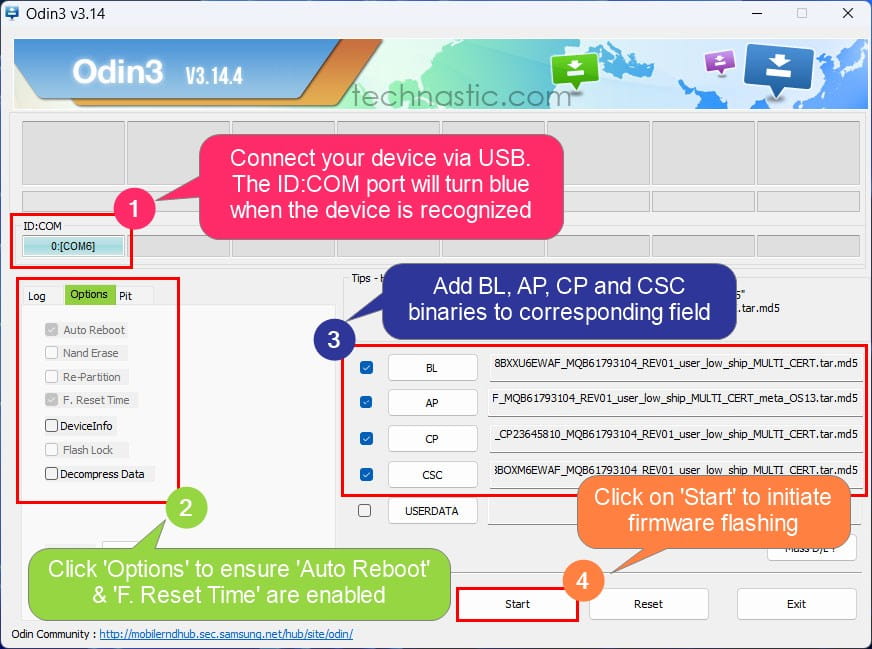
- Connect your device to the computer using a compatible USB cable. The ID:COM port on Odin will be highlighted.
- Click the PIT button and add the PIT file for your Samsung device to this section. Also, check the Re-Partition option in Odin and keep Auto Reboot and F. Reset Time enabled. Click the Start button to initiate firmware installation. Your device will reboot automatically when the firmware flashing is finished.
- Then, click the BL, AP, CP, and CSC buttons one by one and add the corresponding firmware binaries as shown in the screenshot below.

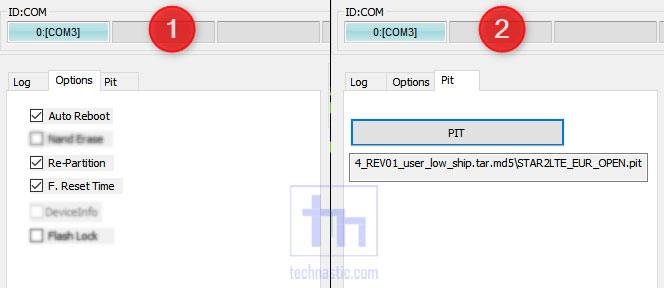
- Also, click the Options tab in Odin and make sure the following options are enabled.
- Auto Reboot
- Re-partition
- F. Reset Time
- Now, click on the PIT tab and add the PIT file for your Samsung device.
- Finally, click the Start button and wait until the firmware installation is finished. Upon the completion of firmware flashing, your device will restart.
Please note that your device might take about 3-7 minutes to boot up for the first time after firmware installation. So, don’t panic and have patience. If you encounter any issues, refer to this guide to fix Samsung Odin firmware flashing errors.

