Odin is a simple-to-use tool for Samsung Galaxy devices. If used properly, firmware or TWRP recovery installation usually goes as expected. However, sometimes you may encounter errors while flashing firmware using Samsung Odin. In this tutorial, we’ll check out the causes behind Odin’s “Complete write operation failed” and other errors and fix them to get your Samsung device up and running again.
List of Odin Errors
When you install Samsung firmware with Odin, the flash tool tries to write the device partitions with the firmware binaries. The flashing procedure requires certain things to be done appropriately. If you make a mistake, Odin might throw the “Complete write operation failed” error. It means Odin couldn’t push the firmware images to your Samsung phone.
Complete(Write) operation failed.
All threads completed. (succeed 0 / failed 1)
While the ‘operation failed’ error is the concluding line in Odin’s log report, a reason is always mentioned that caused the issue. In most cases, a bad Odin flash or firmware installation failure message is preceded by one of the following reasons.
- Hidden.img FAIL!
- Get PIT for mapping.. There is no PIT partition
- Set PIT file..
- Repartition operation failed
- Invalid EXT4 image
- Cache.img.ext4
- MD5 error! Binary is invalid
- SetupConnection.. Can’t open the serial(COM) port
- Sboot.bin.lz4 FAIL!
- FAIL! SHA256 is invalid
- FAIL! Blocked carrier
- FAIL! Model mismatch fail
- Firmware Installation Stuck on Userdata.img
- Recovery.img RQT_CLOSE !! FAIL!
- Recovery.img FAIL!
- FAIL! (DeviceInfo)
- System.img.ext4
- SW REV CHECK FAIL!
- FAIL! (DeviceInfo)
Without addressing the reason behind the ‘complete(write) operation failed’ error, you can’t fix it. Below, we’ll check out some factors that may be responsible for the error while flashing firmware in Odin.
Tips to Fix Odin Errors
Now that we have a complete list of reasons that might be responsible for the ‘complete (write) operation failed’ error, let’s see how we can fix them.
1. Hidden.img Error in Odin
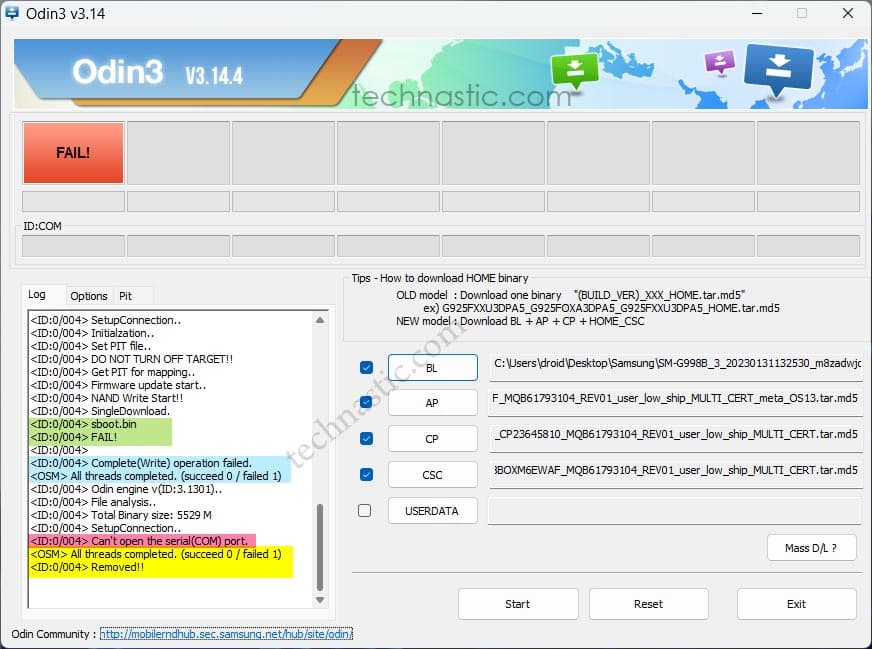
If you encountered a firmware flashing error due to “hidden.img” in Odin, you might be using an older Samsung firmware. Hidden.img used to be a component of the single-file Samsung firmware. When the firmware installation fails at the ‘hidden.img’ error, the Odin log goes like this.
<ID:0/003> Added!!
<ID:0/003> Odin engine v(ID:3.1005)..
<ID:0/003> File analysis.. <ID:0/004> SetupConnection..
<ID:0/003> Initialzation.. <ID:0/004> Get PIT for mapping..
<ID:0/003> Firmware update start.. <ID:0/004> SingleDownload.
<ID:0/003> sboot.bin
<ID:0/003> NAND Write Start!!
<ID:0/003> cm.bin
<ID:0/003> boot.img <ID:0/004> recovery.img
<ID:0/003> system.img
<ID:0/003> modem.bin
<ID:0/003> cache.img
<ID:0/003> hidden.img
<ID:0/003> FAIL!
<ID:0/003> Complete(Write) operation failed.
<OSM> All threads completed. (succeed 0 / failed 1)
Remove the ‘hidden.img‘ file from the firmware to fix the error. Let’s see how to do that.
- Extract the Samsung ZIP file that you downloaded.
- Open the folder and remove the .md5 extension from the firmware using the Rename option.

- Now, you can extract the .tar archive with a Zip extractor like 7Zip.
- You’ll see ‘hidden.img‘ inside the extracted folder. Delete this file.
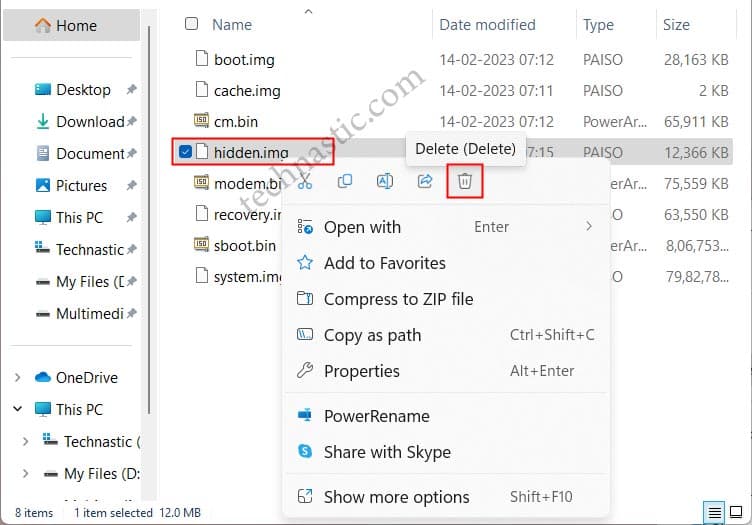
- Having deleted ‘hidden.img‘, select all remaining files using the Ctrl + A keyboard shortcut.
- Right-click and select the Add to archive… option. From the archive options in the 7-Zip menu, select tar as the Archive format and click on the OK button.
- When your new tar file is ready, rename it and add .md5 extension at the end to have a .tar.md5 file.
- You can now flash the firmware file using Odin without getting the firmware installation failed at hidden.img error.
2. ‘Odin FAIL! LZ4 is invalid’ Error
If you have been getting the ‘Odin FAIL! LZ4 is invalid‘ error, ‘Sboot.bin.lz4 FAIL!‘ error, ‘System.img.ext4.lz4 FAIL!‘, or any other error that mentions ‘LZ4‘, you must be using an old version of Odin. With the release of Android Pie-based One UI firmware, Samsung introduced LZ4 compression to its firmware binaries. This kind of file can only be uncompressed by Odin v3.13.1 and above. So, the solution is to use the latest version of Odin.
3. ‘Get PIT for mapping..’ Error
SetupConnection..
Initialzation..
Get PIT for mapping..
There is no PIT partition.
All threads completed. (succeed 0 / failed 1)
Removed!!
‘Get PIT for mapping..‘ and a common Odin error. In some cases, Odin gets stuck on ‘Set PIT file..‘ message and the firmware installation operation ends with ‘Complete Write operation failed‘ error.
SetupConnection..
Initialzation..
Set PIT file..
DO NOT TURN OFF TARGET!!
Re-Partition operation failed.
Complete(Write) operation failed.
All threads completed. (succeed 0 / failed 1)
Odin needs a PIT (partition information table) to flash firmware binaries and images. The PIT is a map that instructs Odin how much space (block size and count) to allocate to different partitions while flashing firmware. An appropriate PIT file might make Odin throw one of the following errors.
- Get PIT for mapping.. There is no PIT partition
- Set PIT file..
- Repartition operation failed
- Invalid EXT4 image
- Odin flash read failure, there is no PIT binary
If you get any of the above errors, download the PIT for your Samsung device.
Now that you have the correct PIT file for your device, flash it with the AP, BL, CP, and CSC binaries using the latest Samsung Odin.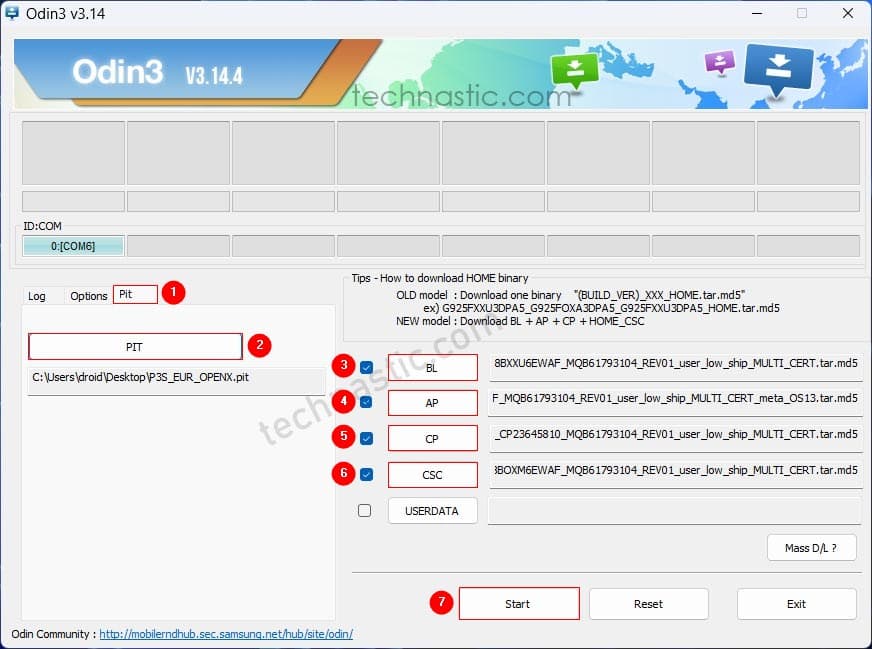
4. FAIL! SHA256 is invalid! in Odin
This error is usually encountered while flashing firmware on Samsung Galaxy devices from carriers like Verizon, AT&T, T-Mobile, Sprint US Cellular, Rogers, Bell, etc. If you are getting any of the following errors in Odin, you can fix them by using the latest PatcheD version of Odin.
- FAIL! Model mismatch fail
- FAIL! SHA256 is invalid
- FAIL! Blocked carrier
5. ‘Complete (Write) operation failed’ Error Due to Cache.img.ext4
Firmware update start..
recovery.img
NAND Write Start!!
cache.img.ext4
Complete(Write) operation failed.
All threads completed. (succeed 0 / failed 1)
Sometimes, you may end up with the ‘Complete(Write) operation failed’ in Odin while trying to flash a custom recovery image like TWRP. In many cases, the developers of the recovery image recommend a certain version of Odin. Recently, I faced this error when I attempted to flash ‘twrp-3.7.0_12-2-dm3q.tar’ on my Galaxy S23 Ultra. The installation failed with the following output in Odin.
Firmware update start..
recovery.img
NAND Write Start!!
cache.img.ext4
Complete(Write) operation failed.
All threads completed. (succeed 0 / failed 1)
The issue was caused by the fact that I was using VMware Desktop (virtual PC). When I tried the latest PatcheD Odin on my Windows 11 PC, I could flash TWRP recovery successfully.
6. ‘SW REV CHECK FAIL!’ Error
This is another common Odin error often faced by those who try to install an incompatible firmware file on their Samsung phone or tablet. You must download the latest Samsung firmware for your specific device model.
Another reason you are getting the ‘SW REV CHECK FAIL!‘ error may be that you are trying to downgrade the software of your Samsung device by flashing an older firmware. Due to security reasons, Samsung has disabled bootloader downgrade. It means you cannot flash anything older than what’s allowed by the current bootloader version of your Galaxy device.
In some cases, people get the following error in Odin while attempting to install a lower version of the bootloader than the one currently installed on their Samsung phone or tablet.
Odin engine v(ID:3.1401)..
File analysis..
Total Binary size: 8830 M
SetupConnection..
Initialzation..
Set PIT file..
DO NOT TURN OFF TARGET!!
Complete(Write) operation failed.
All threads completed. (succeed 0 / failed 1)
To fix this issue, download the latest firmware for your device model and flash it with the latest Odin.
7. Odin Stuck at Setup Connection Error
Sometimes Odin gets stuck at the ‘SetupConnection‘ message in the log. It stays there forever until you close Odin.
File analysis..
Total Binary size: 8766 M
SetupConnection..
All threads completed. (succeed 0 / failed 1)
If you want to fix this issue and get past this point so that you can flash the firmware onto your Samsung Galaxy device, try the following things:
- Uninstall and reinstall the latest Samsung USB Drivers.
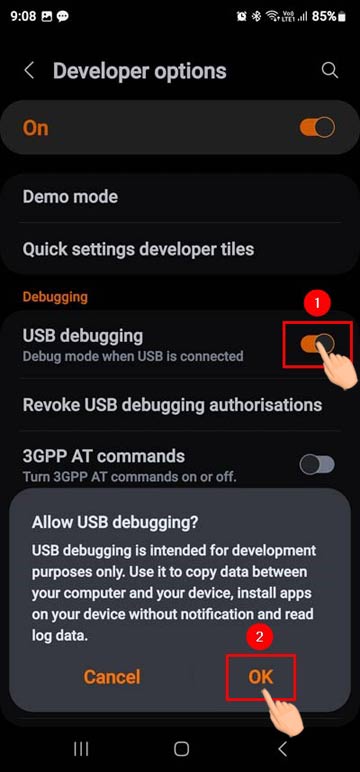
- Go to Settings > Developer options and turn on USB Debugging on your Samsung device.
- Use a USB 2.0 hub to connect your device to your PC. Using a USB 3.0 port may cause a connection error.
- Use the original cable that came with the phone or tablet.
- You may also get this error if you try to downgrade firmware with a lower bootloader version than the current firmware installed on your Samsung device.
Taking care of the precautions mentioned above should fix the setup connection error in Odin.
8. Firmware Installation Stuck on Userdata.img
While searching for all possible instances of Odin firmware installation issues, I came across a GitHub user, Gabriel, reporting that the firmware installation got stuck on ‘userdata.img‘ while trying to install new firmware on his Galaxy S22 Ultra with Odin 3.14.
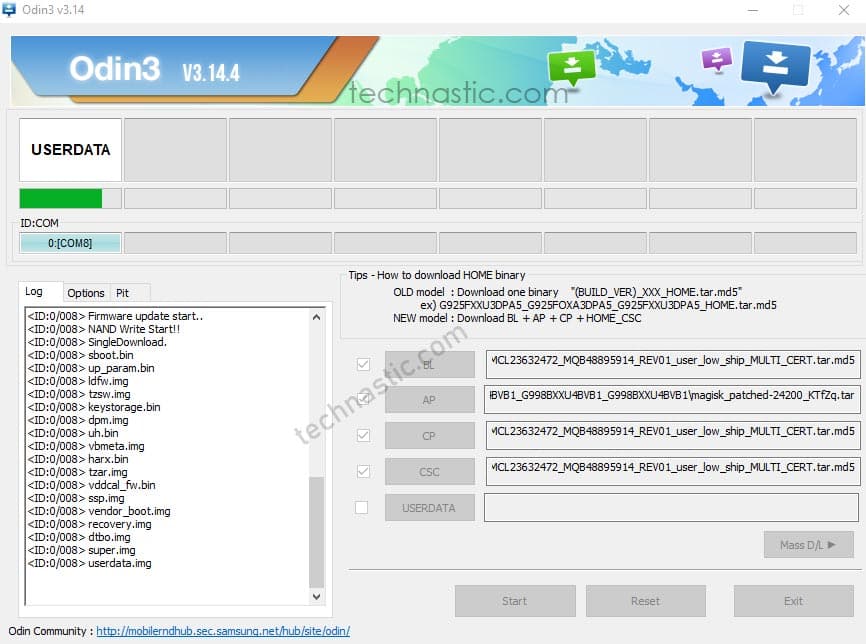
As you can see in the screenshot, Odin didn’t give any error or installation failure message. Usually, in such cases, you’ll see no movement in Odin. If you disconnect the phone from the PC, the phone will give the following warning;
An error has occurred while updating the device software.

You can’t access either the Download Mode or the Recovery Mode. Even the Samsung Smart Switch doesn’t recognize if you get this error.
If firmware flashing gets stuck on userdata.img, super.img, prism.img, etc., and Odin doesn’t give FAIL! or Complete Write operation failed error, it means the Samsung firmware file got corrupted during the download or the zip extraction. Sometimes, people encounter this error because they remove the MD5 extension to bypass the ‘MD5 error! Binary is invalid‘ error in Odin.
To fix this issue, do the following:
- You must NEVER remove the MD5 extension from the BL, AP, CP, and CSC binaries.
- Do NOT force Odin to flash anything that doesn’t pass its validation check.
- Download the firmware again. Ensure a fast and stable internet connection to avoid a bad download.
Having taken care of the above things, try installing the firmware. Don’t panic if you see the “An error has occurred while updating the device software” warning on your phone’s screen. When you connect your Samsung phone to your PC, Odin will detect it the same way as in Download Mode.
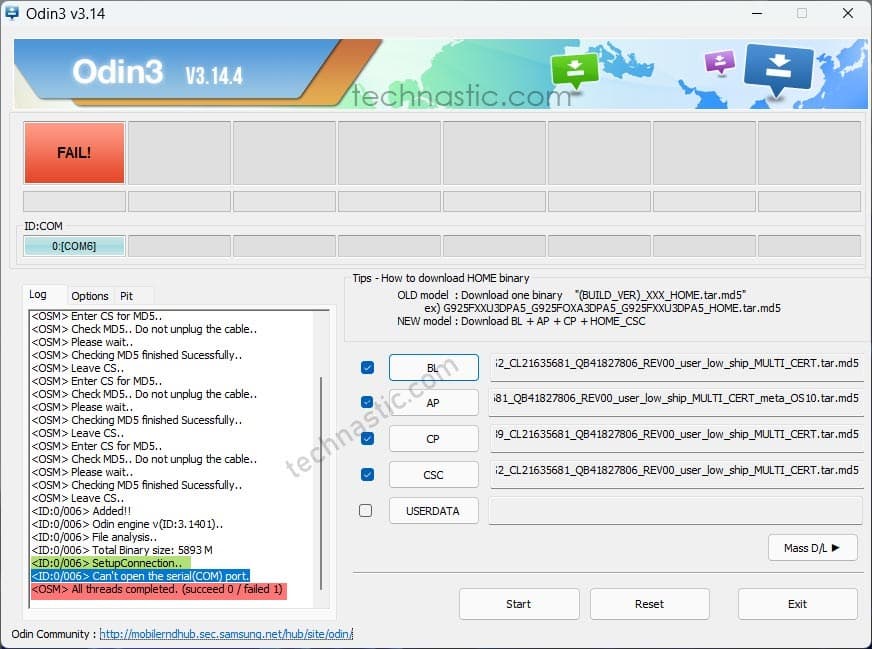
9. ‘Can’t open the serial(com) port’ Error
If Odin can’t open the serial (COM) port, the firmware installation will fail. This error occurs when your device and the PC are not connected properly.
Check MD5.. Do not unplug the cable..
Please wait..
Checking MD5 finished Sucessfully..
Check MD5.. Do not unplug the cable..
Checking MD5 finished Sucessfully..
Added!!
Odin engine v(ID:3.1401)..
File analysis..
SetupConnection..
Can't open the serial(COM) port.
All threads completed. (succeed 0 / failed 1)
To fix this Odin error, try the following solutions:
- Use a USB 2.0 port instead of a USB 3.0 port on your PC or try a different USB port.
- Uninstall and reinstall the Samsung USB drivers on your Windows PC.
- Turn on and allow USB debugging on your device.
- If you still get the serial(com) port error, try a different USB cable and PC.
10. FAIL! (DeviceInfo) Error in Odin
If you get this error in Odin, you may be attempting to flash the firmware that’s not meant for your specific device model. You can solve this error by downloading the appropriate firmware.
Avoiding Firmware Flashing Errors in Odin
- Always use the latest Odin version. If you are unsure which Odin version to use, read my guide.
- In certain cases, using the PacheD version of Odin might help bypass specific errors.
- Ensure that you have enabled USB debugging and OEM unlock from the Developer options on your Galaxy device.
- Always use the original USB cable provided with your Samsung device.
- Ensure that you use a USB 2.0 port while flashing with Odin. In case of a connection error, try different USB ports.
- Do not modify firmware binaries or remove the MD5 extension from firmware files.
- Sometimes, the firmware file can become corrupted during the download process. Re-download it.
- Do not try to flash firmware with a lower bootloader version or downgrade the firmware to a version lower than the current bootloader version of your device.
I hope this article has helped you understand the causes and solutions of the Odin errors. Although it can be annoying, with a bit of troubleshooting, you should be able to resolve the Odin errors easily. Finally, back up your data before attempting any repair work on your device, as it might save you from a potential disaster!