ADB is the bridge that connects Android devices to a Windows, Linux, macOS, or ChromeOS computer for debugging purposes. For security reasons, Android doesn’t allow external devices to access a phone or tablet without the owner’s authorization. You must authorize the ADB client to access the host device. If you haven’t set up ABD drivers properly or enabled and authorized USB debugging, you may encounter the ‘ADB device unauthorized’ error. In this tutorial, we’ll explore the various reasons causing the issue and fix ADB issues on Android and Windows.
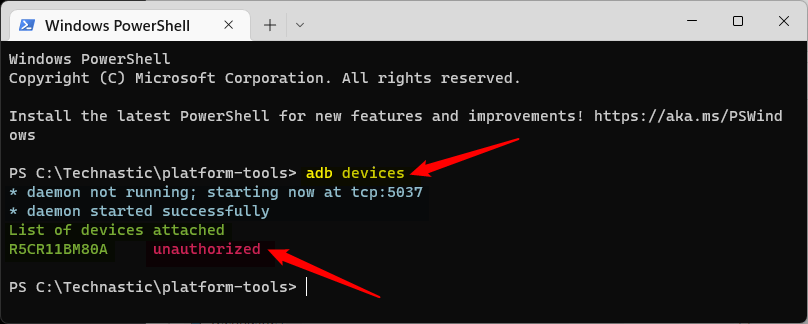
adb.exe: device unauthorized. This adb server’s $ADB_VENDOR_KEYS is not set Try ‘adb kill-server’ if that seems wrong.
If you get the ADB not found or recognized error on Windows, macOS, or Linux, it could be due to one of the following reasons:
- Faulty USB cable or port
- USB debugging is not enabled on your device
- RSA key fingerprint not allowed
- USB drivers need to be updated
- Latest ADB drivers are not installed
- The phone’s screen is locked during command execution
- The ‘platform-tools‘ folder’s path is not added to the command window.
- Auto Blocker is enabled (on Samsung devices)
Fixing ADB Device Unauthorized Error
Finally, let’s check out all possible fixes to solve the “adb: device unauthorized” error while sending commands to an Android device.
1. Enable Developer Options and USB Debugging
If the USB debugging is not enabled on your device, your computer won’t be able to communicate with it via the ADB Daemon. Ensure you have enabled debugging via the Developer options to avoid the device unauthorized error while using commands.
- Open the Settings app on your Android phone or tablet.
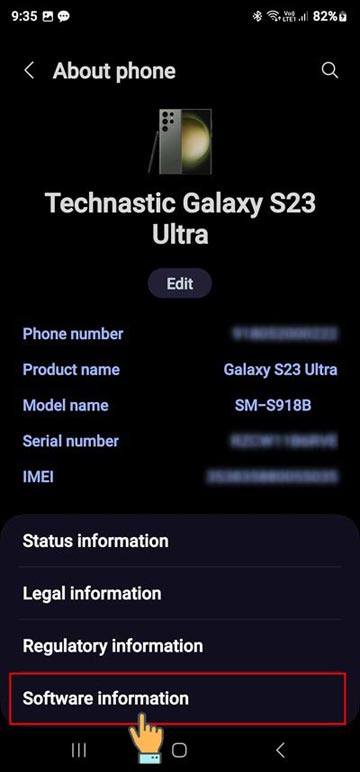
- Look for About, About phone, or About device in the settings menu. Usually, it’s located at the end of the settings menu. If you can’t find it, tap the search box in the Settings app, type “about” and you’ll find it.
- Now, tap Software information.
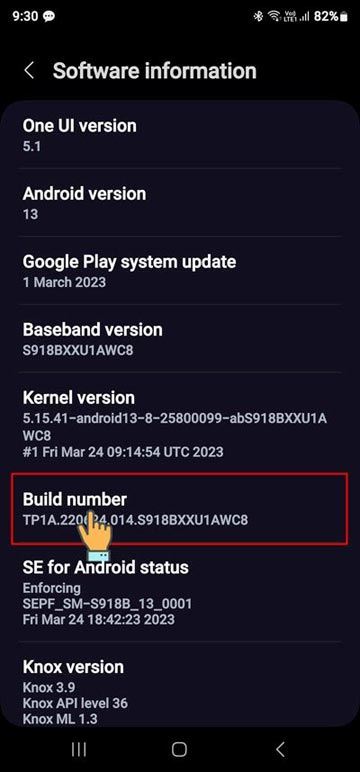
- On the next screen, tap Build number 7 times in a row.
- You’ll see a toast saying, “Developer mode has been turned on“.

- Now go back to the Settings menu and you’ll find a new item named Developer options listed there. On Android devices from Chinese OEMs, you might find it under Settings > Additional settings.
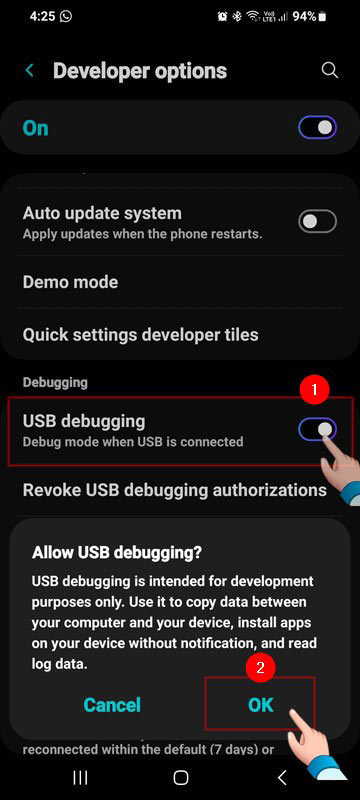
- Open the Developer options and go to the USB debugging option. Tap the toggle button next to USB debugging and tap OK when prompted to turn it on.
2. Extend Screen Off Timeout Duration
If your phone’s screen is locked while you execute commands on your computer, ADB won’t detect it, and you’ll get the device unauthorized error in the Terminal window. Navigate to Settings > Display > Screen timeout on your Android device and extend it to 5 or 10 minutes.
3. Launch the Command Window with the Path of ADB
- Open the ‘platform-tools‘ or the folder containing the ADB drivers.
- Now, launch a Command Prompt or PowerShell window with the folder path. That means you have to open the Command Prompt inside the folder window. There are 2 quick ways to do that.
- Place the mouse pointer inside the platform-tools folder window, right-click in any space, and select the “Open PowerShell window here” (Windows 10), or “Open in Terminal” (Windows 11) option from the Windows Context Menu.
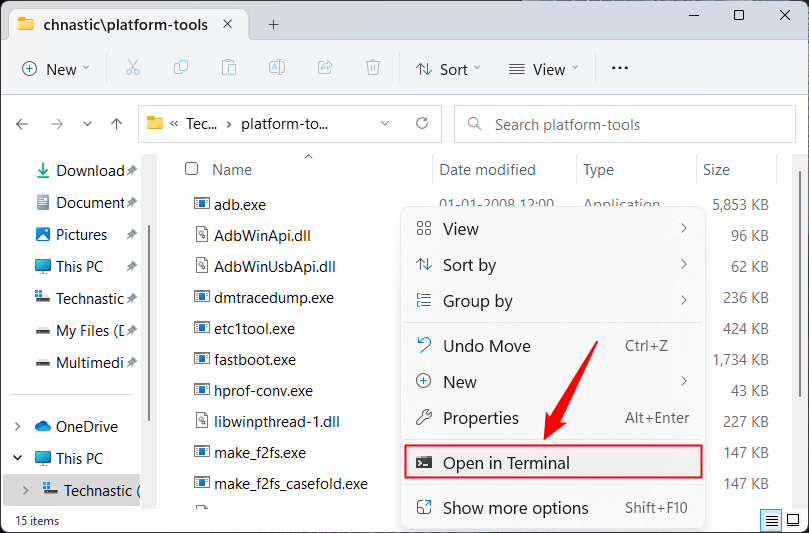
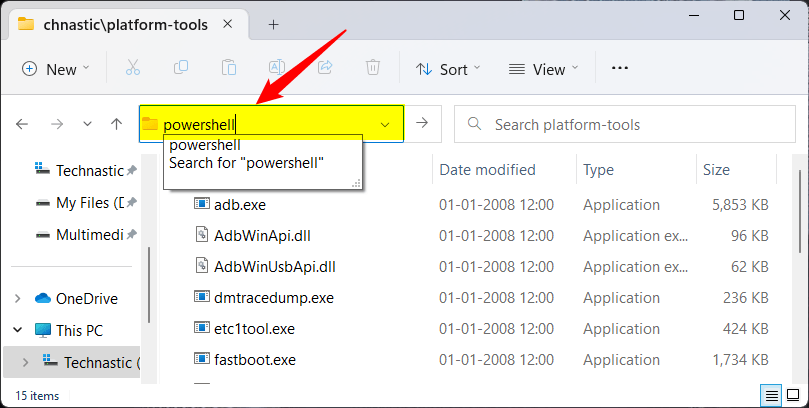
- Type “cmd” or “powershell” in the folder window address bar and press Enter.
- Place the mouse pointer inside the platform-tools folder window, right-click in any space, and select the “Open PowerShell window here” (Windows 10), or “Open in Terminal” (Windows 11) option from the Windows Context Menu.
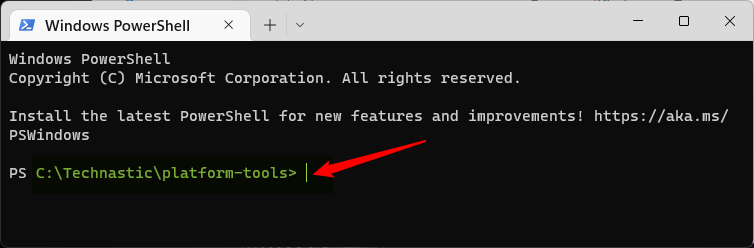
- If you’ve done it correctly you’ll see the path of the platform-tools folder in the Command Prompt window as shown below.
4. Revoke USB Debugging Authorizations
Revoking all previous device authorizations and starting afresh often fixes the unauthorized device error. To remove any ADB device or computer, follow the steps below.
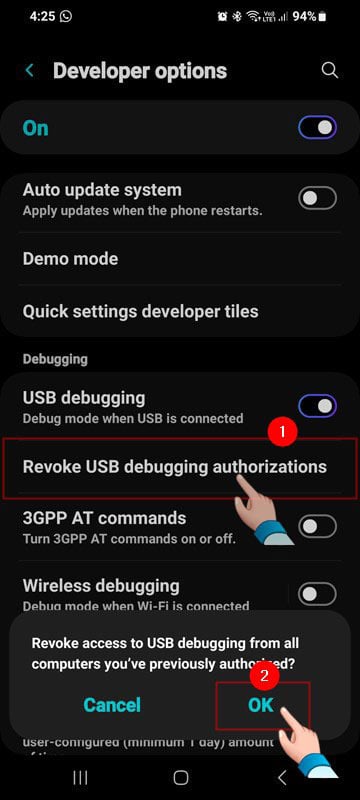
- Go to Settings> Developer options on your phone.
- Right below the option to USB debugging option, tap Revoke USB debugging authorizations.
- A pop-up will appear. Just tap OK to revoke ADB authorization access for all computers you authorized on your Android device in the past.
5. Download and Install the Latest ADB Drivers
If the ADB drivers installed on your computer are outdated or very old, you might encounter the ADB device is an unauthorized error. To eliminate the possibility, install the latest Android SDK platform-tools on your Windows, macOS, or Linux system and follow the relevant tutorial.
6. Allow RSA Fingerprint Key for ADB Debugging
It’s one of the most common causes of the ADB device unauthorized error while sending commands to Android devices via a computer. Ensure your phone’s screen is on while you press the enter key after typing the command.
When you see a pop-up on your device asking, “Allow USB debugging?“. Select the Always allow from this computer option and tap Allow.
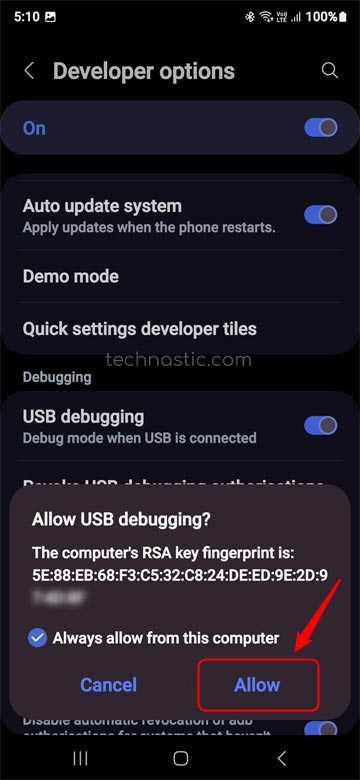
Now try using the ADB commands again. The device unauthorized error should have disappeared.
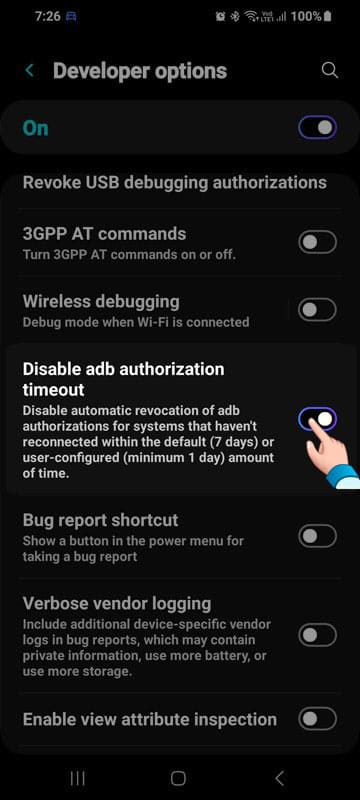
7. Disable ADB Authorization Timeout in Android
Please note that even when you select the “Always allow from this computer” option while authorizing ADB, your device will remember your computer only for 7 days. If you try to use ADB commands from the same computer after that period, you’ll have to authorize it again. To give your computer permanent authorization on your Android devices for ADB-related tasks, do the following.
- Navigate to Settings> Developer options on your Android phone or tablet.
- In the Debugging section of the Developer options menu, you will find an option called Disable ADB Authorization Timeout. Just tap the toggle button next to this option and your device will save your PC as an authorized ADB device and remember its RSA key fingerprint in the future.
That’s all for now! I hope this detailed tutorial helped you fix the device-unauthorized error on Android devices.