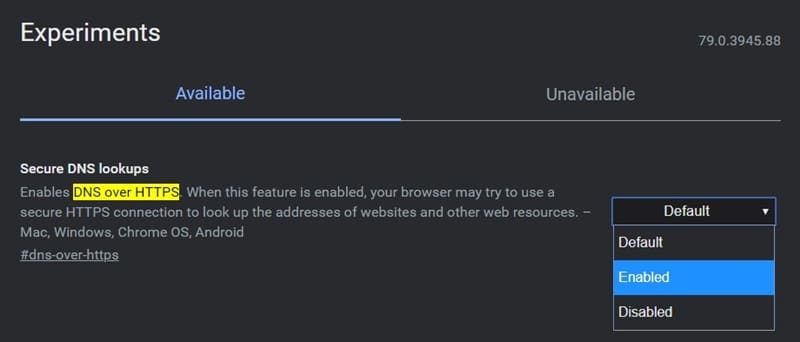
To preserve user security and privacy, and to avoid getting inflicted by Man-in-the-Middle Attacks, browsers are adopting the DNS over HTTPS protocol. Simply browsing over an HTTPS network doesn’t guarantee that the data, or DNS Query, sent to the server will be in an encrypted format. As a result, anyone dealing with these data packets will have complete knowledge about your browsing data. To further protect your privacy, here is how to enable DNS over HTTPS in the Chrome web browser.
DNS over HTTPS
A DNS name or URL you enter in the address bar is sent to the DNS server in a plain non-encrypted format. This means your ISP has full knowledge of the websites you visit. Although the data sent to the servers are still encrypted and safe, the site you enter (i.e. DNS query) isn’t.
Let’s understand this with the help of an example. Suppose you are browsing your friend’s Instagram profile on Instagram.com. While the ISPs will have no information on the profile that you are busy searching for, they will have full knowledge about you visiting Instagram.com. This is because the latter is sent over in a non-encrypted format as mentioned before.
This is where DNS over HTTPS enters into the scene. If you enable it on your Chrome browser and then do the same activity as before, your ISP won’t get the clue that you have even opened Instagram.com, let alone the user’s profile. With that said, here are the steps to enable the same on the Chrome browser.
Don’t Miss: How to Change DNS Servers in Windows.
Enable DNS over HTTPS in Chrome
For the said process to work, we will be required to enable a Chrome flag. These flags are experimental features that are hidden from normal users. However, you could enable it on your said PC with the help of the instructions given below. Make sure to be on Google Chrome version 79.0.3945.88 (or later). With that said, here are the steps to enable DNS over HTTPS in the Chrome web browser. Additionally, you should also have a look at these cool Chrome OS tips and tricks.
Steps to Follow
- Enter chrome://flags in Chrome’s Omnibox (address bar).
- Search for Secure DNS lookup (or DNS-over-https) and hit Enter.
- Click Default and change it to Enabled.
- Finally, restart your browser from the notification appearing at the bottom of Chrome.
That’s it. You have successfully enabled the DNS over HTTPS protocol on the Chrome browser. To further solidify this fact, head to 1.1.1.1/help and look at the ‘Connected to 1.1.1.1’ section.
Read next: Using Google Password Manager to Sync your Passwords
