In this guide, we will be listing the steps to delete the cache of individual websites in Chrome. Browser cache is temporarily stored data and consists of resources such as images, JavaScript, CSS, and cookies. This makes the web pages load faster on your devices, considering most of the online resources related to that page are already stored in the cache. Try opening any website for the first time and then subsequently for a second time. You will notice a considerable decrease in load time in the second launch.
However, in some cases, bad results may be cached. Or it might happen that a website has undergone a drastic makeover, yet your browser is still loading the old caches. In these cases, the website will fail to load properly and half of the elements of the site might be non-functional. The best bet in these cases is to clear the cache of that website.
But here is the catch. Google Chrome doesn’t allow you to delete the cache of individual websites. Yet there exists a hidden trick to carry out the said functionality. Here is how it could be done. On that note, also check out our guide to view the cached copy or old version of a website.
Clearing Cache of Individual Websites
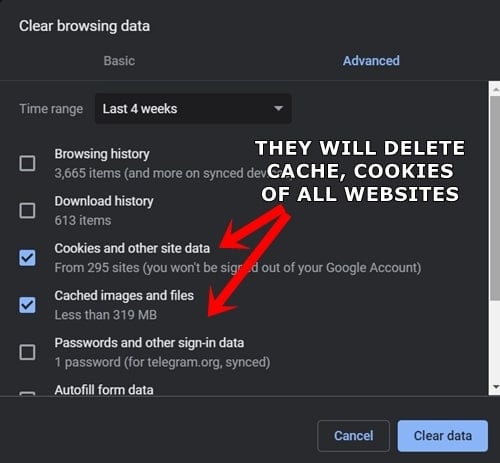
Head over to Chrome’s Settings > Advanced section. Then scroll to Privacy and Security, and you’ll see a Clear Browsing Data option. It provides the option to delete cookies and cache. However, doing so deletes cookies and caches of all the websites and not the individual ones you’re concerned about.
As a result, the next time you open a website, it will load from scratch and take a few more seconds.
Don’t Miss: How to Free Up Disk Space and Clear All Caches in Windows 8
Steps to Follow
- Open the desired website whose cache you wish to delete in Google Chrome.
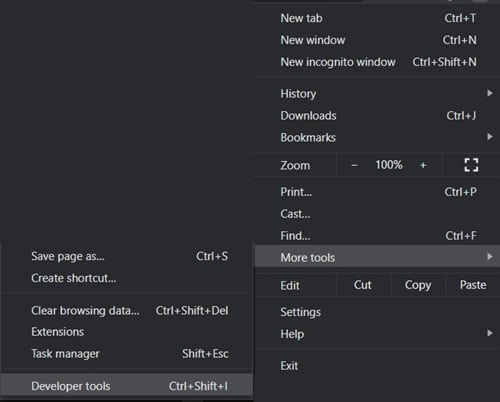
- Click the overflow menu and select More Tools > Developer Tools.
- As soon as it opens, right-click on the refresh icon.
- You’ll now get three options: Normal Reload, Hard Reload, and Empty Cache and Hard Reload.
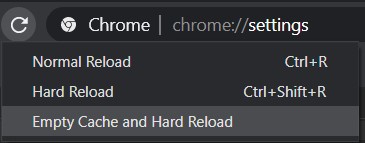
- Select the third option. Wait for a few seconds till all the cache gets cleared. As soon as it does, close the Developer Tools and that website as well.
- Finally, open the website once again. The site will load from scratch and all the related issues should be rectified.
With that, we conclude the guide on how to clear the cache of individual websites in Chrome. Let us know what you think of this guide.
Read next: Stop, view and clear activity history on Windows 10