Odin is Samsung’s official firmware flash tool. It’s easy to use and has a simple and user-friendly interface. The only limitation is that Odin supports Windows only. Earlier, there used to be a Java-based version of Odin named JOdin3 that you could use to flash Samsung firmware without Odin. You can also use Heimdall to flash Samsung firmware binaries without Odin on Windows, Linux, and Mac.
In this tutorial, we’ll see how to use JOdin3 and the Heimdall suite to install Samsung firmware on a Mac.
Flash Samsung Firmware on Mac with Heimdall
As mentioned above, Samsung Odin is the most convenient tool for flashing firmware. If you can manage a Windows PC somehow, I would still recommend doing that. However, if you have no choice but to flash Samsung firmware on your Mac without Odin, you can go with Heimdall.
Heimdall Suite is a third-party tool that works on Mac, Linux, and Windows. However, it’s not straightforward to use, and its developer, Benjamin Dobell, hasn’t released an update since 2017. This might result in compatibility issues with the new versions of macOS.
- Download Heimdall for Mac from the official website.
- Download the Samsung firmware binaries BL, AP, CP, and CSC for your Samsung device.
- You’ll also need the PIT file for your Samsung device.
- Make sure your Samsung device’s charging level is 70% or above.
Install and Set up Heimdall on Mac
If you try to install the Heimdall-1.4.0.dmg on your Mac, you’ll get an error saying “Heimdall Suite 1.4.0.pkg can’t be opened because it is from an unidentified developer.” 
Luckily, there’s a workaround to get Heimdall up and running on Mac. Follow the steps below to set up and install Heimdall on Mac via Homebrew.
- Open the Mac Terminal on your computer. To do so, you can use the Command + Space keyboard shortcut, type “Terminal” and press the Enter or Return key.
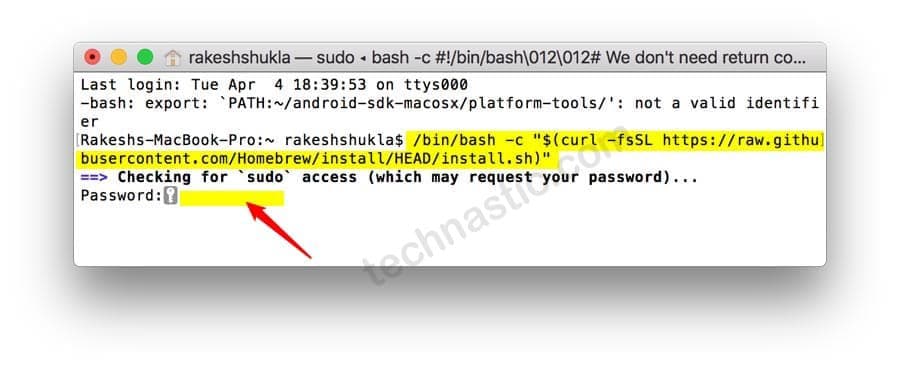
- Now, copy and paste the following command in the Terminal window and press the Enter key.
/bin/bash -c "$(curl -fsSL https://raw.githubusercontent.com/Homebrew/install/HEAD/install.sh)"
- You will be prompted to grant sudo privileges by entering your Mac user password. Type the password to log in to your Mac and press Enter. Please note that your password won’t be visible in the Terminal. Type it anyway and it’ll work.
- Let the Terminal do its job and wait for Homebrew to install.

- When you get the ‘Installation successful‘ message, paste the following code using Command + V.
echo 'eval "$(/opt/homebrew/bin/brew shellenv)"' >> ~/.zprofile
- Once you run the above command,
brewcommands will become available in the Mac Terminal.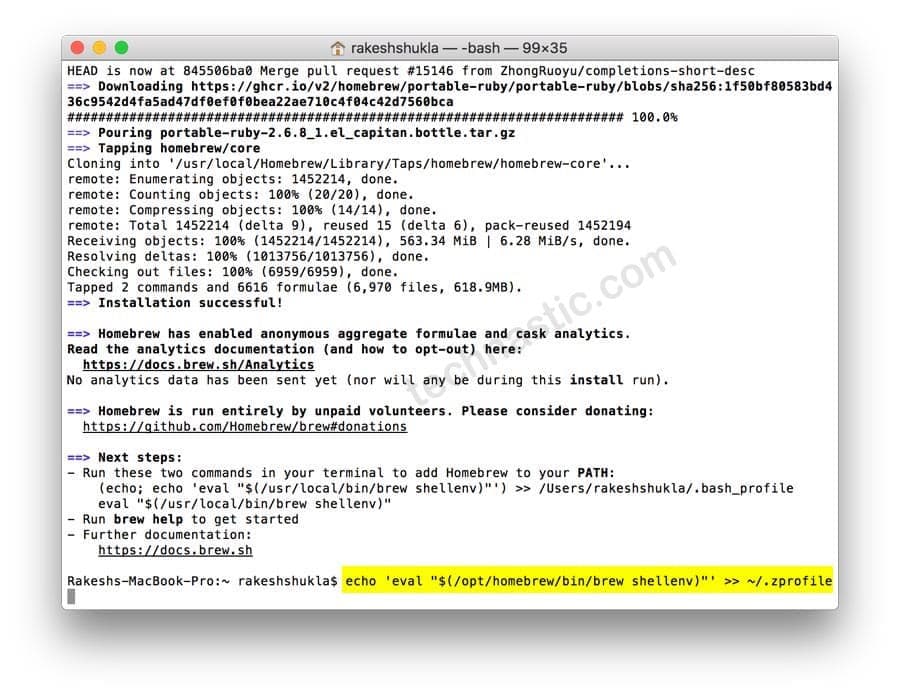
- Finally, it’s time to install the Heimdall Suite on your Mac. Execute the following command for that.
brew install --cask heimdall-suite
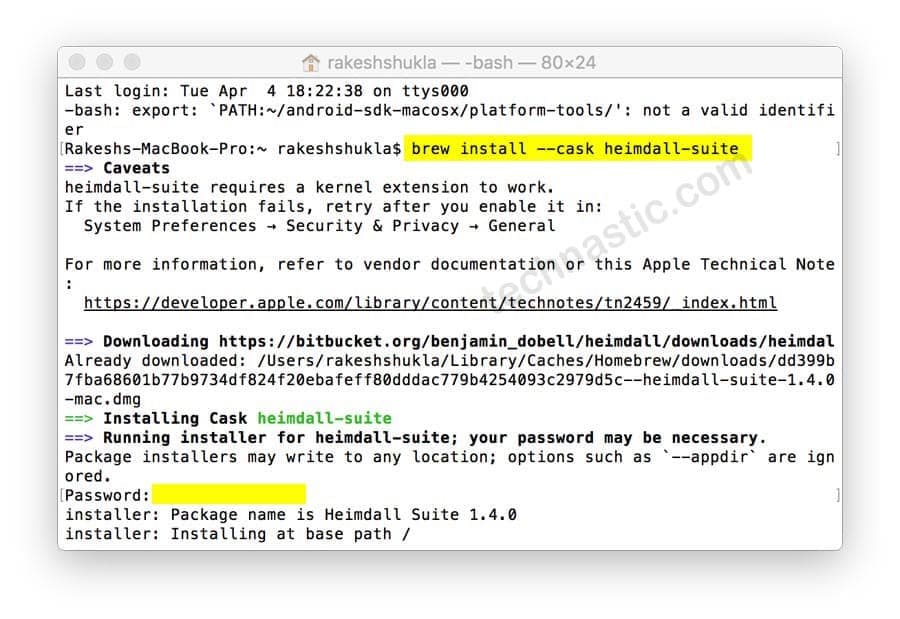
Heimdall will be installed on your Mac, and you can now use it.
Using Heimdall to Flash Samsung Firmware on Mac
Now that you have installed Heimdall, you can flash Samsung firmware using your Mac via the Heimdall frontend and terminal commands.
I assume you have already downloaded the Samsung firmware zip file. You need to extract this zip to get the firmware binaries.
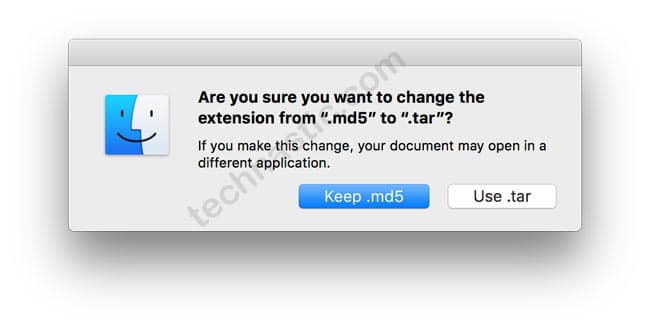
- Open the firmware folder. You’ll find 5 files inside with .tar.md5 extension: AP, BL, CP, CSC, and Home CSC
- Remove the .md5 extension from all files using the Rename option.
- Now that you have only .tar files left, extract each file one by one.

- Each extracted folder will have several firmware components.
- Go to the CSC folder and open the PIT file with Notepad. Below is an example of what PIT looks like from the Samsung Galaxy S23 Ultra.
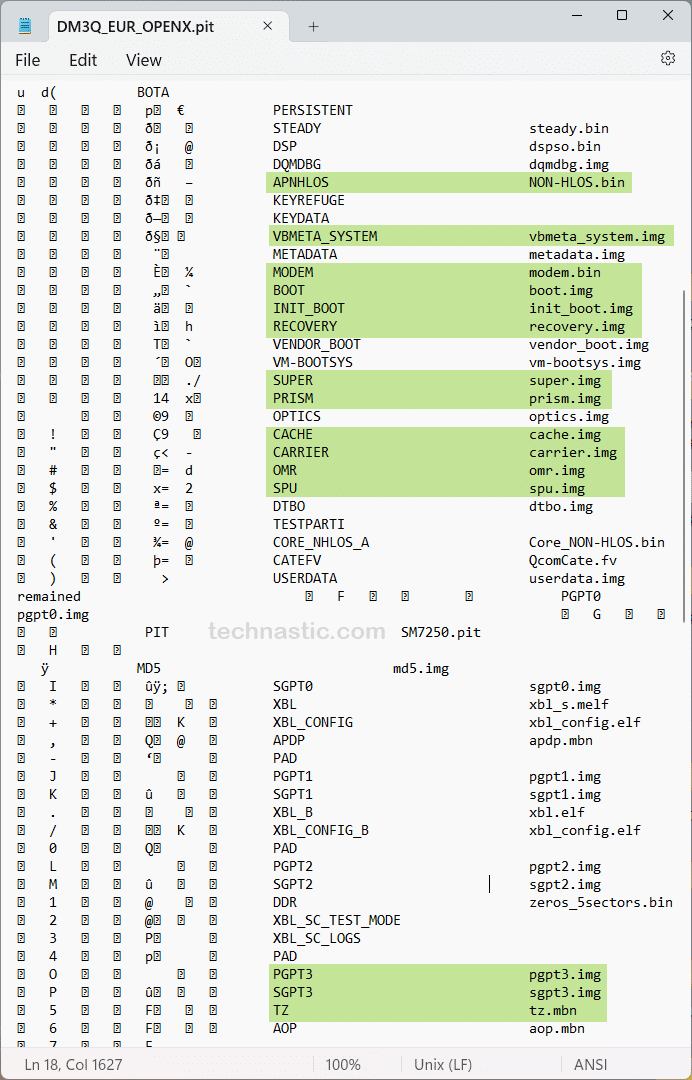
Samsung PIT file analysis - Here, you’ll see the name of all the partitions and firmware components for your Samsung phone. You will find the name of the file for each partition.
- APNHLOS ➡ NON-HLOS.bin
- VBMETA_SYSTEM ➡ vbmeta_system.img
- METADATA ➡ metadata.img
- MODEM ➡ modem.bin
- EFS ➡ efs.img
- BOOT ➡ boot.img
- INIT_BOOT ➡ init_boot.img
- RECOVERY ➡ recovery.img
- VENDOR_BOOT ➡ vendor_boot.img
- VM-BOOTSYS ➡ vm-bootsys.img
- SUPER ➡ super.img
- PRISM ➡ prism.img
- OPTICS ➡ optics.img
- CACHE ➡ cache.img
- CARRIER ➡ carrier.img
- OMR ➡ omr.img
- SPU ➡ spu.img
- DTBO ➡ dtbo.img
- USERDATA ➡ userdata.img
- TZ ➡ tz.mbn
- Create a new folder and move the firmware components you want to flash to it.
- Since we’ll flash these files using a command line, we need to include the name of the partitions with the file name in the command as shown below.
heimdall flash --repartition --resume --pit DM3Q_EUR_OPENX.pit --BOOT boot.img --INIT_BOOT init_boot.img --MODEM modem.bin --APNHLOS NON-HLOS.bin --VBMETA_SYSTEM vbmeta_system.img --METADATA metadata.img --RECOVERY recovery.img --VENDOR_BOOT vendor_boot.img --VM-BOOTSYS vm-bootsys.img --SUPER super.img --PRISM prism.img --OPTICS optics.img --CACHE cache.img --CARRIER carrier.img --OMR omr.img --SPU spu.img --DTBO dtbo.img --TZ tz.mbn --EFS efs.img
- Now, boot your Samsung Galaxy phone into Download Mode.
- Launch the Mac Terminal from the folder where you have all the firmware components.
- Type the following command to list all the functionality Heimdall supports.
heimdall help
- You can execute the following command in the Terminal to know the names of the partitions you
wish to flash.heimdall print-pit --no-reboot
- Since you used
--no-rebootin the above command, you must include--resumeas an argument in the next command to continue. - It’s strongly suggested that you customize the following command according to the partitions mentioned in the PIT file of your Samsung device.
heimdall flash --repartition --resume --pit DM3Q_EUR_OPENX.pit --BOOT boot.img --INIT_BOOT init_boot.img --MODEM modem.bin --APNHLOS NON-HLOS.bin --VBMETA_SYSTEM vbmeta_system.img --METADATA metadata.img --RECOVERY recovery.img --VENDOR_BOOT vendor_boot.img --VM-BOOTSYS vm-bootsys.img --SUPER super.img --PRISM prism.img --OPTICS optics.img --CACHE cache.img --CARRIER carrier.img --OMR omr.img --SPU spu.img --DTBO dtbo.img --TZ tz.mbn --EFS efs.img
- When the above command is executed, the firmware flashing will initiate.
- Wait until the flashing is complete and reboot your phone manually using the power button.
That’s it! You have successfully flashed Samsung firmware with Heimdall on your Mac computer.
Flashing Samsung Firmware with Heimdall
You can also use the Heimdall Frontend on your Mac to install Samsung firmware.

Heimdall cannot flash the Samsung firmware binaries with .tar.md5 extension. You must create a Heimdall firmware package that contains a firmware XML. I have created a sample firmware.xml, which you can edit or customize according to the downloaded firmware.
<?xml version="1.0" encoding="UTF-8"?>
<firmware version="1">
<name>Test Firmware</name>
<version>1.1</version>
<platform>
<name>Android</name>
<version>13</version>
</platform>
<developers>
<name>Benjamin Dobell</name>
</developers>
<devices>
<device>
<manufacturer>Samsung</manufacturer>
<product>SM-S918B</product>
<name>Galaxy S23 Ultra</name>
</device>
<device>
<manufacturer>Samsung</manufacturer>
<product>SM-S918B</product>
<name>Galaxy S23 Ultra</name>
</device>
<device>
<manufacturer>Samsung</manufacturer>
<product>SM-S918B</product>
<name>Ultra</name>
</device>
</devices>
<pit>DM3Q_EUR_OPENX.pit</pit>
<repartition>0</repartition>
<noreboot>0</noreboot>
<files>
<file>
<id>0</id>
<filename>gq3276-boot.img</filename>
</file>
<file>
<id>24</id>
<filename>Uh3276-modem.bin</filename>
</file>
<file>
<id>22</id>
<filename>em3276-super.img</filename>
</file>
<file>
<id>11</id>
<filename>fl3276-prism.img</filename>
</file>
<file>
<id>21</id>
<filename>Xd3276-cache.img</filename>
</file>
<file>
<id>3</id>
<filename>if3276-tz.mbn</filename>
</file>
<file>
<id>6</id>
<filename>cr3276-spu.img</filename>
</file>
</files>
</firmware>
Steps to Create a Heimdall Firmware Package
- Download the appropriate Samsung firmware and extract the downloaded zip.
- Open the extracted folder and remove the .md5 extension from the AP, BL, CP, and CSC binaries one by one.
- Extract the 4 .tar files one by one.
- Create a new folder and rename it to “samsung-firmware“.
- Now, move the firmware components such as modem.bin, cache.img, super.img, prism.img, omr.img, tz.mbn, etc. to the newly created folder.
- Also, copy the ‘firmware.xml’ to the same folder.
- Ensure that you mention all firmware file names in the firmware.xml. You can add as many lines as you wish. The XML will tell Heimdall which files to flash.
- Finally, open the firmware folder, select all files, and compress them as a .tar.gz file.
You’ve created your Heimdall firmware package to flash on your Samsung device.
Flash Samsung Firmware on Mac
- Boot your Samsung device into the Download mode. and connect to your Mac using a USB cable.
- Now, launch Heimdall Frontend, click the Browse button under the Load Packages tab, and add the Heimdall firmware package you created.
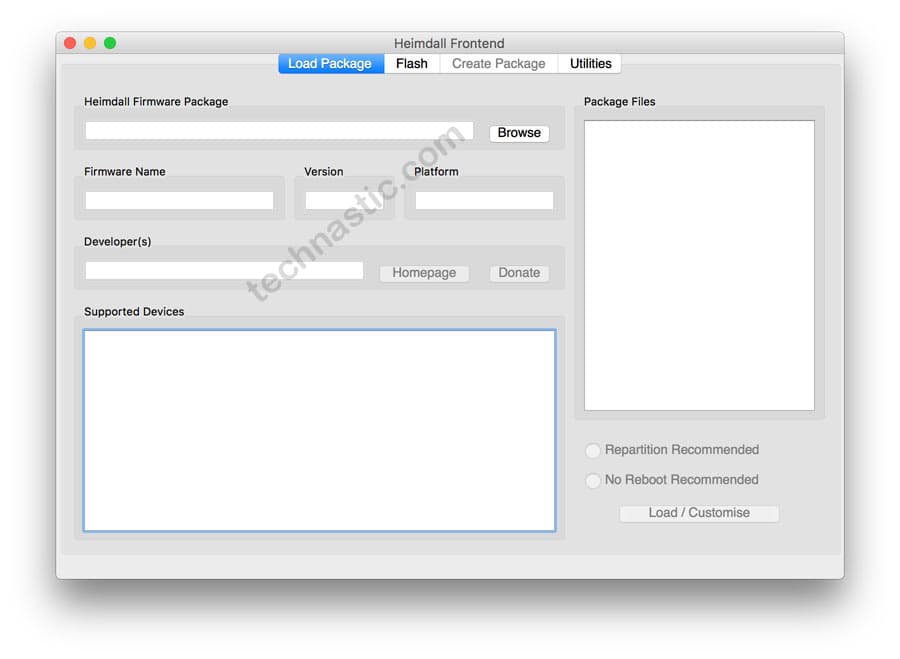
- Heimdall will start decompressing and extracting the firmware package. You’ll see all firmware components listed in the Package Files box.
- Now, click the Flash tab on Heimdall, click the Browse button, and add the PIT file from the CSC folder.
- Finally, click the Start button to flash the firmware on your Samsung Galaxy phone or tablet.
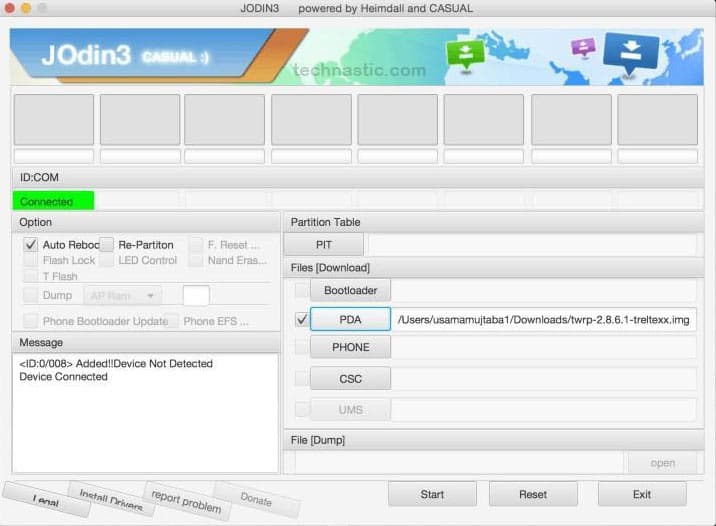
Flash Firmware Using JOdin 3 Casual
JOdin3 was created by Adam Outler back in 2014 to help Mac users flash Samsung firmware. The developer also released JOdin3 Online which worked in a web browser and could be used on any operating system. JOdin3 worked perfectly until Samsung completely changed its firmware structure. Since JOdin3 has not seen an update for years, it may throw errors with new firmware.
If you somehow manage to run JOdin 3 on your Mac, you can try the following steps to flash Samsung firmware.
- Download JOdin3 for Mac: JOdin3CASUAL-0.9.0-osx-incl-JavaFX.zip
- Open JOdin3 and untick the Auto Reboot and Re-partition options.
- Turn off your Samsung phone and boot it into Download mode.
- Connect it to your Mac.
- Click the Bootloader, PDA, Phone, and CSC buttons and add the corresponding firmware binaries as shown below.
BL Bootloader BL_S918BXXU1AWBD_S918BXXU1AWBD_MQB62300606_REV00.tar.md5
AP PDA AP_S918BXXU1AWBD_S918BXXU1AWBD_MQB62300606_REV00.tar.md5
CP PHONE CP_S918BXXU1AWBD_CP23738904_MQB62300606_REV00.tar.md5
CSC CSC CSC_OXM_S918BOXM1AWBD_MQB62300606_REV00.tar.md5
- Once you have added all 4 firmware binaries to JOdin3, click the Start button.