If your internet plan promises 300 Mbps, 500 Mbps, or even 1 Gbps but your Windows laptop consistently delivers much lower Wi-Fi speeds, your broadband connection may not necessarily be the problem. Your laptop’s wireless adapter, battery-saving settings, Wi-Fi band, driver, and wireless configuration can all affect the connection speed you actually get.
This is particularly relevant on laptops because Windows may reduce wireless adapter performance to conserve battery power. Fortunately, several Windows settings can be adjusted to make your laptop prioritize Wi-Fi performance.
Before making any changes, connect your laptop to the same Wi-Fi network and run a few speed tests at your usual working location. Note the download speed, upload speed, and latency. This gives you a baseline against which you can compare the results after applying the tweaks.
1. Turn Off Wi-Fi Adapter Power Management
Windows laptops use power-management features to reduce battery consumption, and one of them can allow Windows to turn off the Wi-Fi adapter when it considers it necessary. While this can help conserve power, disabling the option may improve Wi-Fi consistency on some laptops, particularly when you’re experiencing unexpected speed drops or connection interruptions.
To prevent Windows from powering down your Wi-Fi adapter:
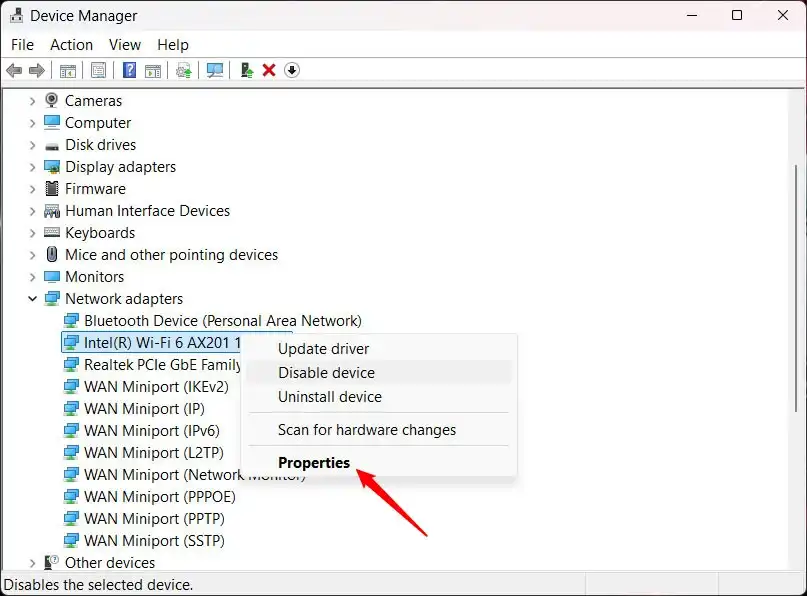
- Press Win + X and select Device Manager.
- Expand Network adapters.
- Find your laptop’s wireless adapter. It may include names such as Intel Wi-Fi, MediaTek Wi-Fi, Qualcomm, or Realtek Wireless.
- Right-click the adapter and select Properties.
- Open the Power Management tab.
- Uncheck Allow the computer to turn off this device to save power.
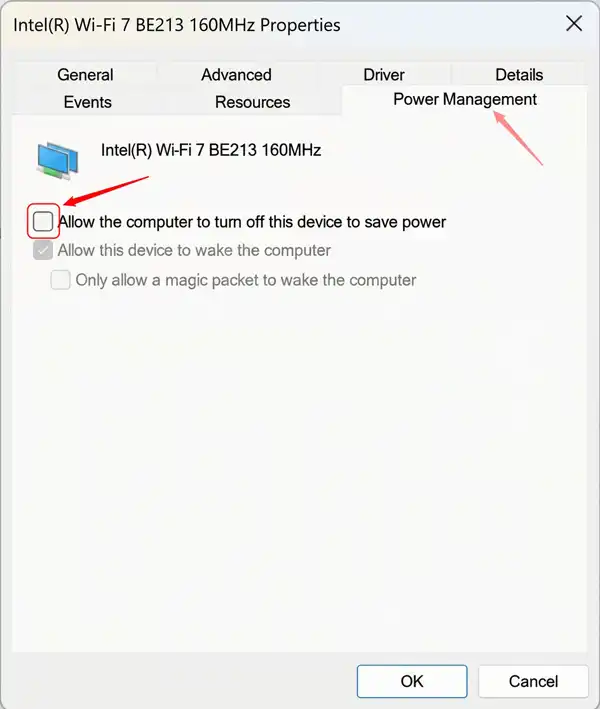
- Click OK to save the change.
You normally don’t need to restart Windows after changing this setting. Reconnect to your Wi-Fi network and run the same speed test you used for your baseline. If your laptop’s Wi-Fi performance or stability improves, keep the setting disabled.
Don’t Miss: How to Share & Connect to Wi-Fi by Scanning QR on Android
2. Make Your Laptop Prefer the Faster Wi-Fi Band
Your laptop may support multiple Wi-Fi bands, including 2.4 GHz, 5 GHz, and, on compatible Wi-Fi 6E or Wi-Fi 7 hardware, 6 GHz. Although 2.4 GHz generally provides better range, the 5 GHz and 6 GHz bands can offer substantially higher speeds when you’re relatively close to the router.
If your laptop frequently connects to the 2.4 GHz band even when you’re near the router, check whether its wireless adapter lets you select a preferred band.
- Right-click the Start button and open Device Manager.
- Expand Network adapters.
- Right-click your laptop’s Wi-Fi adapter and select Properties.
- Open the Advanced tab.
- Look for Preferred Band, Band Preference, or a similarly named option.
- If available, select Prefer 5 GHz.
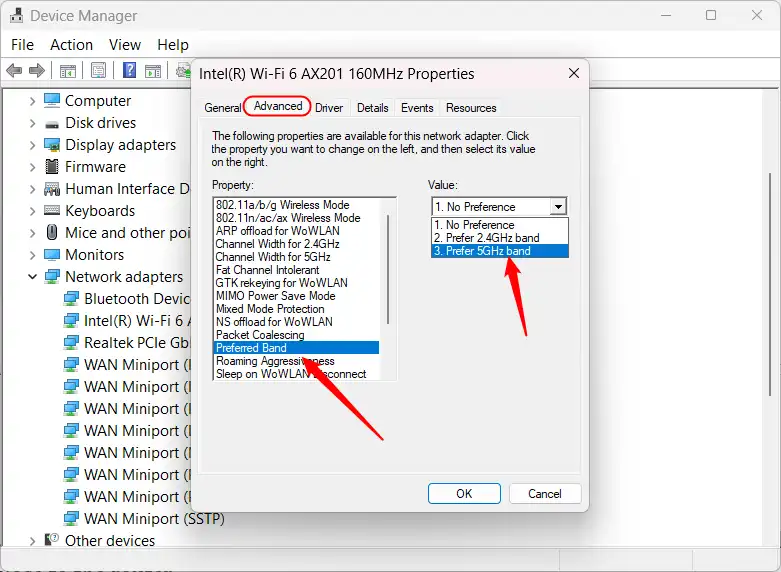
- If your laptop and router support 6 GHz, you may also see an option to prefer 6 GHz.
- Click OK.
The exact setting depends on the Wi-Fi adapter and its driver. Some laptops may not expose this option at all.
3. Increase the Wi-Fi Adapter’s Transmit Power
Some Windows laptops expose a Transmit Power option in the Wi-Fi adapter’s Advanced properties. This controls the radio’s transmission power and can be useful when your laptop struggles to maintain a strong wireless connection.
To check whether your laptop supports it:
- Open Device Manager.
- Expand Network adapters.
- Right-click your Wi-Fi adapter and select Properties.
- Open the Advanced tab.
- Find Transmit Power.
- If available, set it to Highest.
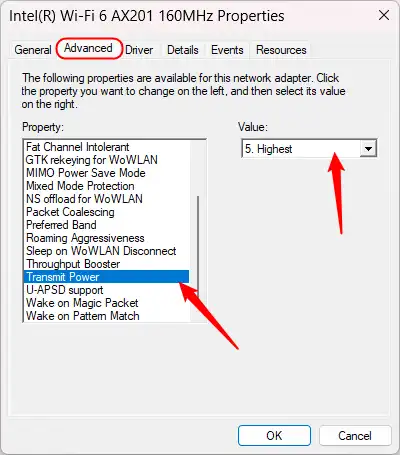
- Click OK and reconnect to your Wi-Fi network.
This option isn’t available on every laptop. If you don’t see it, don’t worry—you haven’t missed anything. The available Advanced settings depend on the wireless chipset, driver, and laptop manufacturer.
Also, increasing transmit power won’t increase the speed of your internet plan by itself. Its potential benefit is maintaining a stronger and more reliable wireless connection when signal strength is a limiting factor.
Test Your Laptop’s Wi-Fi Before and After
After making the changes, reconnect your laptop to Wi-Fi and run several speed tests from the same location where you performed your initial tests. If the speed improves, keep the settings that made a measurable difference. If there is little or no improvement, revert unnecessary changes and investigate other factors such as router placement, Wi-Fi congestion, signal strength, or your internet connection.
Read Next: How to View Saved Wi-Fi Passwords from CMD