Getting an internet speed monitor on Android devices is very easy. However, if you want to display an internet speed meter on the taskbar of your Windows 10 desktop or laptop, there’s a way to do that. An app called Net Speed Monitor can help you place a network speed meter. The app is available for Windows 64-bit version and it is not directly compatible with Windows 10.
Most people only install network tools to monitor the amount of data they use. Those with an unlimited data plan most probably don’t bother with that. With an app called Net Speed Monitor (64-bit), you can enjoy an internet speed meter on your Windows 10 PC.
Bandwidth monitoring is something that Windows 10 has built-in but Net Speed Monitor displays your network speed on the Windows Taskbar. The bandwidth monitoring could be a bonus, in case you’d like to match the numbers calculated by Windows 10 against something. Net Speed Monitor doesn’t work out right on Windows 10 though.
Download Net Speed Monitor 2.5.4
Net Speed Monitor is compatible with the 32-bit and 64-bit versions of Windows XP/Vista/7/8/10. Download it from below, and set it up as described.
If you want to boost network speed in Google Chrome, read the tutorial I shared recently.
Install Net Speed Monitor
- Once you download Net Speed Monitor from the link above you will have a .msi file.
- On later versions of Windows, including any version of Windows 10, right-click the .msi file and select Properties.
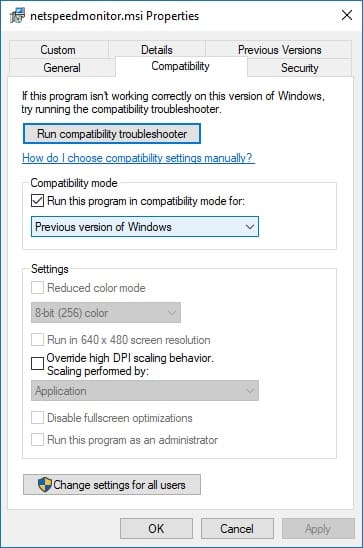
- Under the Compatibility tab, you’ll find a section labeled Compatibility mode. Check the box next to Run this program in compatibility mode for: and from the drop-down menu select the Previous version of Windows.
- Click OK and double-click the .msi file to launch the installer.
- Follow the installation wizard and install the application.
- Once installed, you will be asked to select your Network Interface from a drop-down menu. This is usually the option with the name of your PC’s WiFi chip manufacturer. If you are not sure about this, take your best guess. You can change this later.
Steps to get Internet Speed Meter on Windows 10
- Even though you just installed it, you won’t see any network speed on your taskbar yet. Right-click on an empty area on your taskbar and select Toolbars > NetSpeedMonitor.
- Now you’ll see two rows of zeros that signify your network speed.
- Test if Net Speed Monitor responds to data usage by launching a website like Technastic. If the numbers are zero you may have chosen the wrong network interface.
- To change the network interface, right-click Net Speed Monitor in your taskbar and select Configuration.

- Here, you can select another network interface. Click OK and then try again.
- Once that’s taken care of, you may soon notice that the speed displayed is exaggerated. That’s because by default, the speed is displayed in kilobits/second but you are probably more comfortable with kilobytes/second.
- To change this, launch the Configuration window, and right under the network interface drop-down menu, you’ll find another drop-down menu labeled Bitrate.
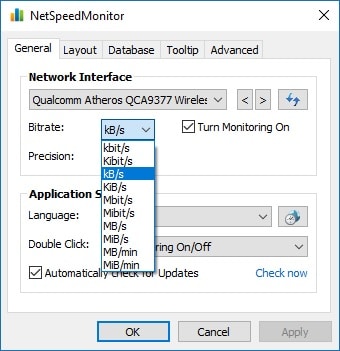
- Select kB/s from the drop-down menu and click OK.
- In case the text isn’t clear, too small, or too big or you wish to change it for any other reason you can do so under the Layout tab in Configuration.
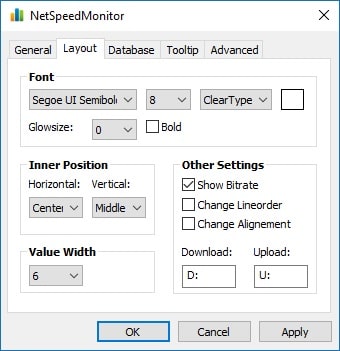
- You can select any of your installed fonts, the size of your choice, and even how the font is rendered. In my experience though, ClearType rendering gives the best results. There are all sorts of other settings here that you can play with if you want.
That’s it! You can now see a live network or internet speed meter on the taskbar of your Windows 10 PC.
Read Next: How to Enable and Use Windows Sandbox in Windows 10