Sometimes, it just seems too good to be true while other times you suspect something might go wrong if you double-clicked on that suspicious exe file. Power users often set up a virtual machine to test such files. Microsoft has brought this functionality to Windows 10 for businesses and power users. It’s called Windows Sandbox and it’s simpler than setting up and running a virtual machine. Although, it is essentially just that, albeit lightweight and temporary. If you’re running Windows 10 Pro or Enterprise build 18305 or later, you can enable and use Windows Sandbox.
Windows Sandbox
Windows Sandbox is a temporary desktop environment with default Windows settings and a brand-new desktop every time you open it. This isolated environment is perfect for testing new apps. You can be sure any problems being caused are due to the program you installed since there are no other third-party apps installed on the system. Once you’re done running the app and close the Sandbox, all data is deleted. This includes any programs you may have installed, their data, any downloaded files, etc.
So each time you run Sandbox, it creates a lightweight 100MB Windows installation to allow you to run your apps in isolation. While your Internet works fine in this environment, you won’t be able to make any changes to the host PC from within the Sandbox. This means you can’t change network properties. Most PCs running Windows 10 Pro or Enterprise will support the Sandbox feature. However, it’s best to make sure they’re also capable.
Minimum system requirements
- Windows 10 Pro or Enterprise build 18305 or later
- 64-bit architecture
- 4 GB of RAM
- 1 GB of free disk space
- 2 CPU cores
- Virtualization enabled in BIOS
Enable Windows Sandbox in Windows 10
Although available to Pro and Enterprise users, Windows Sandbox is not enabled by default. To enable it, follow the steps below.
- Hit the Windows key, type Turn Windows features on or off, and then click on the first search result. You can also search for Appwiz.cpl instead and open it to access the Control Panel. Here, you can click the link on the right that says to launch the same Window.
- In the window, scroll down until you find Sandbox and check the box next to it to enable it.
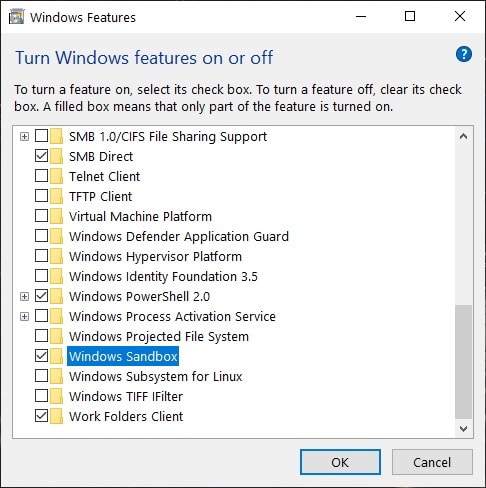
- Click OK and Windows will search for the necessary files and then install the feature. You will then be asked to reboot your computer, so do that.
When your PC boots up, the Windows Sandbox feature will be enabled and ready for use.
How to Use Sandbox
Now that it is installed and ready, you can launch Sandbox from your app list.
- Press the Windows key and type sandbox. Click Windows Sandbox and it will open up. Opening up can take some time depending on your system hardware and the currently open apps. Video editing or copying large files while launching Sandbox can further delay it.

- Once it is launched, you can do anything you want. The transition of the mouse and keyboard controls from the Windows Sandbox to the host system is pretty seamless. The keyboard works for the Sandbox window as long as it is the active Window. Once you click outside of it, the keyboard acts upon the host system.

- When you’re done with Sandbox, click the close button like you would close any regular app.
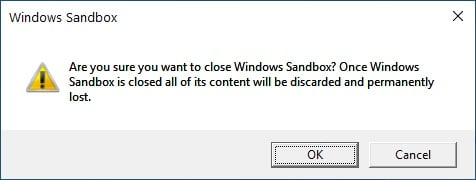
- You will be warned that all the data will be deleted as we’ve already mentioned that it will be. Click OK to proceed.
Read Also: How to Roll Back a Driver to Previous Version in Windows