Is social media taking a toll on your well-being, or are you concerned about your privacy? Well, then it’s the right time to act. You could either take a short break or bid farewell to your Facebook account for good. Likewise, there are two ways of dealing with it. You could either deactivate your Facebook or Instagram account for a temporary solution or delete it forever. In this guide, we will be listing the instructions for both. But before that, let’s first understand the difference between them.
Delete vs Deactivate: Differences Explained
Deactivation puts a temporary pause on your account. If at any point in time, you change your mind and wish to get back to the social media platform, you could easily activate it and start from where you left off. You don’t have to set up your account from scratch again. When your account remains deactivated, your profile won’t be visible to anyone, although your name might pop up in the search bar. Moreover, this deactivation does not affect your Messenger account whatsoever. You could continue to have conversations with your friends as before.
However, with Delete, things are entirely different. As evident from its name, deleting is permanent, i.e., your account will no longer be available on Facebook. Apart from that, all the associated posts, images, videos, and every bit of information associated with that account will be gone. And contrary to deactivation, deleting your Facebook account will delete your Messenger account. Furthermore, you will be signed out of all the websites on which you have used that account’s credentials to log in.
Now that the differences between deactivating and deleting your Facebook account are clear, let’s proceed with the instructions.
How to Deactivate Your Facebook Account
- Head over to the Facebook website and log in to your account.
- Click on the downward arrow situated at the top right and select Settings.
- From the left menu bar, click on Your Facebook Information and then select the Deactivation and Deletion option.

- Select Account Deactivation and click on Continue to Account Deactivation.

- You’ll now have to select the reason for leaving. Apart from that, you could also choose whether you want to keep your Messenger account or deactivate it.
- Now click on Deactivate and then on Deactivate now in the confirmation dialog.


That’s it. Your Facebook account will now be deactivated. To re-enable it, all you have to do is log in to your account. That’s way too easy to get your account back. Let’s now check out the steps to delete your Facebook account.
Don’t Miss: 3 Easy Ways to Beat Your Facebook Addiction
Deleting your Facebook Account
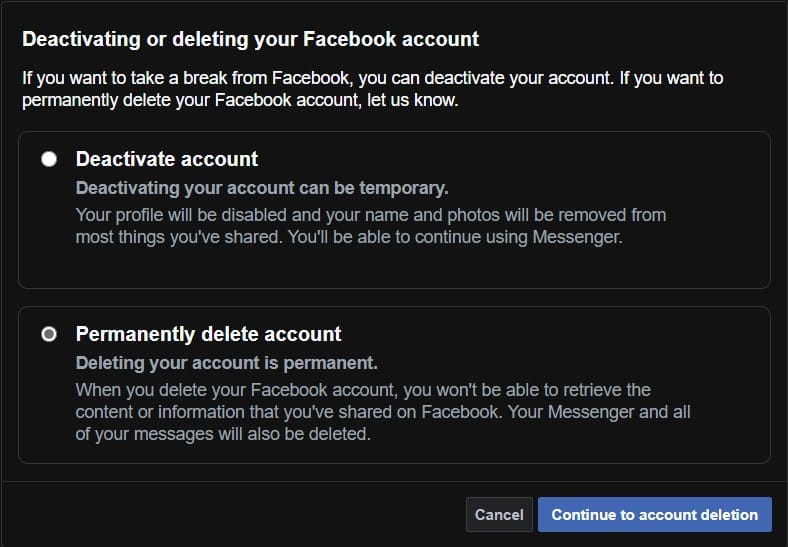
- Again, head to the Deactivation and Deletion option. This time, select Permanently Delete Account and click Continue to Account deletion.
- Before going ahead, you could also download all the Facebook account data. Click on the Download Info option in the pop-up that appears.
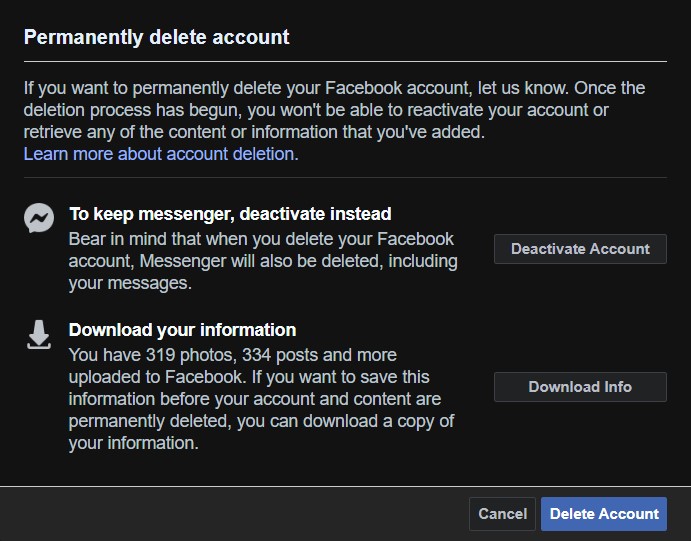
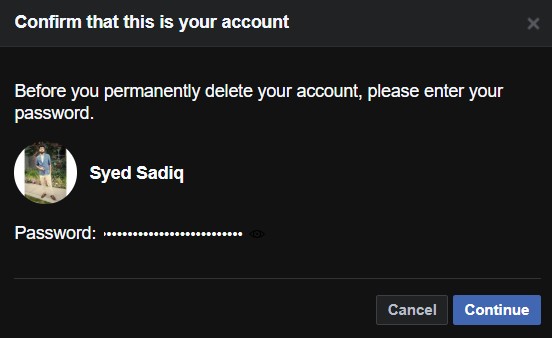
- Once done, proceed with account deletion by clicking on Delete Account. As a last security measure, you will have to re-enter your password. Click Continue after that.
- A final pop-up will now appear asking whether you want to proceed with the deletion of your Facebook account. Click Delete Account, and your account will be gone.
- However, you still have a 30-day window during which you could retract this deletion and get back your account and all its associated data. For that, you will have to log in to your account and select the reinstate option.
Do let us know if you face any issues while executing the above steps.
Read next: How to disable in-app browsers for social media apps