- Clear app cache from device settings: Navigate to Settings > Apps, select the app, tap Storage, and tap the Clear Cache option.
- ADB command to clear cache for all apps:
adb shell pm trim-caches 128G - Clear system cache: Boot into the Recovery Mode on your device and use the Wipe cache partition option.
Cache helps Android retrieve app data faster to improve performance and reduce loading times for frequently used apps. However, accumulated or corrupted cache data can slow down an app and your Android phone. This tutorial will explore the various methods to clear the app and system cache on Android devices via ADB, Fastboot, stock and TWRP recovery, device settings, and third-party apps.
How often should you clear your device’s cache? The frequency of clearing the cache can vary depending on your usage patterns. If your device is slowing down or running out of storage space, it may be a good time to do so. Moreover, clearing the cache can fix freezing or crashing apps on Android.
1. Clear App Cache from Android Settings
Clearing the cache from the app manager on Android is the most straightforward way to get the job done. You might already be familiar with the steps unless you are new to Android.
- Open the Settings on your Android phone. You can also access the settings from the Quick Settings panel or the app drawer.

- Look for Apps or Applications in the Settings menu and tap on it.

- On the Apps list screen navigate to the app you want to clear the cache of and tap it. You’ll be taken to the App info page for the specific app. Alternatively, you can hold the target app icon and tap the Info icon (ℹ).

- Now tap Storage > Clear cache.
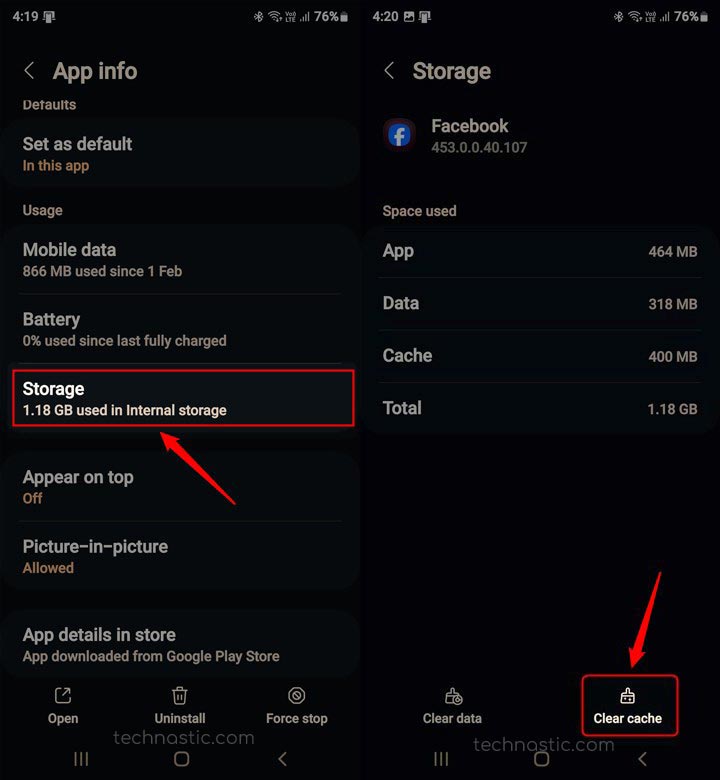
That’s it. The cache for the app will be cleared.
2. Clear Cache on Android via ADB
If you’re comfortable with command-line interfaces and looking for a more advanced approach, you can opt for the ADB method to fine-tune the cache-clearing process. Let’s get started.
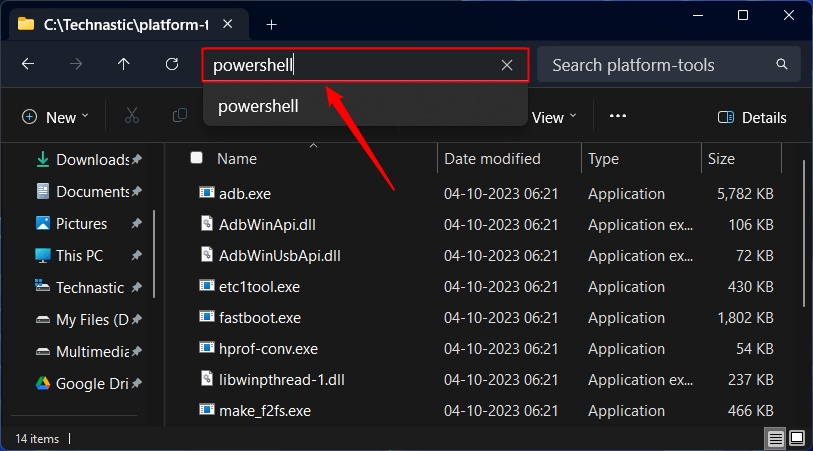
- Download and set up the latest ADB and Fastboot drivers on your Windows, Linux, or macOS computer.
- Ensure that USB debugging is turned on on your Android device and connect it to your computer via USB. Also, go to Settings > Display > Screen timeout and extend it to 5-10 minutes.
- Launch a PowerShell window with the path of the ‘platform-tools’ folder. To do so, right-click inside the folder window and select the Open in Terminal option from the context menu. Alternatively, you can type ‘cmd‘ or ‘powershell‘ in the folder address bar and hit Enter.
- To verify that ADB has detected your connected Android phone or tablet, execute the
adb devicesand authorize ADB on your phone when prompted. ADB will return your device ID as shown below.
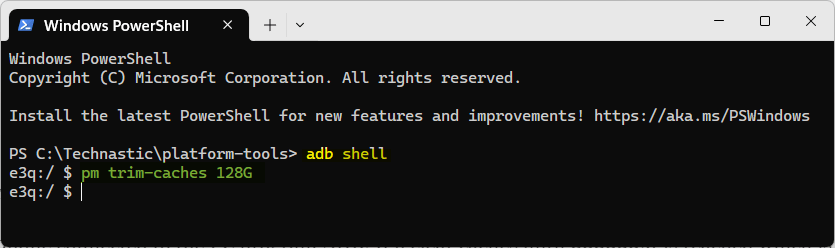
- Finally, type the following command to activate Shell mode.

- The command window will show the connected Android device codename followed by a ‘$‘ sign.
Please remember to omit the ‘adb shell‘ portion while typing the commands after the ‘$‘ sign’. Now, let’s check out the commands. To clear the data and cache of an app, you must mention its package name in your commands. We have a detailed article describing 4 methods to find the app package names of Android apps.
ADB Command to Clear App Data and Cache
Command: adb shell pm clear <package-name>
This command will delete all user data and cache of an Android app. You can use it to reset an app on your device.

Delete the Cache for a Specific App
Command: pm clear --cache-only <package-name>
Normally, the pm clear command resets the app data and caches both. However, by adding a condition to it, you should be able to clear the cache of a specific app package. This method works on Android 13 and older devices.
If you have a rooted Android phone, you can use the following ADB command to clear the cache for an Android app.
adb shell
su -c "rm -rf /data/data/<package-name>/cache/*"
If the above command doesn’t work, try the following:
adb shell
run-as <package-name> sh -c "rm -rf cache/*"
However, if the app you want to clear the cache of is debuggable, you can use the following command which does the job without granting root access to ADB.
adb shell
run-as <package-name> rm -rf /data/data/<package-name>/cache/*
Clearing the Caches for All Apps
I use the shell pm trim-caches command to clear the cache of all apps installed on my phone. The command takes the desired free space parameter in K/M/G (kilo/mega/gigabytes) and trims caches according to the defined space. So, if you add an insane size in MB or GB, ADB will clear caches until that size is reached. Since the size is never reached, all caches are cleared.
adb shell pm trim-caches 128G
Clearing All App Data and Caches
Clearing the app cache and data manually could take a lot of time and effort if you do that for all apps installed on your Android device individually. We have an ADB command that clears all data along with the cache.
adb shell cmd package list packages|cut -d":" -f2|while read package ;do pm clear $package;done

Clearing Dalvik Cache on Rooted Devices
To wipe the Dalvik cache and data, you must have a rooted Android device. Here are the steps to clear the Dalvik cache on Android.
- Launch a PowerShell or terminal window with the path of the folder that contains the ADB and Fastboot files.
- Extend the screen timeout of your device and connect it to your computer via a USB cable.
- Execute the following command.
adb shell
- When you enter the Shell interface, type the following command to invoke the Superuser.
su
- Superuser will prompt you to grant root access to ADB Shell.
- Now use the following commands to clear the Dalvik cache.
rm /data/dalvik-cache/*
- Finally, reboot your device manually or by executing the following command in the command window.
adb reboot
3. Clear System Cache via Recovery
If deleting the app cache doesn’t serve your purpose, you can wipe the system cache on your Android device via the stock recovery or TWRP.
Wiping Cache Partition via Android Recovery
Follow the steps below to clean the dumped cache files on your phone or tablet.
- Boot your Android device into Recovery Mode using hardware keys, ADB commands, or tools like ADB AppControl and WebADB.
- Connect your device to your computer and type the following command in the command window to enter Android Recovery or TWRP.
adb reboot recovery

- Wait until your device reboots into Recovery Mode.
- You can navigate the options using the Volume keys and select them by pressing the Power button.
- Highlight the Wipe cache partition option and press the Power key.
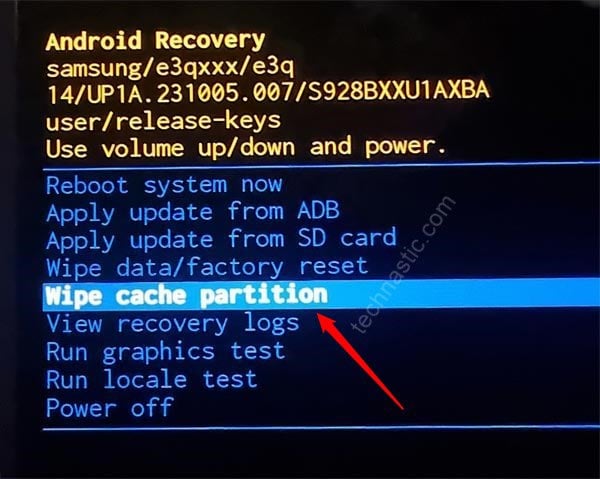
- Select Yes to confirm system cache deletion.
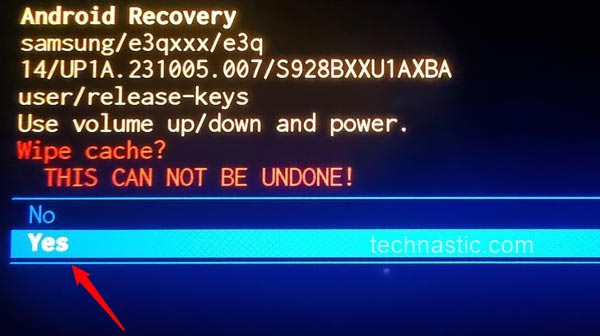
- When the cache partition is wiped, return to the home screen in recovery and select Reboot system now.
Wiping Dalvik / ART Cache via TWRP
Dalvik is a virtual machine used by Android. When an app is installed on an Android device, it modifies the Dex bytecode files and optimizes them for smoother performance. These optimizations are cached in a ‘.odex’ (optimized dex) file. As for the ART (Android runtime), it’s a successor of the Dalvik cache. Dalvik and ART are different from the app cache created by an app to store temporary files.
If you use TWRP recovery, select Wipe > Advanced App > Dalvik / ART Cache and Swipe to wipe to delete the system cache on your Android device.

4. Using Fastboot Erase Cache Command
While you can use ADB commands while your device is booted into OS, Fastboot commands work only in Bootloader or Fastboot mode. Unlike ADB, Fastboot supports limited things like flashing firmware images, wiping partitions, locking and unlocking the bootloader, etc. Using Fastboot commands, you can erase partitions like cache and user data on your Android device.
- Connect your device to a computer and launch a command window.
- Execute the following command to reboot into Fastboot Mode.
adb reboot bootloader
- Wait until your Android device enters Fastboot Mode.

- Type the following command in the PowerShell or Terminal window and hit Enter.
fastboot erase cache
- When the cache partition is wiped, execute the following command.
fastboot reboot
5. Using a Cache Cleaner App
If you find the ADB and Fastboot methods too complicated, you can use cache cleaner apps to delete the cache for Android apps. Whether or not you should use apps to clear the cache depends on individual preferences and requirements. While these apps offer convenience by automating the cache-clearing process, they may also use excessive resources and pose privacy concerns.
Below are some of the best and most popular apps for cleaning and managing apps and data on Android devices.
By clearing accumulated cache data regularly, you can optimize your Android device’s performance, free up memory, and ensure that apps run smoothly without lag or crashes. This simple maintenance task can help improve the overall functionality of your device and enhance user experience.