Windows may be the most popular desktop OS in the world but not the most advanced. Three years after Windows 10 was launched, the OS is still trying to catch up in several areas. Microsoft recently released the April update to Windows 10 with a host of new features. Now with the next Windows update, Redmond is finally bringing an official way to access the Windows 10 clipboard history.
The clipboard on Windows has always been a non-visible feature. You knew what you copied went to a clipboard, but there was no way to access that clipboard. Users had to rely on third-party apps for that. Moreover, the clipboard only kept your most recently copied text or item, instead of multiple instances of copy operations. Features like this have been present on other desktop operating systems for years. The said feature is also currently available to Windows 10 insiders on the fast ring running Windows 10 Redstone 5 build (build 17666).
As of now, the clipboard only stores plain text, HTML, and images less than 1 MB. This might change in the future or by the time the next Windows update rolls out towards the end of the year.
How to enable clipboard on Windows 10
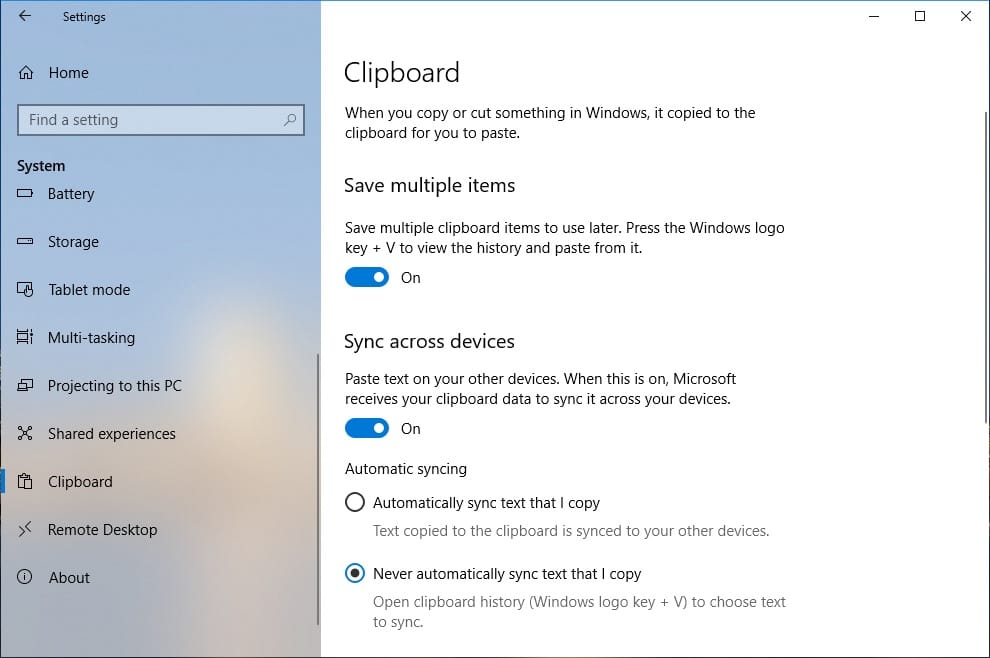
To enable the new clipboard features, head over to Settings>System, scroll down, and click on Clipboard on the left column. If you don’t see Clipboard on the left column, you’re not using the Redstone 5 (build 17666). The clipboard feature is turned off by default. Turn on the toggle under Save Multiple Items to turn it on. Below that, you can also turn on Sync Across Devices to let your clipboard history sync between your Windows devices running the supported Windows 10 builds. People concerned about privacy might not want to turn it on. Syncing involves uploading your clipboard history to Microsoft’s servers. Your other Windows devices will need to be logged in using the same Microsoft account.
If you’re concerned about your privacy though, Windows 10 does let you choose which clipboard items synced. Automatically sync text that I copy. is the default syncing preference. However, there is another option that you can select which is Never automatically sync text that I copy. If you select this option, Windows will let you choose the clipboard items you want to sync.
Must read: How to Shutdown Windows 10 without Installing Updates
How to use Windows 10 Clipboard history
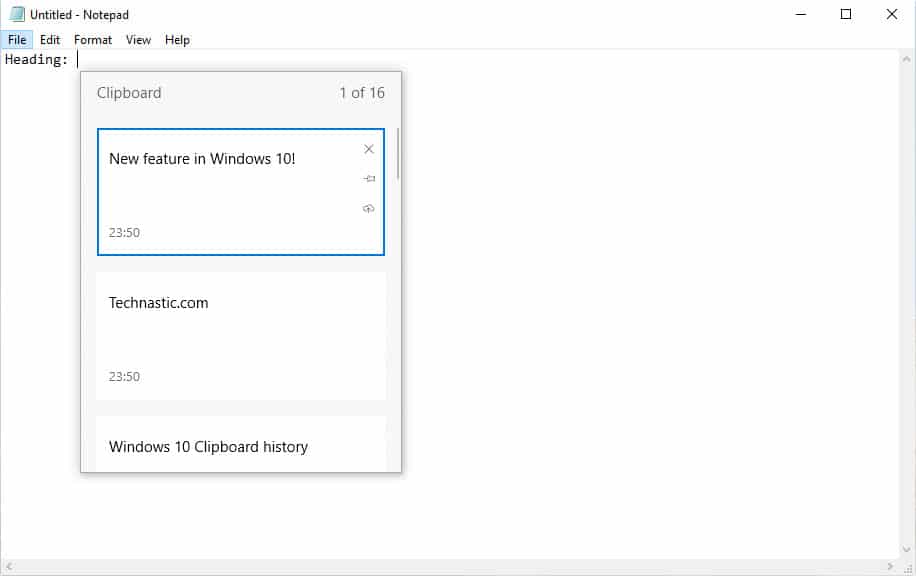
Unlike the Windows Ink feature, the clipboard doesn’t get its dedicated button or icon on the taskbar. To access it you’ll have to rely on the keyboard shortcut. Pressing Windows+V on your keyboard will bring up the clipboard in any application. It opens right where your cursor is at that moment, or in the bottom right corner if you’re on the desktop. The clipboard panel shows a history of items you’ve copied to your clipboard, with the most recent item at the top. Select something on your clipboard by clicking it to paste it into the current application.
You can pin items by clicking on the pin icon appearing when you hover over a clipboard item. Windows will then keep the item instead of discarding it to make room for a new item. This is ideal for items you frequently need to paste. Clicking the X button will remove the item from the clipboard. If you’ve enabled syncing, and selected the Never automatically sync text that I copy option, you’ll also see a cloud icon when you hover over clipboard icons. Clicking on it will sync that item across your Windows 10 devices. If you’ve not selected the Never automatically sync text that I copy option but sync is on, all items will be synced automatically and you won’t see a sync icon.
For now, only clipboard items with a size of less than 100KB are synced across devices. The size may increase in the future, but until then you’ll be unable to copy a large image on one device and paste it on another.