Are you an avid laptop or desktop user? Are you the one who stores personal data or office data on your PC? If you are searching for a solution to protect your data from unauthorized access you can easily disable or block the USB ports in Windows 10 through registry. Later, you can enable the USB ports whenever you want to using enableusb.reg. Below, I’ll be describing the best solutions to help you to stop others from accessing your data through USB ports on your Windows PC.
Steps to Block USB Ports in Windows 10
Well, there are many 3rd-party software available in the ocean of the internet with which we can enable or disable the USB ports with a password. But why go for such third party software? when you have an existing one. Yes, you are right. We have an inbuilt program in Windows OS. Its called Microsoft Windows. You can enable and disable USB ports using a simple registry tweak. Since you are the one with who has administrative access, so only you can change these registry settings. Other account users cannot change these registry values. So no worries at all.
Without much delay, let’s see how we can block the USB ports in Windows 10. Before starting, make sure you are in an admin account and have administrative access.
Method 1: Using Registry Editor
- Open Run window in your PC by pressing the short cut key ‘Windows+R‘.
- Type ‘regedit‘ in the text box and click on the OK button. A notification window will appear on the screen requesting for access to the registry. Click on the Yes button to grant permission.

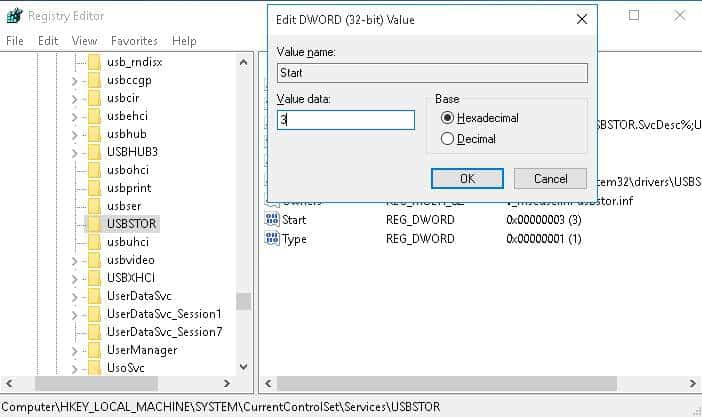
- If you are comfortable working in Registry Editor window, then go to HKEY_LOCAL_MACHINE\SYSTEM\CurrentContro>Set\Services\USBSTOR
- Then double click on the Start registry and then a small window will open on the screen. You can now change the Value data to 4 to disable the USB ports and change the value to 3 to enable the USB ports.
- Then click on OK button to finish the implementation.
Method 2: Block USB Ports using NotePad
If you are not comfortable working in Registry Editor, then here is another method to help you tweak the USB registry.
- Open notepad in your PC and copy-paste the below code in it.
Windows Registry Editor Version 5.00
[HKEY_LOCAL_MACHINE\SYSTEM\CurrentControlSet\Services\USBSTOR]
”Start”=dword:00000004
[HKEY_LOCAL_MACHINE\SYSTEM\CurrentControlSet\Services\USBSTOR\Enum]
”Count”=dword:00000000
”NextInstance”=dword:00000000
- Once you paste the above code in the notepad, save it as disableusb.reg. Make sure that the text file is saved with .reg extension. Now double click on this disableusb.reg file to disable your USB ports.
- If you want to enable the USB ports, then copy-paste the below code and save the file as enableusb.reg.
Windows Registry Editor Version 5.00
[HKEY_LOCAL_MACHINE\SYSTEM\CurrentControlSet\Services\USBSTOR]
”Start”=dword:00000003
[HKEY_LOCAL_MACHINE\SYSTEM\CurrentControlSet\Services\USBSTOR\Enum]
”Count”=dword:00000000
”NextInstance”=dword:00000000
- Run this enableusb.reg file to enable your USB ports.
That’s it! You can also format a USB drive using command prompt on Windows.
Method 3: Using Enableusb.reg and Disableusb.reg Files
If you find the command prompt method to block the USB ports, you can simply download the zip file attached below. The zip file contains enableusb.reg and disableusb.reg files. Run the respective files to enable and disable the USB ports on your Windows PC.
Downloads
That’s it. So if you find this post useful, then share it with your peers and let them protect their data.
Read Next: How to Delete Junk Files in Windows 10 Automatically