An IP address is a series of numbers or letters, in the case of IPv6, that is assigned to each device connected to a network using the Internet Protocol or IP. This is how devices on a network know that another device exists, and then they can communicate. A DHCP (Dynamic Host Configuration Protocol) server, usually your router, assigns a dynamic IP address to any device connected to the network. Other examples of a DHCP server include a Linux machine and a Windows server. Automatic assigning of IP addresses saves you the trouble of assigning them manually. The automatically assigned IP address changes often, hence the name dynamic IP address. Sometimes, you may want to set a fixed or static IP address.
For most people, a dynamic IP address works fine because they have no idea about the complexity that goes behind updating their Facebook status. Their expertise may be in other fields. Some people will find the need to set a static IP address, for instance, when using their PC as a home media server. Certain apps can only connect to a device using its IP address. You wouldn’t want to keep entering a different IP address each time the device reboots. Many other similar cases favor setting up a static IP address. Whatever your reason, switching to a fixed or static IP address isn’t all that difficult.
There are a couple of ways to do this. You can assign a static IP address to your Windows PC via your router or directly from your PC. It is better to let your router assign a dynamic IP address. Yet, if you want to set a static IP address, we’d recommend doing it via your router settings.
Don’t miss: Change Taskbar Transparency on Windows 10
Set Static IP Address on Windows
- Press Windows+R on your keyboard to launch the Run dialogue box. You can also hit the Windows key and type run to search for it.
- In the Run dialogue, type ncpa.cpl and hit Enter.

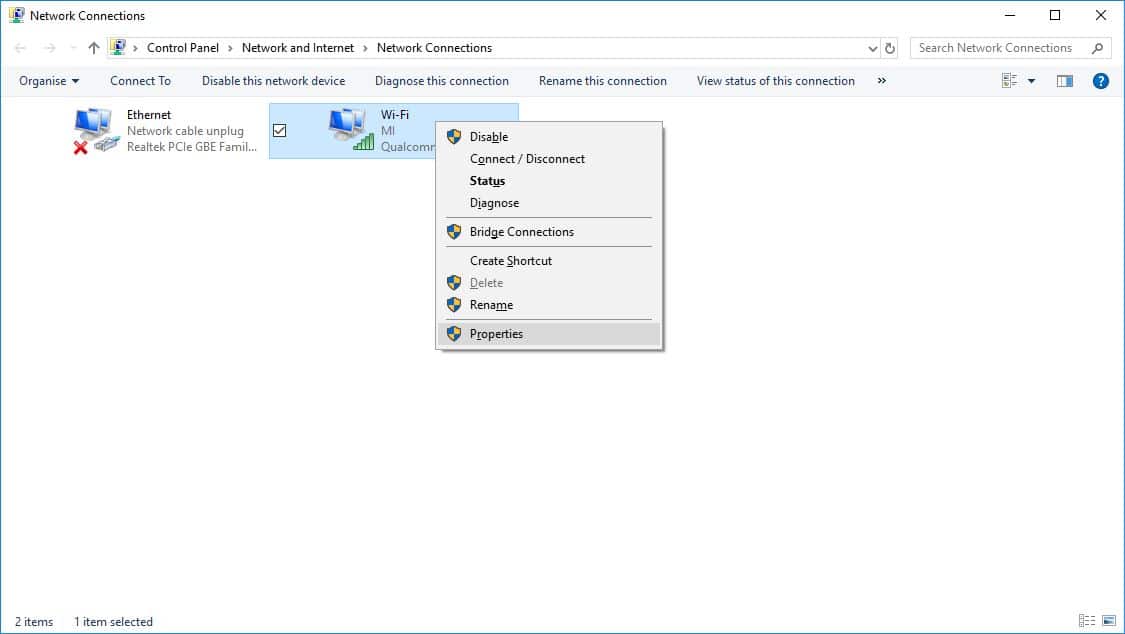
- This will open the Network Connections window. Right-click on your connected network adapter or the network adapter to which you want to assign the IP address.

- From the context menu, select Properties.

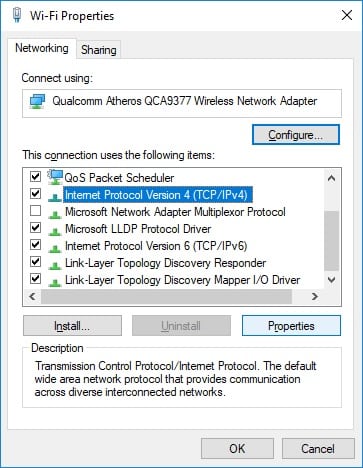
- In the Properties window that opens up, scroll down, select Internet Protocol Version 4 (TCP/IPv4), and click on the Properties button.
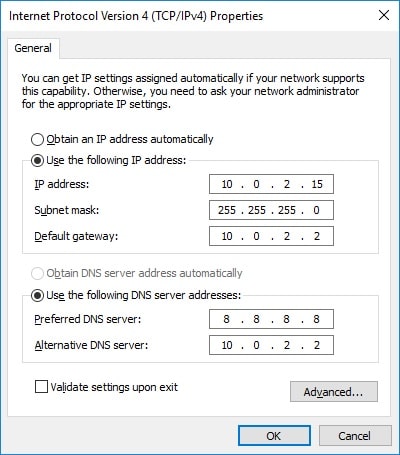
- Select Use the following IP address, and then type in the IP address, Subnet mask, and Default gateway corresponding to your network setup.

- Next, type in your Preferred DNS server and Alternate DNS server.
- Check the box next to Validate settings upon exit and click OK when done.
- Close all the open windows.
Windows will now automatically run the diagnostics to check whether the connection is good. If there are problems, it will ask you to run the network troubleshooting wizard. If you’ve been using Windows for a while, you know the troubleshooting wizards never really help. So if you run into trouble, it’s better to check that your configured settings are valid.
Set a static IP address using the Command Prompt
- Hit the Windows key, search for cmd, and launch the command prompt. Alternatively, press the Windows+R keys on your keyboard, type cmd in the Run dialogue, and hit Enter.
- Type the following command and hit Enter.
ipconfig /all
- Now, to set a new IP address, run the following command.
netsh interface ip set address name="connection name" static your_ip_address subnet_mask default_gateway
Here, replace the connection name with your connection name. Similarly, replace your_ip_address, subnet_mask, and default_gateway with the appropriate IP address, subnet mask, and default gateway values. For instance,
netsh interface ip set address name="Wi-Fi" static 10.0.2.15 255.255.255.0 10.0.2.2
- Set the DNS server using this command.
netsh interface ip set dns name="connection name" static dns_server_ip_address
Substitute the appropriate values as before.

