1. Don’t Install RAM Booster and Phone Cleaner Apps
This is one of the most common Android misconceptions. Apps that promise to “free RAM” by constantly killing background apps can actually create more work. When you open those apps again, Android has to reload them.
The same applies to many so-called battery optimizer apps. Installing another app that permanently runs in the background to optimize your phone can defeat the purpose.
Android already manages memory and background processes.
Instead of installing a cleaner:
- Remove apps you don’t use.
- Check which apps consume the most battery.
- Clear the cache of a problematic app when appropriate.
- Keep adequate free storage.
- Restart the phone if it has been behaving unusually.
- Use Android’s built-in Battery Saver when you actually need it.
If an app claims it can dramatically increase RAM or battery life with one tap, be skeptical.
2. Don’t Keep Unused Apps Installed
An app you haven’t opened in six months still takes up storage. Some apps run in the background, receive notifications, keep cached data, or periodically access network resources.
Start with Settings → Apps and look for applications you haven’t used recently. On some phones, you can sort apps by size or usage.
Remove:
- Games you no longer play
- Shopping apps you rarely use
- Duplicate utilities
- Old photo/video editors
- Apps installed for a one-time task
- Abandoned customization tools
If you might need an app again later, archive it instead of keeping the full application installed. Android’s app archiving feature is covered separately below.
3. Don’t Leave High Refresh Rate Enabled for Everything
A 120Hz or 144Hz display makes scrolling and animations look noticeably smoother. But maintaining a high refresh rate can consume more power than a lower refresh rate. Many modern phones can automatically switch between lower and higher refresh rates depending on what you’re doing.
Navigate to Settings → Display → Refresh rate / Motion smoothness / Screen refresh rate. Choose the adaptive option if you want a balance between smoothness and battery life.
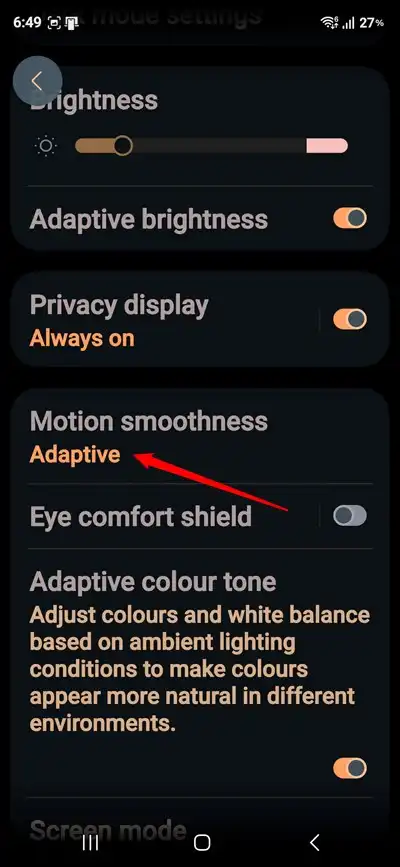
If you’re travelling and battery life is more important than animation smoothness, temporarily switching to a lower refresh rate can be worthwhile.
4. Never Ignore Android’s Built-in Theft Protection
Modern Android phones have considerably better theft protection than many people realize.
On supported devices, Android can automatically lock the phone when it detects a theft attempt, lock it after it goes offline, lock it after repeated failed authentication attempts, and allow you to remotely lock it. Some devices also offer Identity Check, which requires biometric authentication for sensitive actions outside trusted locations.
You can enable the feature via Settings → Google → All services → Theft protection
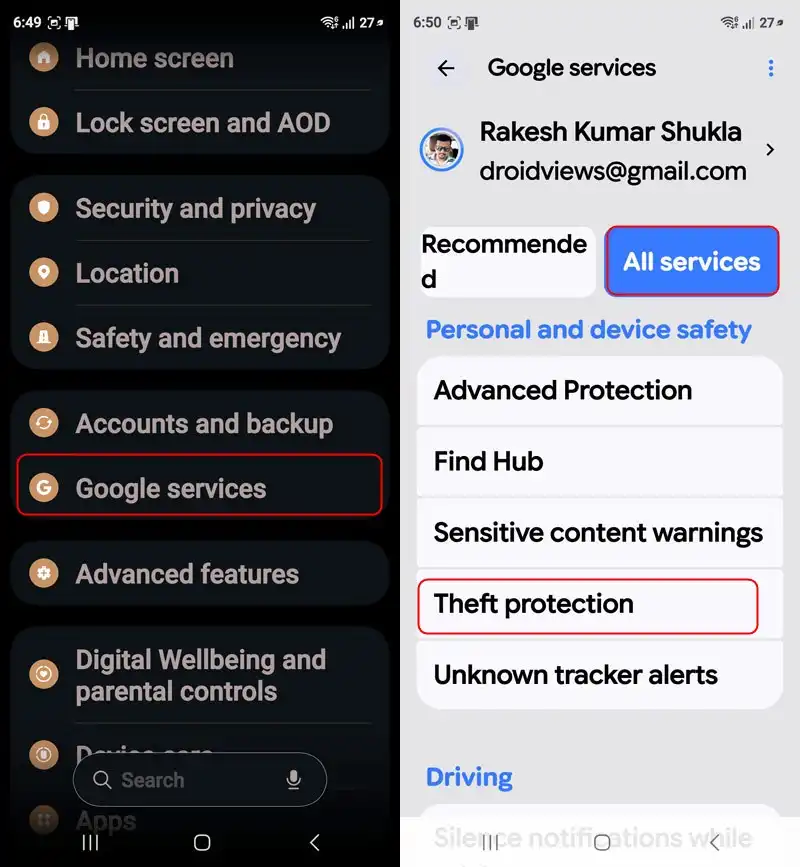
For Remote Lock, Google provides android.com/lock, which can be used to lock a supported lost phone remotely. Don’t wait until the phone disappears before configuring these features.
5. Don’t Give Every App Every Permission
When an app asks for permission, don’t automatically tap Allow. Ask: “Does this app actually need this permission to perform its main function?” A navigation app needs location, and a video-calling app may need the camera and microphone. But a simple calculator has no obvious reason to access your contacts.
Review permissions through Settings → Privacy → Permission Manager and check:
- Location
- Camera
- Microphone
- Contacts
- SMS
- Phone
- Photos and videos
- Nearby devices
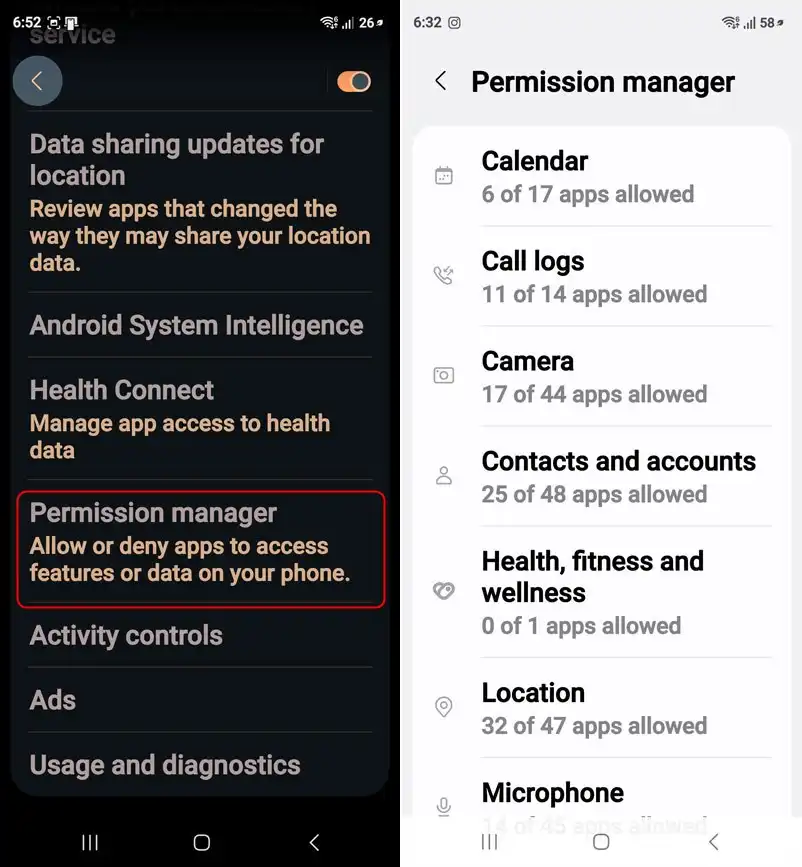
Depending on your device and permission, Android may offer Allow only while using the app, Ask every time, or Don’t allow. Limiting unnecessary permissions reduces what a compromised or overly aggressive app can access.
Pay special attention to location access. Location is one of the most revealing permissions, and an app doesn’t necessarily need to know where you are 24/7 just because it uses location for one feature.
Go to Settings → Apps → [App name] → Permissions → Location and, if continuous access isn’t necessary, change Allow all the time to Allow only while using the app or another more restrictive option.
Also review apps you installed long ago. Their permission requirements may have changed, or you may no longer use the feature that originally justified location access.
6. Never Leave Your Quick Settings Panel Too Powerful
Most people check their lock screen, but few actually test what can be accessed from the notification shade while the phone is locked.
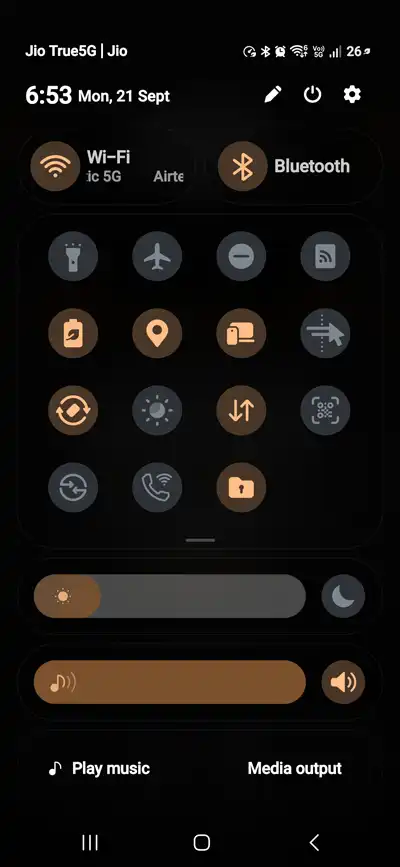
Lock your phone and swipe down from the top. Can you access Quick Settings? Can someone toggle Wi-Fi, Bluetooth, Airplane mode, NFC, mobile data, or other controls without unlocking the phone? Open your phone’s Lock screen settings for options controlling access to Quick Settings or notification shade controls while locked.
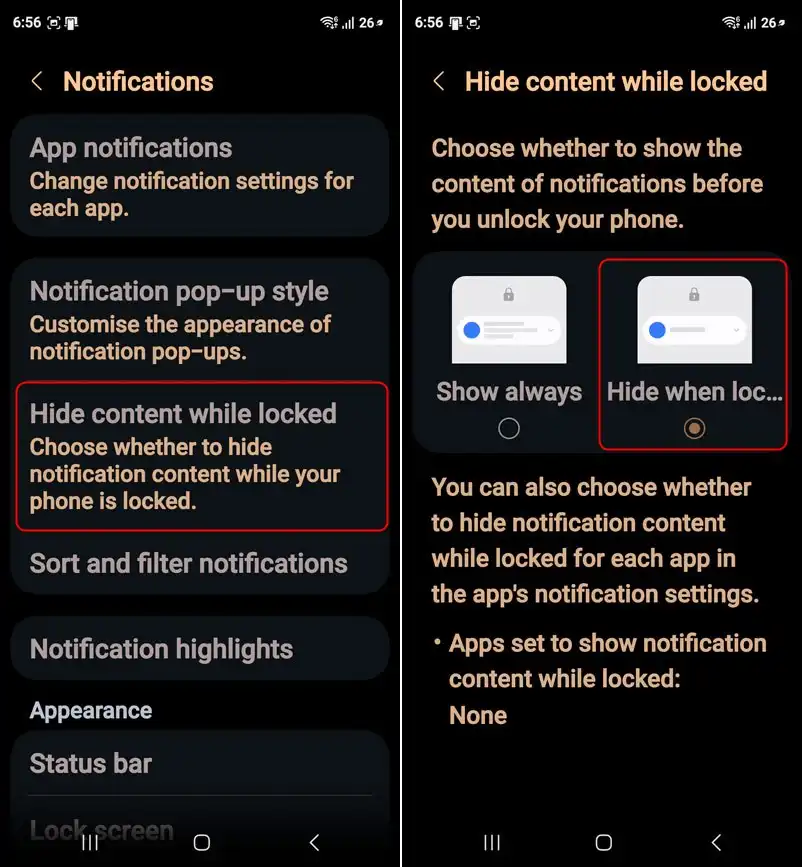
7. Never Show Sensitive Notification Content on the Lock Screen
Your phone can be securely locked while still revealing sensitive information. Android provides settings to hide notification content while the phone is locked. Google currently documents this under Settings → Security & privacy → More security settings → Notifications on lock screen, although the location can differ by manufacturer.
Look for an option such as:
Hide sensitive content
You can also selectively disable lock-screen notifications for particularly sensitive apps.
8. Never Automatically Connect to Every Wi-Fi Network
Your phone may remember networks you’ve connected to months or years ago. That’s convenient, but there’s little reason to keep dozens of old networks saved forever.
Go to Settings → Network & internet → Internet → Saved networks
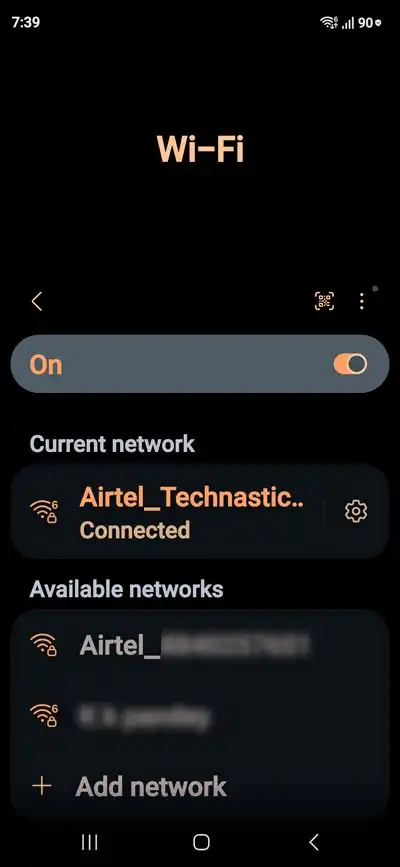
Remove networks you no longer use, particularly public networks from:
- Hotels
- Airports
- Cafés
- Restaurants
- Events
- Shops
Android also provides a Turn on Wi-Fi automatically setting on supported devices, which can automatically enable Wi-Fi near saved networks.
Review this setting if you don’t want your phone automatically enabling Wi-Fi whenever it detects a previously saved network.
9. Never Let Your SIM Card Remain Unprotected
Your SIM card is more important than most people realize. If somebody steals your phone, they could potentially move the physical SIM into another device and use your phone number for calls and SMS messages.
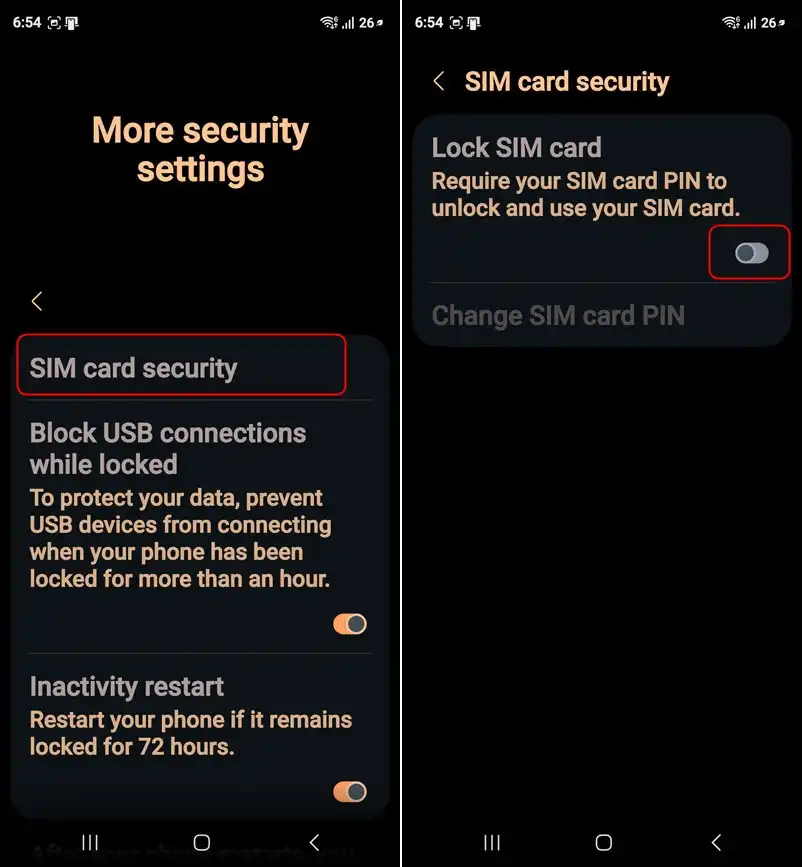
Android allows you to protect the SIM with a SIM PIN. Once enabled, the PIN is required when the phone starts or when the SIM is inserted into another device.
Navigate to Settings → Security & privacy → More security settings → SIM lock → Lock SIM
Important: Don’t guess the SIM PIN repeatedly. Too many incorrect attempts can lock the SIM and require a PUK code from your carrier.
10. Don’t Root Your Phone Without Knowing the Risks
Root access can be extremely useful for advanced Android customization, but it changes the security model of the device.
Rooting can affect:
- Banking and payment applications
- DRM-protected content
- OTA updates
- Device security mechanisms
- System integrity
- Compatibility with some apps
It also means that an incorrectly configured application with elevated privileges can potentially do much more damage than an ordinary app.
If you root your phone, understand exactly why you need root before modifying the system.
For most users, Android’s built-in customization options, ADB, Shizuku, and supported automation tools provide plenty of control without permanently modifying the system partition or security model.
11. Don’t Ignore Strange Battery Drain, Pop-Ups, or Any Unusual Behavior
A phone that suddenly becomes hot, drains its battery unusually quickly, displays persistent pop-ups, or shows unfamiliar applications deserves investigation.
It doesn’t automatically mean you’ve been hacked. A buggy app, poor cellular signal, excessive background activity, or a software update can produce similar symptoms.
Start with:
Settings → Battery → Battery usage
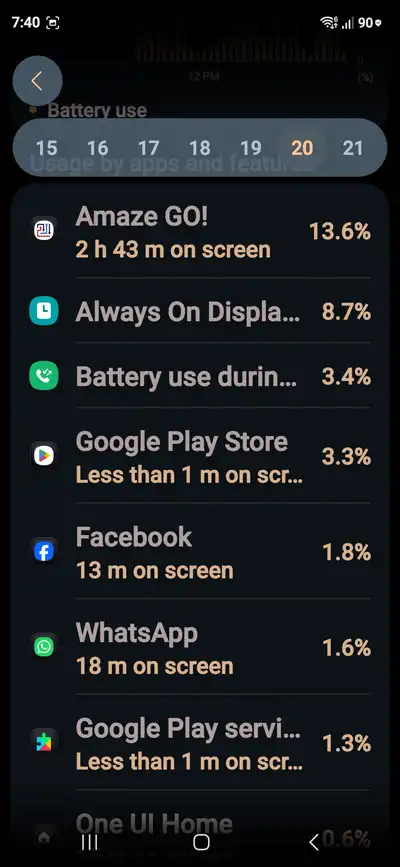
Look for an application consuming significantly more battery than expected. Then check Settings → Apps for recently installed or unfamiliar applications.
Also inspect:
- Accessibility services
- Device administrator apps
- VPNs
- Notification access
- Display-over-other-apps permissions
- Installed certificates, if relevant
Run Google Play Protect and remove suspicious applications.
If the problem began immediately after installing an app, uninstalling it is one of the first troubleshooting steps worth trying.
12. Never Treat Your Phone’s Settings as “Set and Forget”
Most Android users install new apps, grant permissions, connect to new Wi-Fi networks, try new VPNs, enable accessibility services, and eventually forget what they changed.
Every few months, spend five minutes performing a security and privacy audit.
Check Your Permission Manager
- Open Settings → Privacy → Permission Manager
- Review apps with access to your camera, microphone, location, contacts, SMS, and files.
- Remove permissions that no longer make sense.
Check Privacy Dashboard
If your phone supports it, open the Privacy Dashboard to see which apps recently accessed sensitive permissions.
This is particularly useful for spotting unexpected camera, microphone, or location access.
Check Accessibility Services
- Go to Settings → Accessibility
- Review downloaded or installed accessibility services.
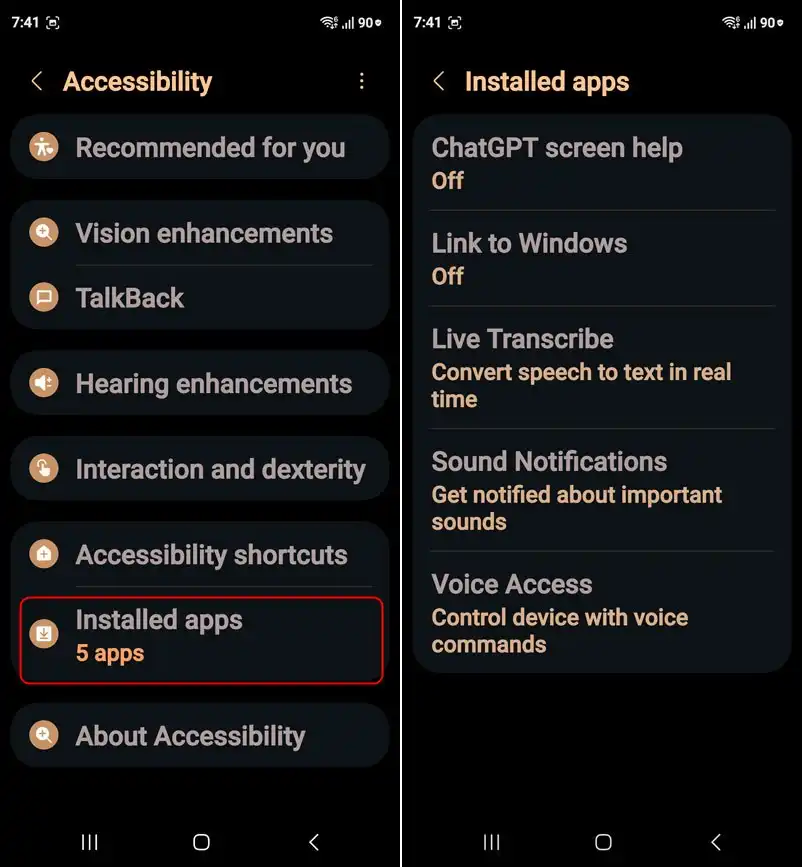
- If you don’t recognize an enabled service, investigate it immediately.
Check Device Admin Apps
- Search Settings for Device admin apps
- Review which applications have administrator privileges.
- You shouldn’t blindly disable legitimate security or enterprise-management services, but you should know exactly why each enabled administrator exists.
Check VPNs
- Go to Settings → Network & internet → VPN
- Remove VPN profiles you no longer use and investigate any VPN you don’t recognize.
Check Installed Apps
- Open Settings → Apps and periodically remove applications you haven’t used in months.
- Pay particular attention to apps you don’t remember installing.
Check Saved Wi-Fi Networks
- Remove old public Wi-Fi networks you no longer use.
- Also review automatic Wi-Fi connection settings.
Check Private Space
If you use Private Space, make sure your sensitive apps are actually inside it and configure it to lock automatically if that option is available. Android allows supported devices to hide Private Space from the app drawer whenever it is locked.
Check Theft Protection
- Go to Settings → Google → All services → Theft protection
- Review the available theft-protection options for your device, including Theft Detection Lock, Offline Device Lock, Failed Authentication Lock, Remote Lock and, on supported devices, Identity Check.
Check Google Play Protect
- Open Google Play Store → Profile picture → Play Protect
- Make sure Play Protect is active and pay attention to warnings about potentially harmful applications.
Final Thoughts
You don’t need to tweak your Android phone constantly to keep it running well. The biggest improvements usually come from removing unnecessary background activity, avoiding useless optimizer apps, controlling battery-hungry connections, limiting permissions, protecting sensitive information on the lock screen, and taking advantage of Android’s built-in theft and privacy controls.
The important part is not to blindly change every setting mentioned above. Check your phone, understand what each option does, and change the settings that actually apply to the way you use your device.
And if you haven’t reviewed your Android privacy and security settings recently, the 5-minute audit in #12 is a good place to start.