The first thing we usually do after getting a new PC is to tune its settings to our needs. Another way to make subtle changes to a Windows PC is to use Registry tweaks. By tweaking the Registry Editor, you can improve the performance of your Windows 11 PC, enable or disable certain features, and customize different UI elements. In this article, we’ll check out some of the best Windows 11 Registry hacks and tweaks to get the best out of your computer.
Warning: Since the Registry Editor is the most sensitive part of the OS, taking things into your hands might lead to unexpected results. Therefore, you are advised to follow the tips carefully and take a manual backup of the Registry. Additionally, create a system restore point as a precaution.
To back up your Registry settings, open the Registry Editor and click File > Export….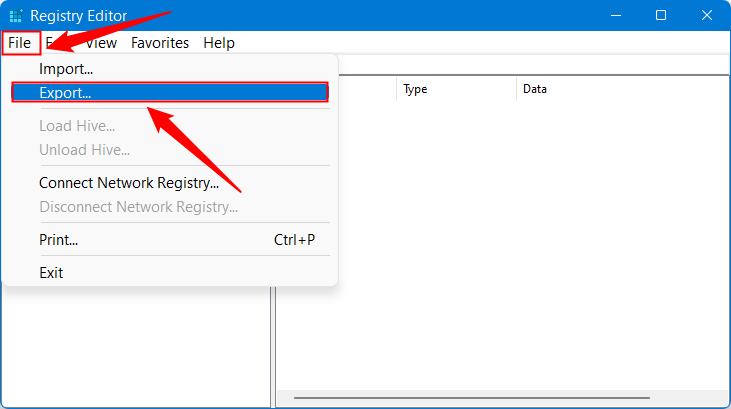
Assign a name to the backup file, and save it to your preferred location by clicking the Save button.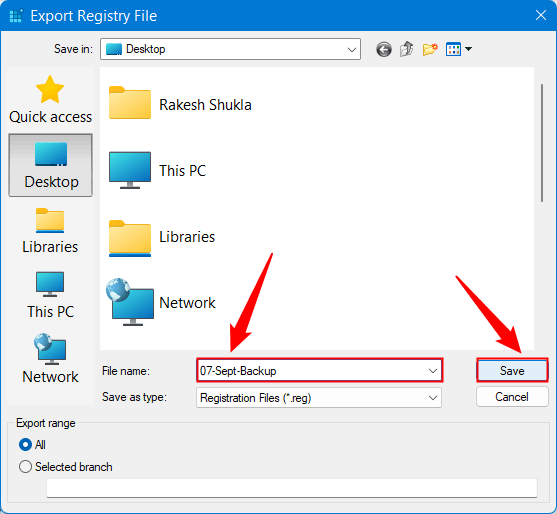
Now that you have saved the backup of your Registry Editor setup, it’s time to explore the Windows 11 Registry hacks and tweaks to experience the next level of customization on your PC.
Must Read: How to Enable God Mode in Windows 11
1. Revert to Windows 10-Style Context Menu
While Windows 10 had a less visually pleasing but more straightforward context menu, Windows 11 hides several commonly used options under Show more options. I prefer the good old context menu, and if you are in the same boat, there’s a little registry hack that can bring back the old context menu. Once you tweak the Registry as described below, you’ll get rid of the Windows 11 context menu.
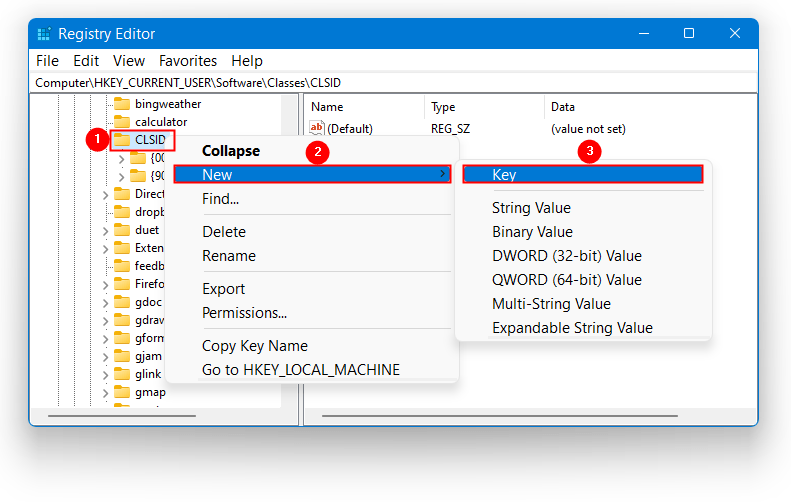
- Open the Registry Editor and navigate to the following path. Alternatively, you can paste the following address into the address bar of the Registry Editor window and press the Enter key to get to that location.
HKEY_CURRENT_USER\Software\Classes\CLSID
- Right-click CLSID and select New > Key.
- When the new key is created, rename it to
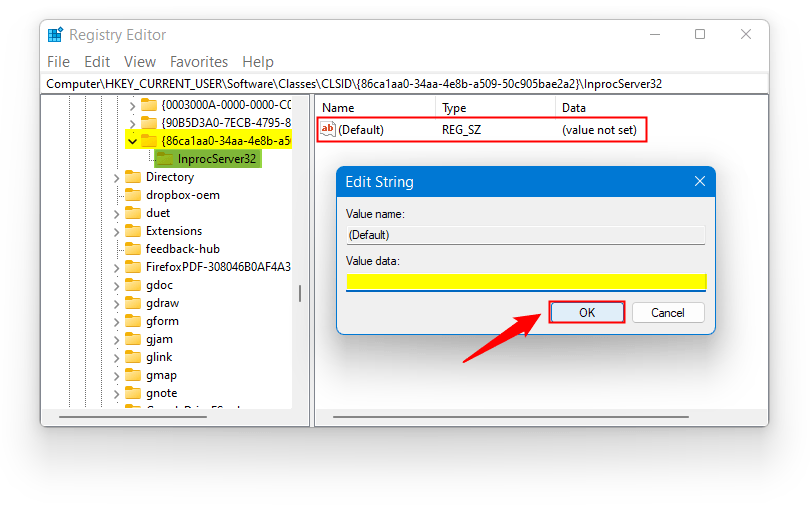
{86ca1aa0-34aa-4e8b-a509-50c905bae2a2}. Now right-click the newly-created key and select New > Key.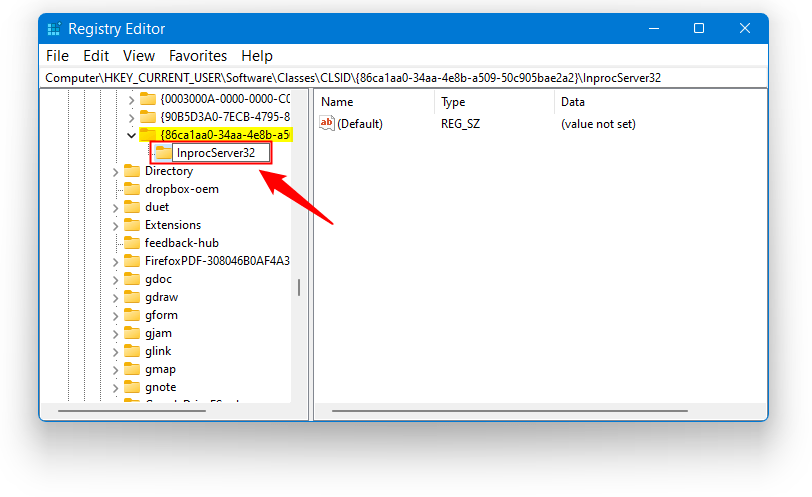
- Assign InprocServer32 as the name of this new entry as shown above. Now, double-click the (Default) entry in the right-hand pane. Make sure you do not make any changes in the Edit String window and click the OK button. This step is mandatory otherwise the trick won’t work.
- That’s it! All you need to do is restart your PC so that the changes you made can come into effect. Once your computer starts, you can enjoy the Windows 1-style old context menu on your Windows 11 PC.
2. Add an App to the Windows 11 Context Menu
Wouldn’t it be better if we could add those programs to the context menu in Windows 11? There is another cool Registry hack using which you can add an app shortcut to the desktop context menu. The trick works well in Windows 10 and 11. Besides this registry hack, there are a few ways to customize the Windows 10 context menu as well.
- Open the Registry Editor and go to:
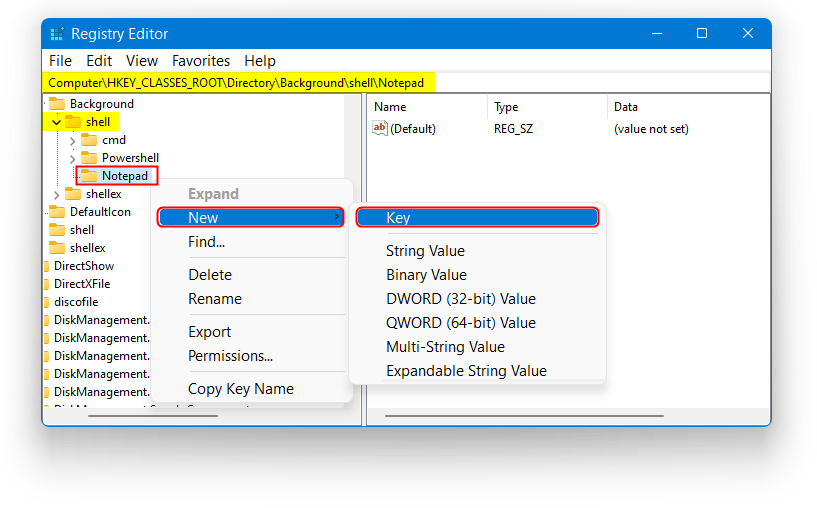
HKEY_CLASSES_ROOT\Directory\Background\shell
- Right-click ‘shell‘ and choose New > Key.

- It’s time to assign the newly created entry a name. Please note that the name you assign must correspond with the name of the app. For instance, if you want to add a Chrome browser shortcut to the context menu, name it “Chrome”. In my case, I’ll add the Notepad app to my Windows 11 context menu.
- Now, right-click the Notepad key you created and again choose New > Key.
- When the new key is created under Notepad, rename it to ‘command‘.
- Then double-click the (Default) key in the right-hand pane and paste the full path of the app you want to add in the Value data field as shown below. To learn 7 ways to copy the full path of a file in Windows, follow our detailed tutorial. Anyway, navigate to ‘C:\Windows\SysWOW64\notepad.exe‘. Select ‘notepad.exe‘, press Shift + Right-Click, and choose the Copy as Path option from the context menu.

- Finally, click OK. Now, right-click the desktop, and select Show more options > Notepad to launch the app right from the context menu.
3. Adjust the Size of Taskbar Icons
If you find the size of icons shown on the Windows 11 taskbar is too big or too small for you, you can easily change the icon size to your liking with the following Registry hack.
- Go to the following path in the Registry Editor.
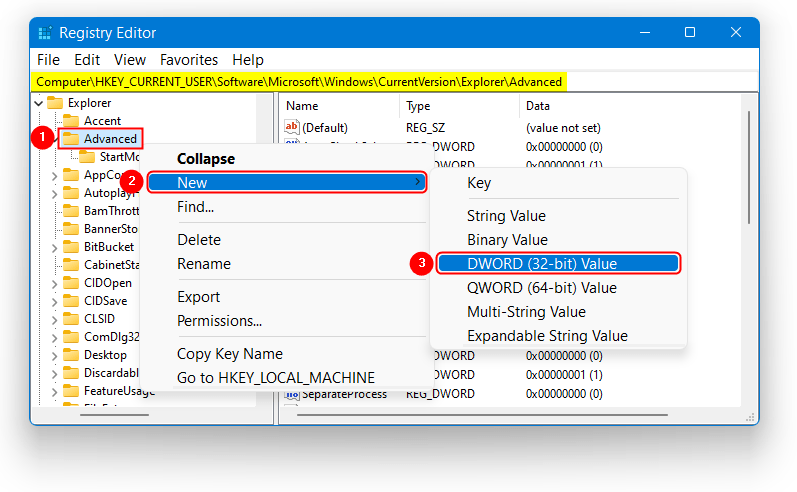
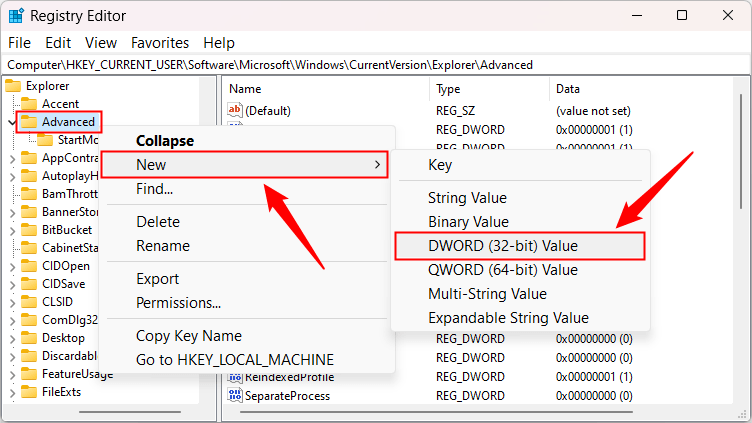
HKEY_CURRENT_USER\Software\Microsoft\Windows\CurrentVersion\Explorer\Advanced
- Right-click Advanced and select New > DWORD (32-bit) Value.
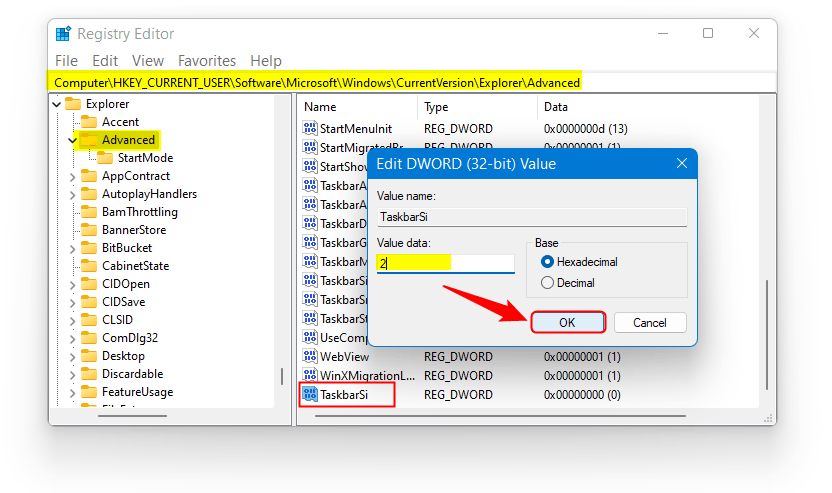
- When the new DWORD file is created, name it “Taskbar Si“. Then right-click this file and select Modify.
- It’s time to change the Value data for this DWORD entry to 0 (small), 1 (medium or default size), or 2 (large).
- Having changed the value data, refresh the desktop or restart your PC to see the effect.
4. Disable the Windows 11 Lock Screen
The lock screen feature was introduced with Windows 8 in August 2012 and has been there since then. It works as an extra layer of security and shows a background image along with icons like battery, messages, network, etc. Many people like it, but many people don’t. If you belong to the latter group, there’s a way to disable the lock screen on Windows 11 with a neat registry tweak. Having disabled the lock screen, you can get directly to the login screen when your Windows PC restarts.
Follow the steps given below to disable the Windows 11 lock screen.
- Launch the Registry Editor and go to the following location:
HKEY_LOCAL_MACHINE\SOFTWARE\Policies\Microsoft\Windows
- Right-click the Windows key and choose New > Key.
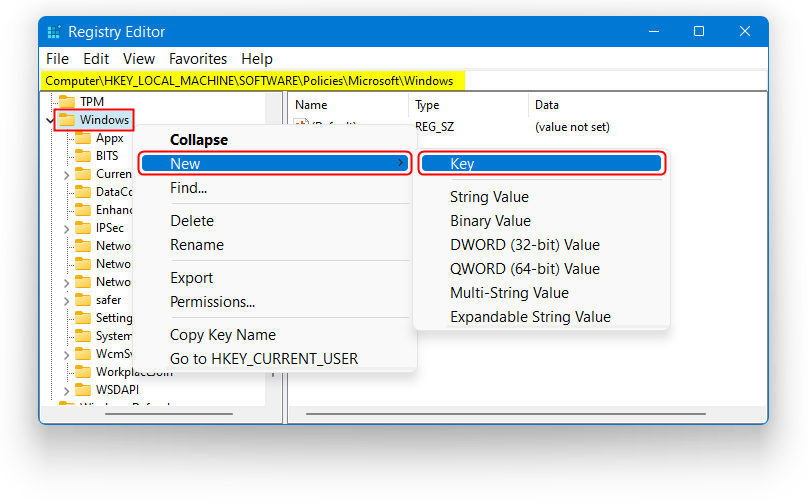
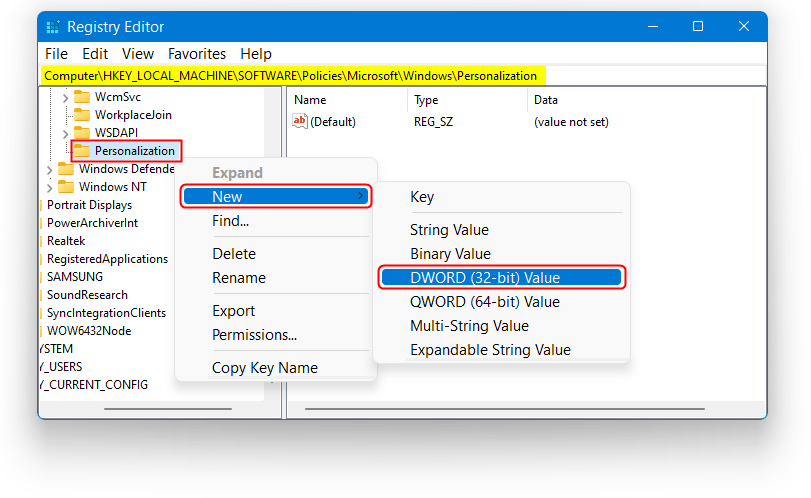
- Assign “Personalization” as the name of this new key.
- Now, right-click Personalization and select New > DWORD (32-bit) Value.
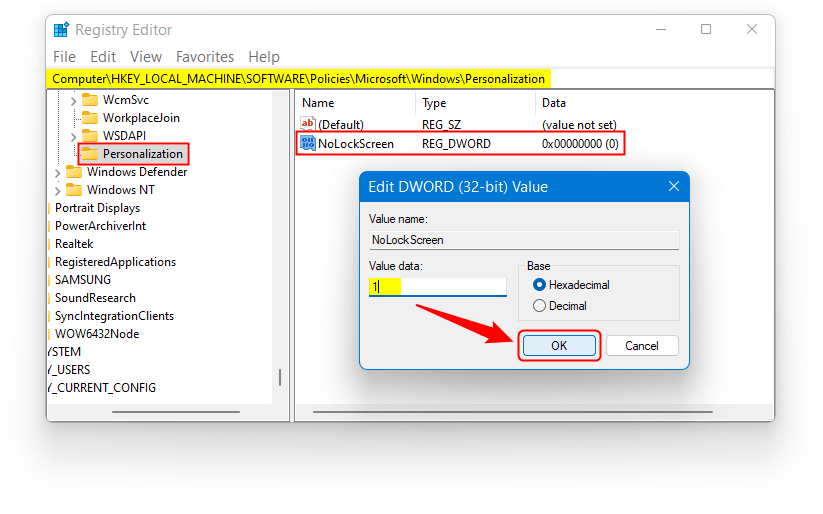
- When the DWORD file is created, rename it to NoLockScreen.
- Next, right-click NoLockScreen and select the Modify options. Alternatively, you can double-click this file to modify its value.
- Type 1 in the Value data field, to disable the Windows lock screen and click the OK button.
- That’s it! You have successfully disabled the lock screen on your Windows 11 PC. In case you want to enable it later, change the Value data to 0.
5. Change the Icon Spacing on the Desktop
Windows 11 is visually more appealing than Windows 10. If you want to enhance the cleanliness of your desktop, you can try increasing the spacing between the icons. If you have lots of icons on the desktop, you can try decreasing the space between icons to make your desktop cleaner. Whether you want to increase or decrease the icon spacing on your desktop, the following registry hack will help you.
- Open the Registry Editor, and navigate to the following location.
HKEY_CURRENT_USER\Control Panel\Desktop\WindowMetrics
- Click the WindowMetrics key to select it and look for 2 entries named IconSpacing and IconVerticalSpacing in the right-hand pane. While IconSpacing is responsible for horizontal spacing, the value of IconVerticalSpacing controls the vertical spacing between desktop icons in Windows 11.

- Now, right-click IconSpacing and select the Modify option. By default, the horizontal and vertical spacing value for desktop icons is -1125. You can decrease or increase this value to increase or decrease the spacing of the icons. Similarly, you can change the vertical spacing between icons by changing the value for IconVerticalSpacing.
6. Make Your Windows 11 PC Shutdown Faster
Windows 11 boots up and shuts down much faster than Windows 10. The OS takes some time before it properly starts or shuts down. The OS requires this time to close the ongoing background processes and save application data. If the data is not saved before the PC shuts down, you may lose data, and the app functions may get corrupted. This registry tweak can help you make your PC shut down faster.
- Open the Registry Editor and go to the following location.
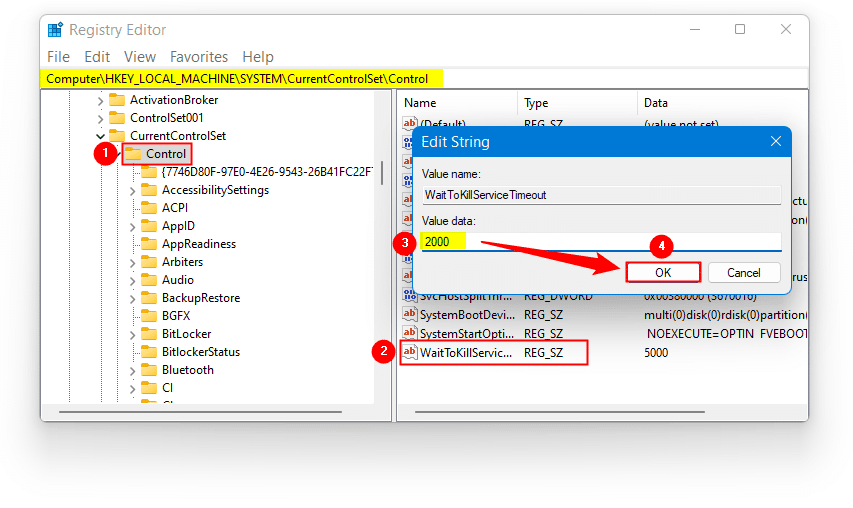
HKEY_LOCAL_MACHINE\SYSTEM\CurrentControlSet\Control
- Click the Control key and look for the WaitToKillServiceTimeout entry in the right-hand pane.
- Right-click WaitToKillServiceTimeout and select Modify. By default, the wait time for killing processes is 5000. You can change this value to 1500 or 2000 to speed up the shutdown on a Windows 11 PC.
7. Move the Taskbar to Left, Right, Top, or Bottom
While Windows 11 lets you align the taskbar app icons to the left and center, it does not allow you to move the whole taskbar to the right, left, or top of the screen. This registry hack makes it possible to change the taskbar position to any of the four edges of the screen.
- Open the Registry Editor and navigate to the location mentioned below. You can also paste the path in the Registry Editor address bar and press Enter to jump directly to the StuckRects3 entry.
HKEY_CURRENT_USER\Software\Microsoft\Windows\CurrentVersion\Explorer\StuckRects3
- Double-click the Settings binary file in the right-hand pane. A new window will open showing its properties.
- You’ll see 7 entries listed under the value data field. The 5th value in the 00000008 row is set to 03 by default which is the value for the bottom position of the taskbar. Below is the list of codes for the left, right, top, and bottom positions.
00 - Left
01 - Top
02 - Right
03 - Bottom
- Double-click 03 in the ‘00000008‘ row and replace its value with any of the values mentioned above. For instance, type 01 if you want to move the Windows 11 taskbar to the top position.
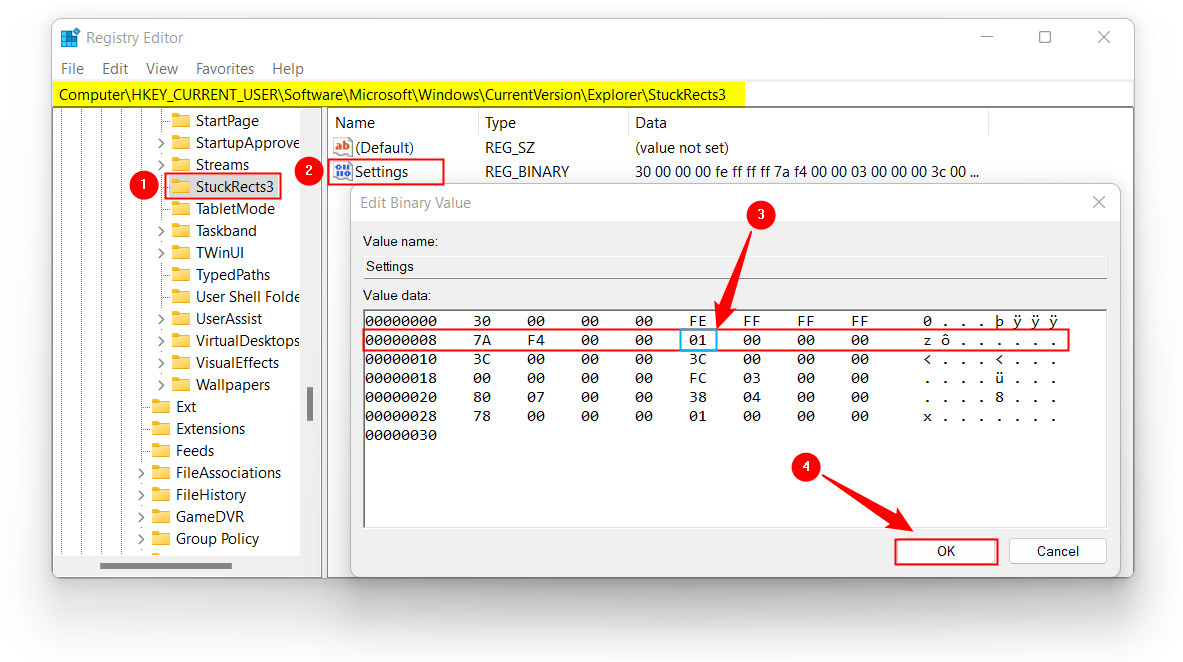
- Having made the change, click the OK button. Close the Registry Editor.
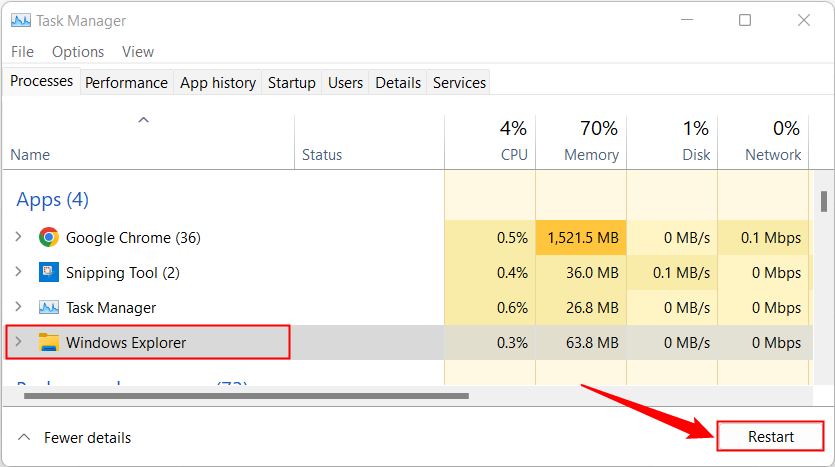
- Now, you need to give one final touch by restarting Windows Explorer. This is required for the changes to apply. There are several methods to restart Windows Explorer. We’ll check out 2 of them below.
- Press the Win + X or Alt + Ctrl + Delete buttons simultaneously and select Task Manager.
- Select Windows Explorer from the list of apps and processes and click the Restart button. You can also access the Restart option by right-clicking Windows Explorer.
- Alternatively, you can kill the Explorer.exe and restart it via the Command Prompt. Launch the Command Prompt as an administrator.

- Type the following command in the Command Prompt window and press Enter.
taskkill /f /im explorer.exe
- The execution of the command will kill Explorer.exe. Now, type the command line mentioned below to start it.
start explorer.exe
- That’s it! As soon as Windows Explorer restarts, the taskbar will move to your preferred side of your Windows 11 desktop.
8. Disable Bing in the Start Menu
Microsoft integrates its search engine Bing into the Windows Start Menu and Windows 11 is no exception. Whenever you search for a file, image, or document, you’ll also see search suggestions from Bing. If you don’t like that, there’s no way to disable Bing in the Start Menu from Settings. However, if you opt for the Registry Editor hack given below, you are not out of luck.
- Navigate to the following location in the Registry Editor.
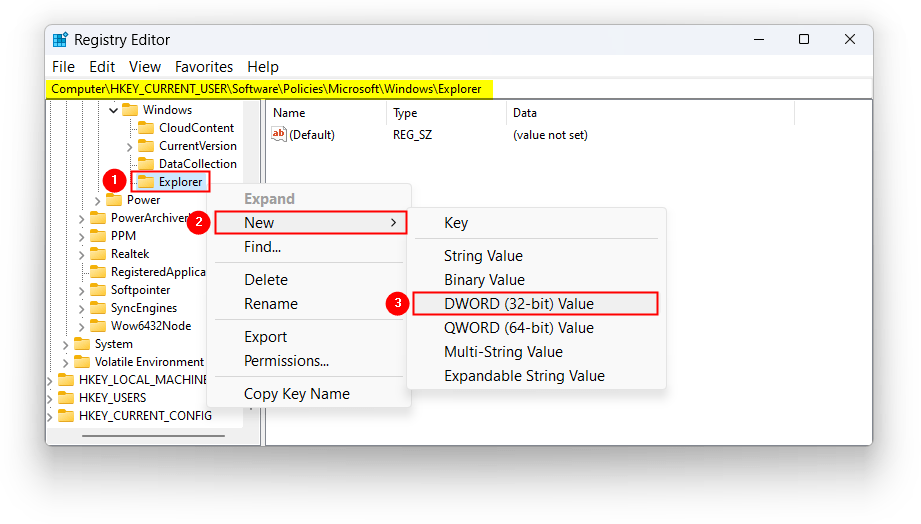
HKEY_CURRENT_USER\SOFTWARE\Policies\Microsoft\Windows
- Right-click the Windows key and select New > Key.

- When the new key is created, rename it as “Explorer“.
- Now, right-click Explorer and select New > DWORD (32-bit) Value.
- Doing so will create a new DWORD entry in the right-hand pane. Assign “DisableSearchBoxSuggestions” as a name to this file.
- Double-click DisableSearchBoxSuggestions and change the Value Data from ‘0‘ to ‘1‘ as shown below.
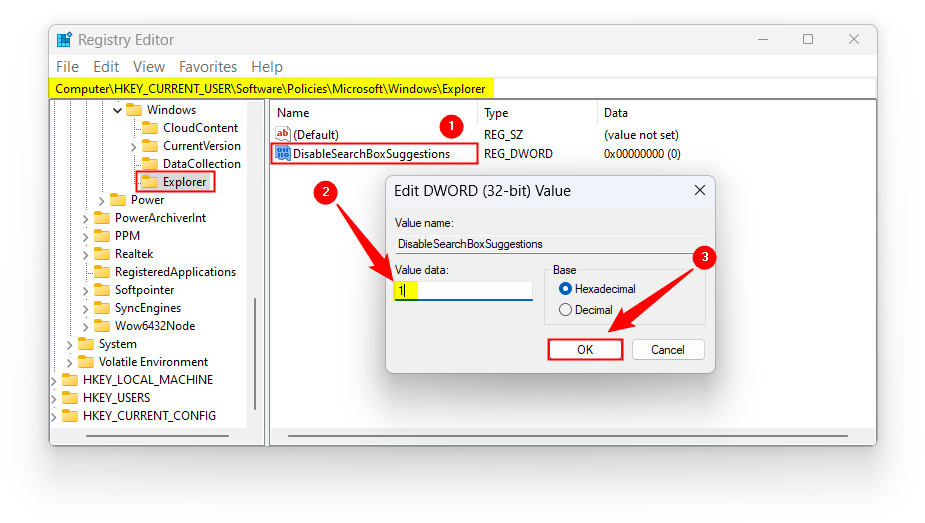
- Finally, click the OK button to save the changes. The Bing search feature will be disabled from the Start Menu when you restart your PC.
9. Restore Windows Photo Viewer
With the Windows 10 update, Microsoft introduced the Photos app to replace the Photo Viewer app as the default to open image files. The good thing is that the Photo Viewer app is still there in the OS but remains disabled by default. In case you want to use it, you can restore the old app with the following registry hack.
- Open the Notepad app. To do so, click the Windows icon in the taskbar, type “notepad” in the search box, and click Notepad.
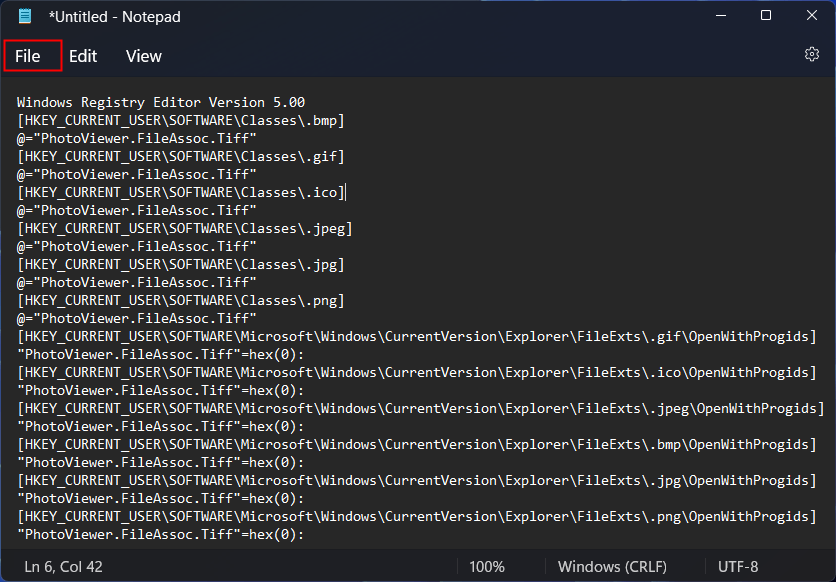
- Now, copy the following snippet and paste it into the Notepad file.
Windows Registry Editor Version 5.00
[HKEY_CURRENT_USER\SOFTWARE\Classes\.bmp]
@="PhotoViewer.FileAssoc.Tiff"
[HKEY_CURRENT_USER\SOFTWARE\Classes\.gif]
@="PhotoViewer.FileAssoc.Tiff"
[HKEY_CURRENT_USER\SOFTWARE\Classes\.ico]
@="PhotoViewer.FileAssoc.Tiff"
[HKEY_CURRENT_USER\SOFTWARE\Classes\.jpeg]
@="PhotoViewer.FileAssoc.Tiff"
[HKEY_CURRENT_USER\SOFTWARE\Classes\.jpg]
@="PhotoViewer.FileAssoc.Tiff"
[HKEY_CURRENT_USER\SOFTWARE\Classes\.png]
@="PhotoViewer.FileAssoc.Tiff"
[HKEY_CURRENT_USER\SOFTWARE\Microsoft\Windows\CurrentVersion\Explorer\FileExts\.gif\OpenWithProgids]
"PhotoViewer.FileAssoc.Tiff"=hex(0):
[HKEY_CURRENT_USER\SOFTWARE\Microsoft\Windows\CurrentVersion\Explorer\FileExts\.ico\OpenWithProgids]
"PhotoViewer.FileAssoc.Tiff"=hex(0):
[HKEY_CURRENT_USER\SOFTWARE\Microsoft\Windows\CurrentVersion\Explorer\FileExts\.jpeg\OpenWithProgids]
"PhotoViewer.FileAssoc.Tiff"=hex(0):
[HKEY_CURRENT_USER\SOFTWARE\Microsoft\Windows\CurrentVersion\Explorer\FileExts\.bmp\OpenWithProgids]
"PhotoViewer.FileAssoc.Tiff"=hex(0):
[HKEY_CURRENT_USER\SOFTWARE\Microsoft\Windows\CurrentVersion\Explorer\FileExts\.jpg\OpenWithProgids]
"PhotoViewer.FileAssoc.Tiff"=hex(0):
[HKEY_CURRENT_USER\SOFTWARE\Microsoft\Windows\CurrentVersion\Explorer\FileExts\.png\OpenWithProgids]
- After that, click the File tab and select the Save as option.
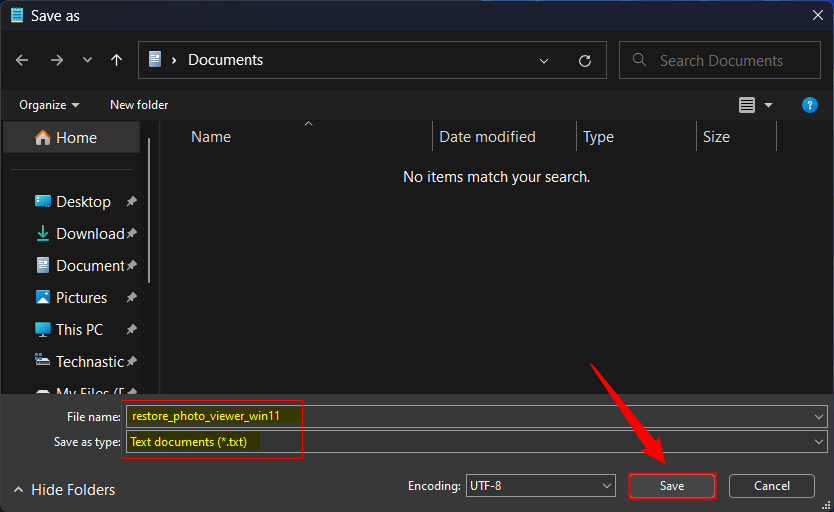
- Assign “restore_photo_viewer_win_11” as the name of this file and click the Save button.
- When restore_photo_viewer_win_11.txt is saved, change the file extension from “.txt” to “.reg“.
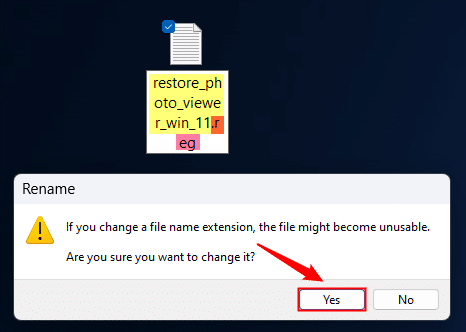
- Now, double-click restore_photo_viewer_win_11.reg and select Yes when prompted. The script will tweak the Registry Editor to enable the Photo Viewer app.
- Finally, right-click an image file, select the Open with option, and select Photo Viewer from the list of apps.
10. Open the Last Opened Window in Any App
If you have multiple windows open in an app, you’ll see the thumbnails for all opened windows by hovering the mouse pointer on the app icon. A neat registry hack makes the app with multiple windows open switch to the last opened window. If you want this feature in your Windows 11 PC, try the trick given below.
- Navigate to the following location the Registry Editor.
HKEY_CURRENT_USER\Software\Microsoft\Windows\CurrentVersion\Explorer\Advanced
- Perform a right-click while the Advanced key is selected and choose New > DWORD (32-bit) Value.
- When the new DWORD entry is created, rename it “LastActiveClick”.
- Now, double-click LastActiveClick and replace ‘0‘ with ‘1‘ in the Value Data field.
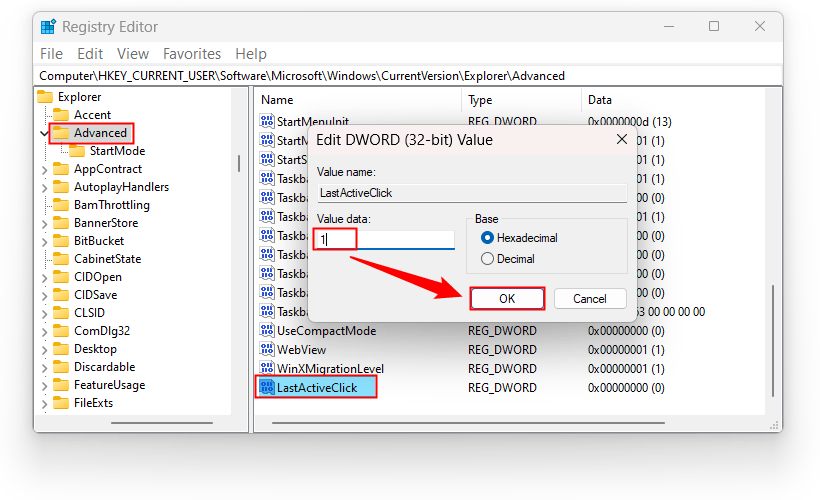
- Finally, click OK to save the changes and restart your PC.
We’ll add more Windows 11 registry hacks and tweaks to this article soon. To learn more about the Windows Registry Editor, refer to the Microsoft support page.
Read Next: 17 Useful Registry Tweaks and Hacks for Windows 10