Android is based on the Linux operating system so it has endless possibilities. And if you root your Android device, you will get a whole new world of customization, trying different custom ROMs and Kernels. Android even allows you to add multiple operating systems to a single device. Therefore, it’s a must that you take a full backup of your Android device’s data so that you can restore it whenever you want without losing anything.
Now, while trying different custom ROMs, kernels, and mods, there is a slight chance that you may lose your data. This may result in the loss of Apps, images, personal data, and sometimes even ROM. And if you lose your ROM, then there is a very slight chance that you will be able to use your Android device again. So now you may be thinking about what precautions you should take before trying different custom ROMs. The ultimate solution for this is to take a full backup of your Android device and store it on the SD card and your PC.
In this tutorial, we will help you through the procedure of taking a backup of your apps, images, data, and even your ROM and everything else that resides in an Android device, except for your SD card. The backup of your Android device will be stored on your SD card, and you can even copy that backup file to a more secure place like your PC. We will make a Nandroid Backup of your Android device. Nandroid Backup takes a full backup image of your device and stores it so it can restore your Android device when something happens.
We will also suggest some apps to back up your existing apps, images, videos, and texts for both rooted and unrooted Android devices.
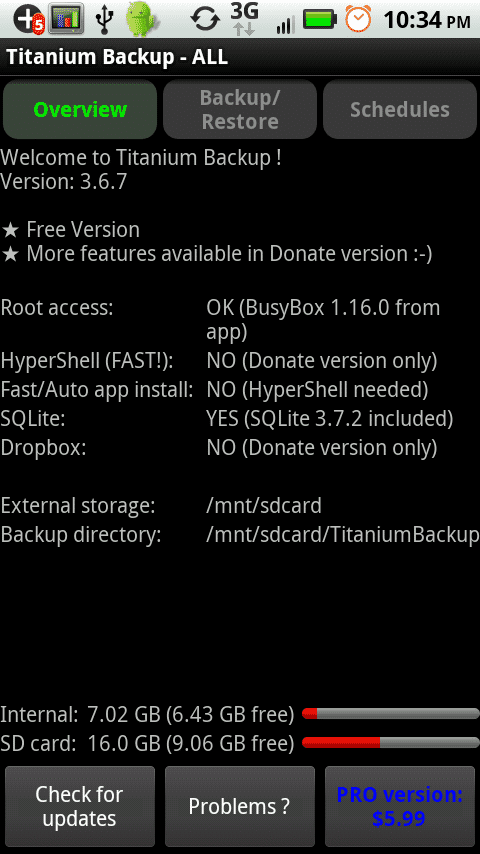
Backup Android with Titanium Backup
If you are one of those who want to take a complete backup of your Android device, excluding RO,M and you have no problem rooting your device, then the Titanium Backup app is the best solution for you. Titanium Backup app requires a rooted Android device, and this app is available in the Play Store for free of cost. With Titanium Backup, you can:
- Back up your apps and data (including system apps).
- Restore your apps and data (including system apps).
- Scheduled Backups.
- Move apps to/from the SD Card.
- Backup and restore SMS, Call logs, and Wi-Fi settings.
Download the Titanium Backup App
Take your 1st backup with Titanium Backup
Follow the steps below to back up the data present in your Android device:
- Download the Titanium Backup from the Play Store or the link given above.
- After the app is installed, launch the Titanium Backup app.
- Click on the Backup/Restore option.
Backup and Restore - Now, tap the “menu” button on your device.
- A menu will pop up. From there, select “Batch”.
- In the batch menu, select “Backup all user apps + system data”.
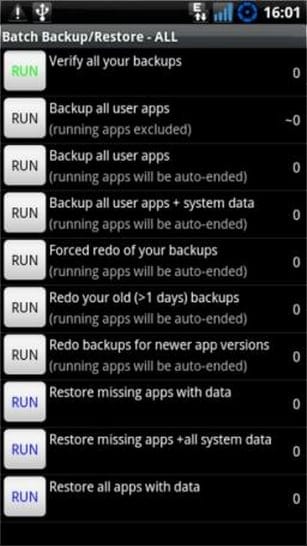
Backup User Apps+System Data - You will be asked whether to kill the running apps or not. Select “Kill active apps”.
- Now click “Run the batch operation”.
- The backup will be done and will be stored in your SD card in the directory “TitaniumBackup”.
Restore your Backup with Titanium Backup
Follow the steps below to restore your backup with the Titanium Backup app:
- Open the Titanium Backup app.
- Click on the Backup/Restore option.
- Tap the “menu” button on your device.
- A menu will pop up. From that menu, select “Batch”.
- In the batch menu, select “Restore all apps with data”.
- The backup will now be restored, and your device will look like the day when you made the backup.
The only thing that may constrain some users from taking the backup with the Titanium Backup app is that the Titanium Backup requires root. So, in the next section of our tutorial, we will suggest an app to take a backup of your Android device without the need to root your device.
Helium Backup
Helium-App Sync and Backup is one app that you should use to back up your Android device if you don’t want to root your device. Helium App backs up everything ranging from your call logs to videos, apps, and data. The only thing that cannot be backed up by the Helium app is your ROM. Some of the features of the Helium app are:
- Back up your data to the SD card.
- Restore your data from the SD card.
- Back up your data to a PC.
- Restore your data from the PC.
Download Helium-App Sync and Backup
Backup your data with the Helium App
- Download the Helium app from the Play Store or the link on your Android device.
- Open the Helium app on your Android device.

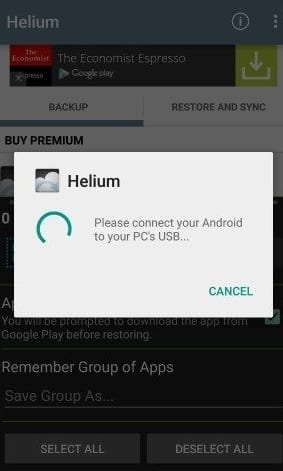
Helium – App Sync and Backup - When you open the app, the app will ask for your access to your Google account to backup data on Google Drive. Grant access to Helium.
- Now, Helium will prompt you to connect your Android device to your PC to connect to the Helium desktop application.
- Connect your device to your PC with a USB Cable.
Helium App - Now, install Helium for Chrome.
- Now, open Helium on both your PC and your Android device.
- Helium will now pair both devices.
- You can disconnect your Android device now.
- Now, on your Android device, tap the “Backup” button in the Helium app.
- The Helium app will now ask where you would like to save the backup. Select “Google Drive” if you want to access the backup on different devices.
Note: You will have to pair your Helium Android app and Helium Chrome application each time after you reboot your device. If you face any problem while connecting and pairing your device to a PC, then select the “Enable PTP” button in the Helium app, and on the next screen, choose the “Camera (PTP)” option. This will resolve any connection and pairing issues.
Till now, we have described 2 apps that can take a backup of your Android device. However, both apps miss one common feature. We can’t take the backup of the ROM through both of these apps. To take a backup of the ROM, you need to take a Nandroid Backup of your Android device. Below is the procedure to do so.
Nandroid Backup
Nandroid is sometimes also written as NANDroid. It is a permanent storage memory of your Android device. A Nandroid Backup is a standard directory image for backing up a perfect mirror image of your Android device. With the help of Nandroid Backup, you can save:
- All Apps
- Images
- Videos
- Music
- Games
- Text messages
- Multimedia messages
- Wallpapers
- Widgets
- All stored passwords (Wi-Fi passwords included)
- Ringtones
- Your Stock ROM
- All Accounts
- All System Settings
And pretty much everything!
After taking a Nandroid Backup, you can:
- Try different ROMs.
- Protect yourself against accidentally loading malware.
- You can use this NANDroid Backup on any device of the same model so if you have lost your phone and got a replacement for the same, then install the backup and your Android device will be as good as before.
Note: If you want to restore something from a Nandroid backup, then you will have to restore everything or nothing. There is no option for restoring a specific app or photo from Nandroid Backup.
Taking a backup with the help of Nandroid Backup involves 2 steps:
- Rooting your Android device.
- Taking Nandroid Backup
Step 1: Rooting Your Android Device
Rooting is a way to unlock the full potential of your Android device. Rooting gives users the power to optimize and experiment with their Android devices by trying CWM (ClockworkMod Recovery) and different mods. It gives your processor a chance to adjust to different custom ROMs and kernels. By rooting your Android device, you can experience the power of CyanogenMod custom ROM, which is assumed to be the best custom ROM.
To take a Nandroid Backup of your Android device, you need to first root your Android device. The reason is that the unrooted devices will not grant access to the Custom Recoveries to take a backup. Rooting is a complex procedure. Different smartphones have different procedures for rooting. However, the easiest way to root a smartphone is to use a Universal Root Tool.
In the above link, you will get 6 popular universal root tools with a high success rate, and these tools can root your Android device in no time. After rooting your Android device,e you have to follow the next step, which is to install the Nandroid Backup.
Step 2: Taking Nandroid Backup
NANDroid backup is a type of application that can take a backup of your Android device and restore it in a real quick time. There are many ways of taking a Nandroid Backup. One of the simplest ways to take a Nandroid backup of your device is to take a backup with the help of Custom Recoveries. There are 2 types of Custom Recoveries: TWRP and CWM. We will explain the process of taking Nandroid Backup through both recoveries.
Taking Nandroid Backup with TWRP
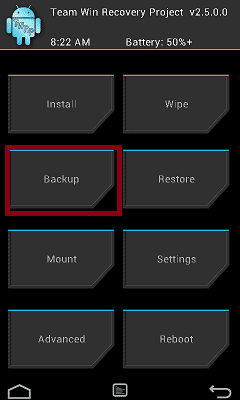
TWRP (Team Win Recovery Project) is one of the easiest recoveries to use, and it has one of the most impressive UI’s (User Interface). TWRP is different for different smartphones and models. To take a Nandroid Backup with the help of TWRP, follow the steps below:
- Install TWRP on your Android device. Remember that different smartphones have different TWRPs. So, install the correct one on your Android device.
- Boot the device into the TWRP mode.
- In TWRP mode, select “backup”.
TWRP - In the backup, there will be many options like system, data, boot, recovery, and cache. Select all of them.
- Enable the compression if you want. It will reduce the size of the backup, but it will take more time to create the backup.
- Choose the option “Set the backup name” to set a name for the backup you are creating.
- Now, at the bottom of the screen, there will be an option “Swipe to Backup”. Swipe there.

TWRP Backup Options - Now the backup process will start and will be completed in a few minutes.
- The backup will be stored on your SD card. You can copy the backup to your PC to be more secure.
Take Nandroid Backup with CWM
CWM Recovery (ClockworkMod Recovery) is a recovery similar to TWRP and is widely used by Android enthusiasts. Like TWRP, CWM is also different for smartphones and models. To take a Nandroid Backup with the help of CWM, follow the below steps:
- Install CWM on your device.
- Boot into the CWM Recovery mode.
- In CWM, you will find several options. Choose “Backup and Restore” from the list of options.
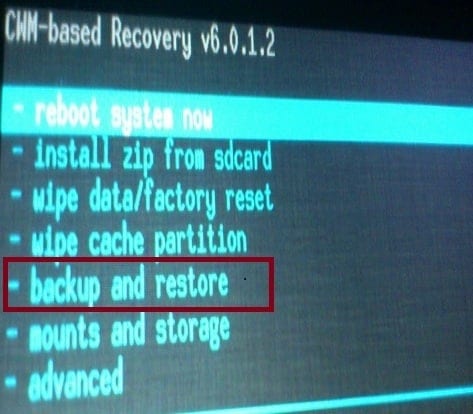
CWM Recovery - In the “Backup and Restore” section, there will be many options like Backup to /sdcard, restore from/sdcard, and many more.
- Select the desired type of backup you want to create.
- The backup will now be created, and it will take a few minutes.
- Your device will be rebooted now.
- That’s all! You have successfully created a Nandroid Backup with CWM.
This was our ultimate guide for taking a full backup of your Android device. For any queries, drop a comment below. Feel free to share this article.