One of the things that made Google Chrome popular, both on desktops and Android was its simplicity. Chrome for desktops had a minimal design that hid many features inside a menu instead of the browser interface. Things like bookmarks and history all took a backseat. That’s something Chrome brought to Android as well. Where other browsers were packed with news and bookmarks on the main page, Chrome had the Google search bar and your most visited websites. Newer versions of Chrome have ditched that minimalism in favor of article suggestions. By following the steps in this tutorial, you can easily remove or turn off the article suggestions in the Chrome browser for Android.
Most of these articles are suggested by the Google app or the Google Now pane on your launcher if it has one. Google Now is already not as useful anymore as it was, having stuffed away all important things in the Google app instead of where they should be. Chrome too now feels bloated and not simplistic. It isn’t close to as horrible as some of the other browsers trying to sell ads. Yet, it isn’t even the simple browser that gets out of your way that it used to be.
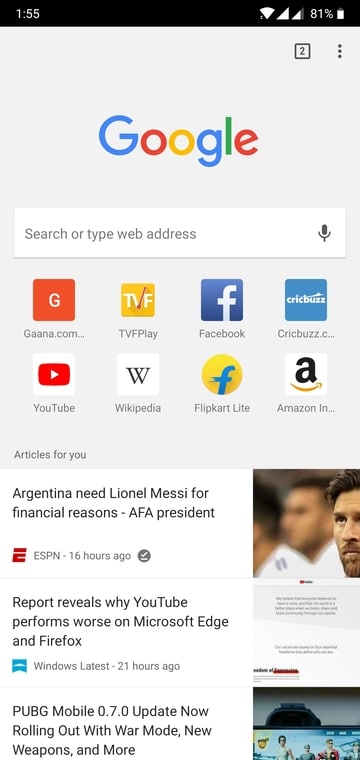
It makes sense if you want to get rid of it especially if you’re already using Google now. If you’d like a distraction-free browsing experience without switching your browser, you can turn on or off some flags. Chrome flags are hidden settings in the Chrome browser that make it easy for developers or early adopters to test certain features. Keeping these settings hidden ensures the end user doesn’t turn them on by mistake. Google considers these features experimental but most of them are quite safe. Using the flags, you can hide the article suggestions behind an expandable header or remove them altogether.
Also read: How to Create a Bootable USB on Chrome OS
Turn Off Chrome Article Suggestions
This is a slightly moderate approach wherein the article suggestions are still there when and if you want them. However, instead of being front and center and cluttering up the new tab page, they can be collapsed behind an expandable header. You can enhance your browser experience with Chrome flags for Android.
- Launch Google Chrome on your Android device and go to this URL: chrome://flags/#enable-ntp-article-suggestions-expandable-header. You can type it out or copy and paste the URL into the URL bar. Alternatively, head to chrome://flags instead and search for expandable. This is the only Chrome flag with an expandable keyword in it, for now. For a more precise search, you can type ntp-article-suggestions in the search bar.
- Under the Show article suggestions expander header on New Tab page heading, click the drop-down menu and select Enable.
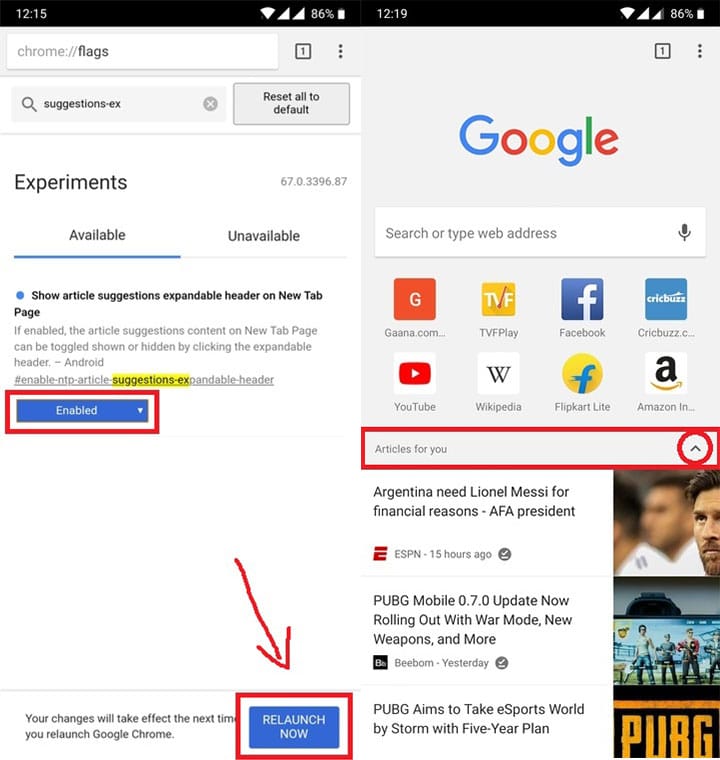
- A button appears on the bottom asking you to RELAUNCH NOW. Tap on it to relaunch the browser.
When the browser opens again, head to a new tab page and you’ll notice a small arrow on the right of the Articles for you header. Tap it to collapse or expand the section.
Remove Article Suggestions on Chrome for Android
If you never want to see the suggested articles you can remove them instead of hiding them. For this, you’ll need to disable a flag instead. The flag that controls the displaying of the suggested articles is Show server-side suggestions on the New Tab page.
- Launch Chrome on your Android device and head over to this URL by copying and pasting it or typing it yourself: chrome://flags/#enable-ntp-remote-suggestions. As before, you can instead go to chrome://flags and search for ntp-remote-suggestions.
- Tap the drop-down menu under Show server-side suggestions on the New Tab page and select Disable.
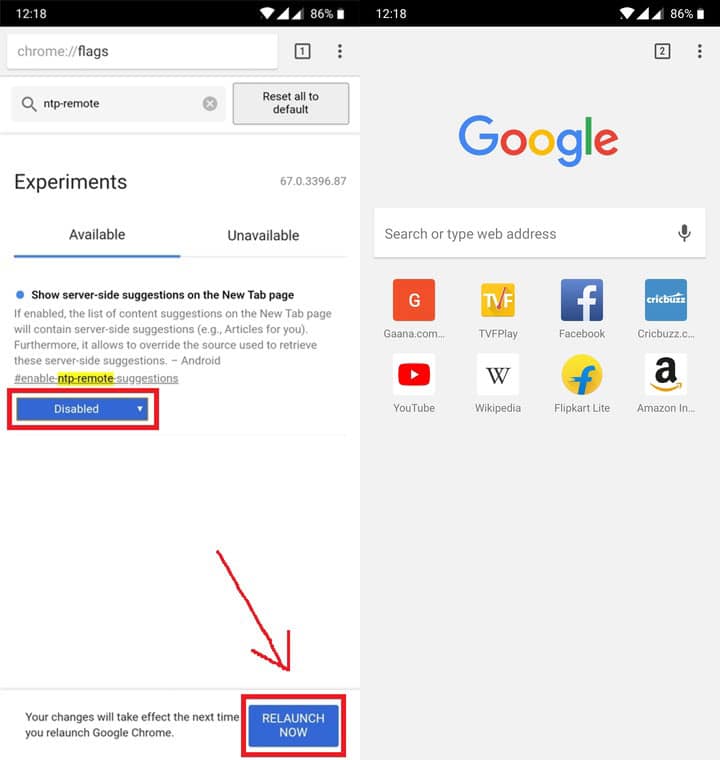
- Tap the RELAUNCH NOW button when you change the flag and Chrome will restart.
When you head to a new tab page now you’ll find it squeaky clean with only the omnipresent Google search bar and favicons of your most visited websites. If you feel annoyed with Chrome’s notifications, you can manage it in a few simple steps.