In Microsoft Word, a backup will be created automatically when you save it. The latest auto-recover feature in Microsoft Word will save the document automatically at regular intervals of time and also helps you recover the lost changes. Most of us sometimes might lose the changes we make in the Word document and later regret not saving the document. To avoid such regrets, we will help you to enable auto recovery to automatically save and recover Word documents.
AutoRecover to Automatically Save and Recover Word Documents
Enable AutoRecover Feature
To use the AutoRecover feature in the Word document, you need to enable the feature in Microsoft Word. Follow the below simple steps to enable it.
- Open the Word document on your PC and click on the File tab in the top left of the application window.

- From the list of items on the left, click on Options.
- Word options dialog box will appear on the screen. Click the Save option from the list of items on the left.
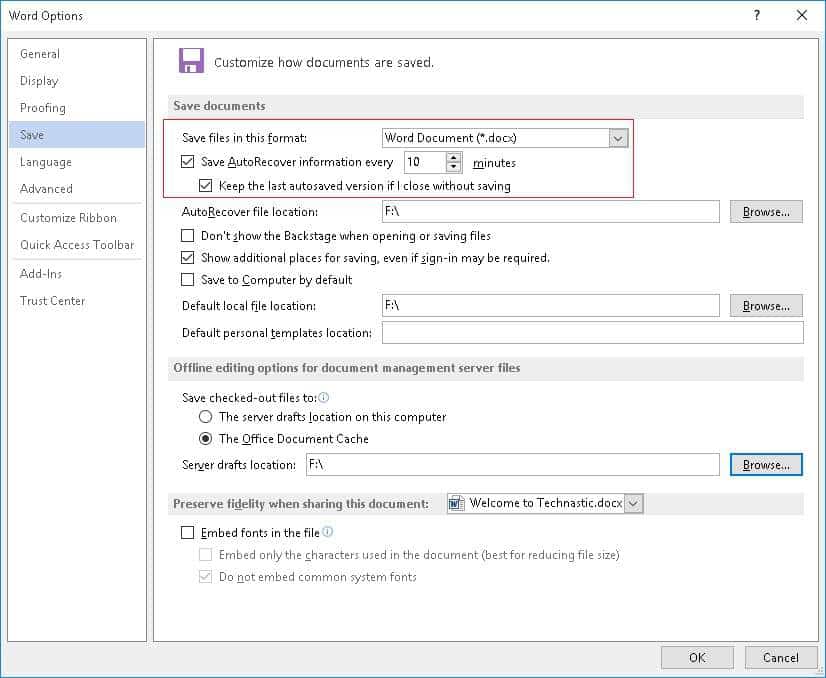
- Under the Save documents section, select the “Save AutoRecover Information every” checkbox and enter the number of minutes in the edit. An auto-backup of the document will be taken automatically at the given intervals of time.
- You can also change the location where you want to save these backup documents by clicking the Browse button next to the AutoRecover file location edit box.
- Once the documents are automatically saved, you can click the info section under the file tab to view the list of versions of the auto-saved documents.

Recover Lost Changes
Once you have enabled the auto-recover feature in the Word document, it will save automatically the versions of that document. Well, let’s see how we can recover these versions to get back the lost changes.
- Open the Word document on your PC and click on the File tab in the top left of the application window.
- From the list of items on the left, click the Info option.
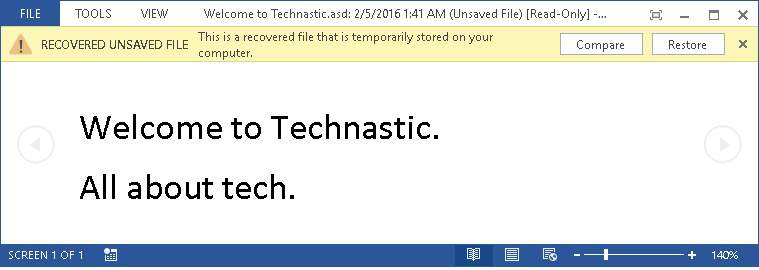
- On the Info screen, the Versions section contains a list of files that were either closed without saving or automatically saved using the AutoRecover feature.
- Now click the version that you want to recover. Now the unsaved file will open in read-only mode with a message on the top of the application window asking whether to compare or restore the unsaved document.
- Click the compare button to view the changes. To fully recover the version file, click the restore button.
- Now a dialog box will appear asking whether to overwrite the existing one with the one you want to restore. Click the OK button.
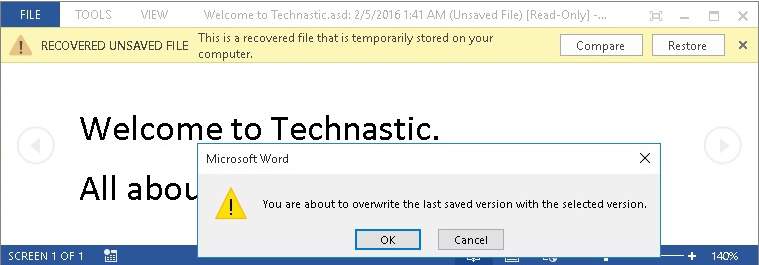
- Press the Ctrl+S keyboard shortcut key combination to save the document.
That’s it. Now you don’t need to worry even if you lose the changes made in the Word document.
Do let us know your valuable suggestions in the below comments section.