Call forwarding is a simple trick that has been available for ages but not many people know about it, especially Android users. Back in 2006 (I’m not sure of the time but it’s certainly before Android and iPhone changed the smartphone industry) when everyone had feature phones, call forwarding was a common and kind of easy task.
With Androids being super popular these days anyone hardly uses a feature phone. Although not many know about it call forwarding is still available in Android but it is kind of hidden deep inside. Here’s how to enable call forwarding on your Android phone.
Disclaimer: For this tutorial I’m using stock Android 5.1.1. The procedure may vary from device to device.
- Tap the “Phone” icon or open your dialer app
- Tap on the three vertical dots on the top right corner of the screen
- Select “Settings”
- On the next screen, select “Calling accounts”
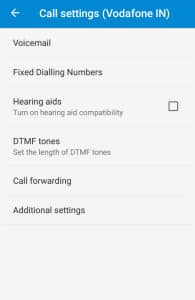
- Now, select the sim whose calls you want to forward
- Select “Call forwarding”
- Now you’ll see four options – Always forward (if this option is selected, all the calls coming to this number will be forwarded to an alternate number), When busy (if this option is selected, the calls coming to your phone when you are talking to someone will be forwarded to an alternate number), When unanswered (if this option is selected, the calls coming to your phone will be forwarded to an alternate number if your phone goes unanswered after few attempts), and When unreachable (if this option is selected, incoming calls will be forwarded to an alternate number if your phone has no signal).
- Select an option as per your need
- Enter the alternate number to which you want calls to be forwarded
- Press “OK” to confirm your actions
Now, depending on your selected option, your calls will be forwarded to an alternate number that you provided.


