Windows Store is an app store for Microsoft Windows and was first made available for Windows 8. Both free and paid apps are available in the Windows Store. Windows Store has undergone a complete revamp for Windows 10 making it easy to navigate and install the apps you want. Windows store is a part of Microsoft’s quest for a single place for all applications. Yet the Windows store is not the go-to place for all the applications because PC users are still unable the find the applications they are looking for.
Microsoft has been trying to push most of the apps to its store. Similar to Android Play store apps, Microsoft apps are large, especially the game apps. These apps occupy large spaces and also take the majority of your internet speed and time. Even after updating the apps, some may not work. By default, all apps are set to auto-update whenever Wi-Fi is available. It’s quite uncomfortable to disable the auto-update feature for each app of Windows 10 store app.
Let’s see how to enable or disable the auto-update feature in Windows 10 store apps.
How to Disable Auto-Update Feature in Windows 10 Store
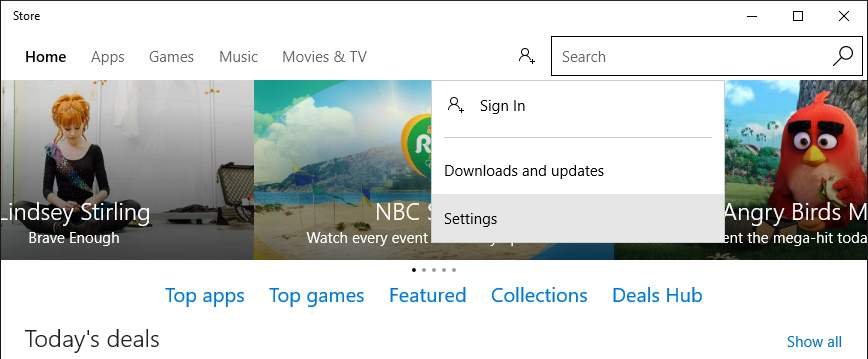
- Open the Windows Store app in your Windows 10.
- Click on the menu icon in the app.

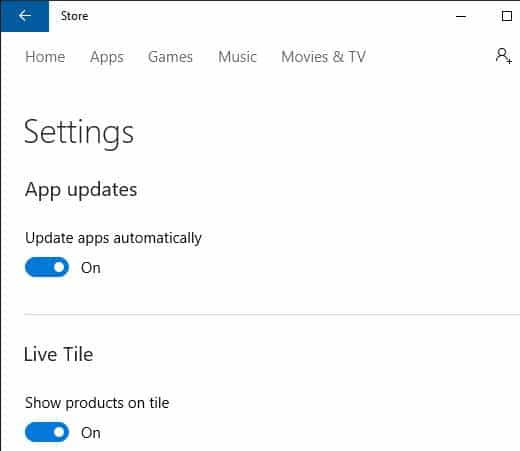
- Select the Settings option and toggle the button under Update apps automatically to toggle the auto-update feature.

You have now successfully disabled the auto-update feature.
After disabling the auto-update feature, go to Store > Menu > Downloads and updates. Here you can update the apps individually by clicking on the update button.
Manually updating the app helps save the data by avoiding heavy downloads and unstable versions of apps. If you can’t update the individual apps, click the Update all button and pause it for unwanted apps.
If you find this tutorial useful, do share it with your friends. Let us know your suggestions in the below comments section.
