In times of crisis, storage and memory are all that we are worried about. In spite of the terabytes and terabytes of data floating around in the cloud, sometimes we just need a file that sits around a megabyte, maybe your thumb-drive is running low on storage, or you cannot upload large documents using e-mail. Whatever the reason might be, the outcome always stays the same – we need compressed files. Well, lucky for you, we’ve got something.
It is without any uncertainty that Microsoft Office is the most used suite on all the Windows machines out there. Name at least 5 people who use an office suite other than Microsoft Office on top of your head. About 95% of Windows users love to use what is the best office experience out there. With the coming of newer Office versions like Office 2016 and Office 2013, Microsoft has added a whole bunch of utility options which you might not even have realized was present.
Some such options allow you to significantly reduce the image size, by using the simple principles of compression and eliminating the image data stored. While it is completely safe to do so, we still recommend you have the original file saved elsewhere just for backup purposes. Without any further ado, let’s have a look on how you can compress images in Microsoft Office files. This procedure works in almost all the Office applications including Word, Publisher, PowerPoint and more.
Compress Images in Microsoft Office Files
- Open up the required document that you wish to have compressed images in. While we’re going to use Microsoft Office Word 2016 for this demonstration, this works for almost all other Office applications that support adding of images.
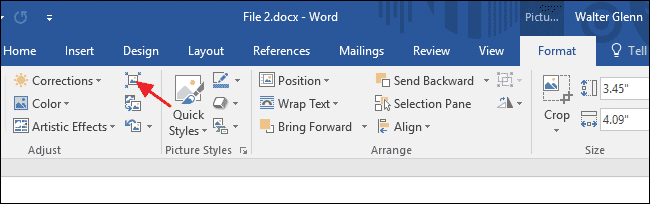
- Once you have your required document, select an image, and you will notice an extra tab pop-up named ‘Format‘. Head over to this tab for further options regarding the image.
- Among all of the complicated options, you should find a small icon which symbolizes an image being shrunk down. This is the ‘Compress Image‘ button that we’ve been looking for.
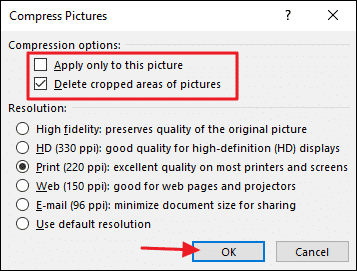
- Furthermore, you will be able to choose if you want to compress only this image or all the images attached in this document. Pick your option, and continue.
- Now, you will have a visual on a whole bunch of options. You can check the ‘delete cropped areas of this picture‘ option if you need a lot of compressions. You also have a lot of resolution options to be precise.
- Depending on the number of images you have attached, Word might take a bit of time to apply the same settings to all of the images.
Voila! With just a few seconds spared, you now have a file size which is significantly smaller to the original one. If you have any queries regarding the tutorial whatsoever, refer us in the comments down below.