It has always been easier to take screenshots on Ubuntu has always been a lot easier than it was on Windows. Unlike Windows, where you had to press the PrtSc key and then paste the captured screenshot in MS Paint or something to get the actual screenshot, all it takes is pressing the PrtSc key. Just doing that saves an image of your entire screen in your Pictures folder. What’s even better is that most Linux desktop environments and distros ship with their screenshot tools in case you need something more than just taking a screenshot of your entire screen.
Sometimes, as in the case of KDE Plasma’s default screenshot tool Spectacle, these tools are enough. Sometimes they’re not. Even Spectacle, which is the best pre-installed screenshot tool I’ve used on any desktop environment, is not enough for many people. Most of what Spectacle or any other pre-built screenshot tool does can be easily done using keyboard shortcuts. If you want to annotate a screenshot without having to open it up in something like GIMP, these screenshot tools won’t be much help. So today we’ll show you how to take a screenshot on Ubuntu (or Linux in general) like a pro.
Taking Screenshots on Ubuntu
1. Using Keyboard shortcuts
As mentioned above, if you want to take a screenshot of the entire screen, just hit the PrtSc key on your keyboard, and the screenshot will be saved in your Pictures folder. But there’s a lot more you can do with keyboard shortcuts than take screenshots of the entire screen. For instance, if you only want to capture a particular area of the screen, you can use the Shift+PrtSc key combination. As soon as you press the keys, the cursor changes into a crosshair that you can drag to draw out a rectangular area.
Everything inside the rectangular area will be saved as a screenshot. Similarly, there are various other keyboard shortcuts to take different kinds of screenshots. The shortcuts below are not Ubuntu-specific and should work across all Linux distros and desktop environments. Also, all of these methods will save the screenshot in the Pictures folder in PNG format unless specified otherwise.
PrtSc – takes a screenshot of the entire screen.
Ctrl+PrtSc – copies a screenshot of the entire screen to the clipboard. This does not save the screenshot anywhere.
Shift+PrtSc – lets you capture a rectangular region on your screen as a screenshot.
Shift+Ctrl+PrtSc – copies the screenshot of a rectangular region on your screen. Does not save the screenshot anywhere.
Alt+PrtSc – takes a screenshot of only the currently active window.
Ctrl+Alt+PrtSc – copies a screenshot of the currently active window to the clipboard. Does not save the screenshot anywhere.
2. Flameshot
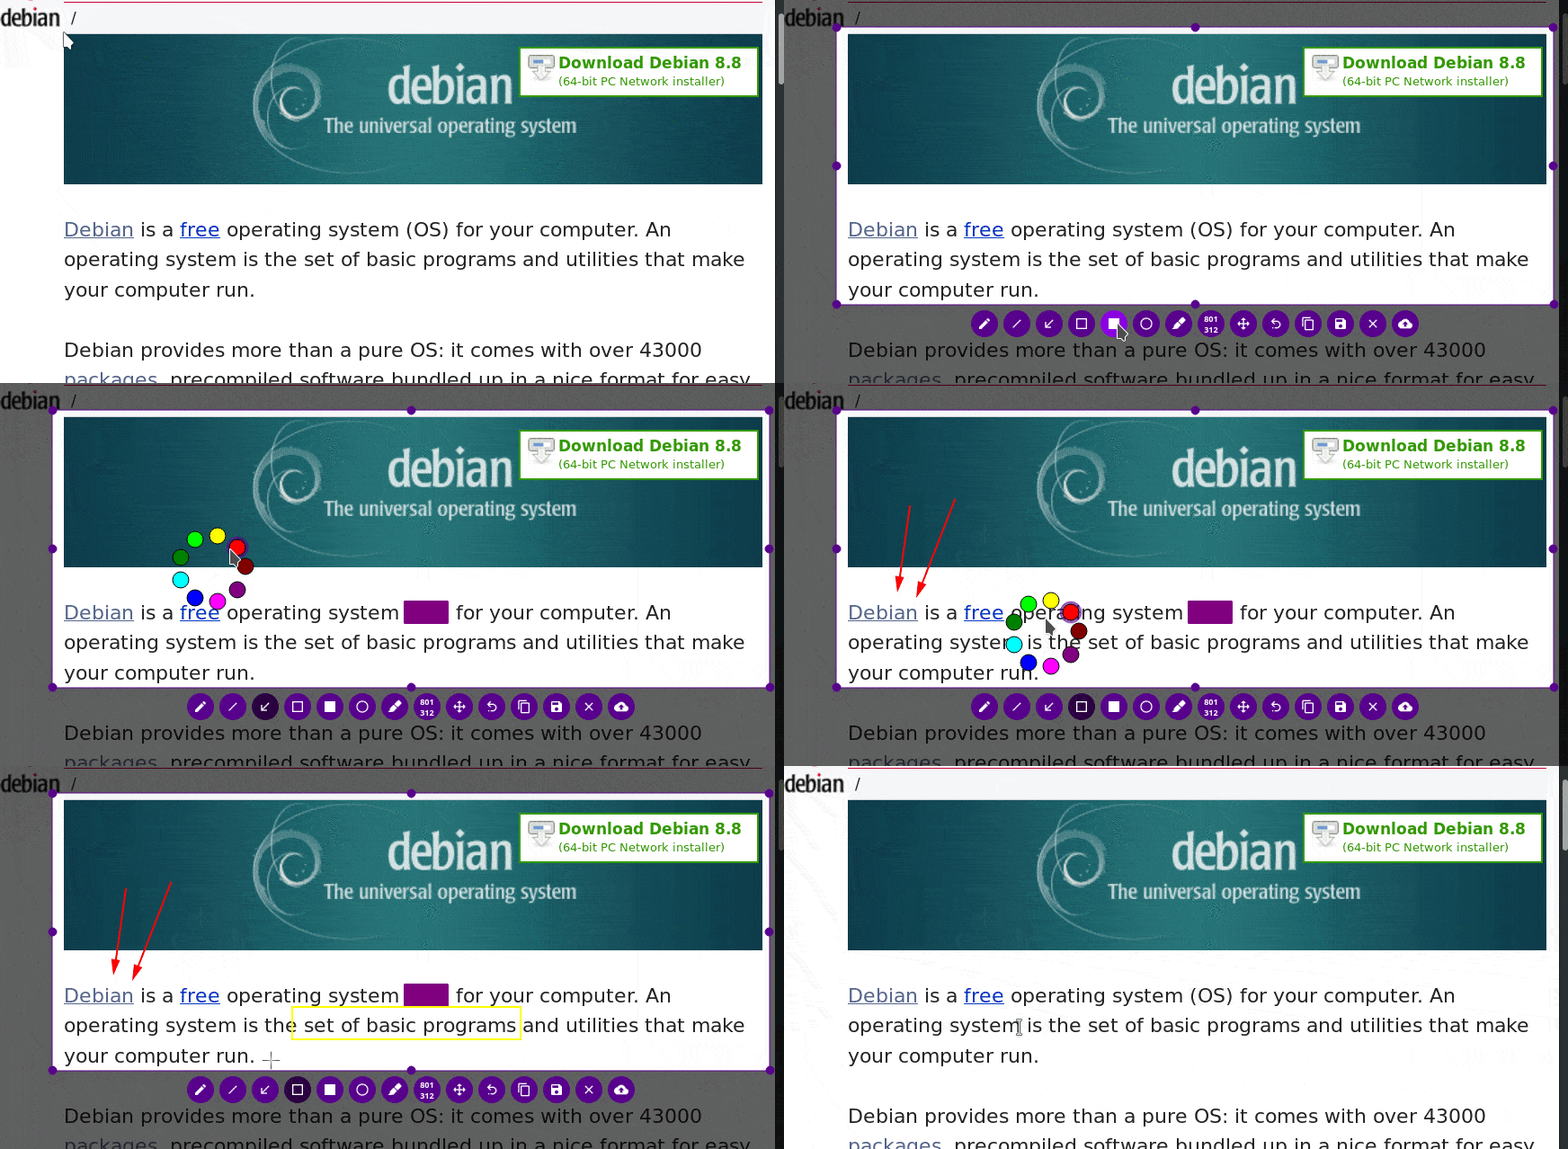
Flameshot is one of the best screenshot tools I have ever tried on Linux. It arrived on the scene last year on GitHub and is under active development. Not only does it let you capture a screenshot, but you can also immediately annotate it without leaving the app. Flameshot also offers other editing features, such as letting users blur a certain part of the image or crop it, or even upload directly to Imgur.
Features
- Customizable appearance.
- Easy to use.
- In-app screenshot annotation and editing.
- Crop image
- Blur a part of the image
- DBus interface.
- Upload to Imgur.
- Open a screenshot in another app
How to install
Flameshot is already included in the Ubuntu repositories, so to install it, all you have to do is search for it in the Software Center and click Install. Or you can cut back on the steps and copy and paste the following command in a Terminal window.
sudo apt install flameshotIn case you’re not using Ubuntu, you can check out their official installation guide at GitHub. It includes instructions for Debian, Arch, Fedora, OpenSUSE, Void Linux, and Docker.

