Most of us have learned from our childhood that RAM is the primary memory and is one of the main components in the computer. What if the RAM size is less or gets filled up? Here comes the concept of virtual memory. One of the features which you can find in any operating system in the world. When there is no space available in RAM, then some of the memory space is restored by transferring some files into the virtual memory. Thereby preventing the PC from slowing down.
Virtual Memory is one of the core factors that determines your system’s performance. Virtual memory size is allocated during the system memory allocation.Low RAM size is one problem for slower performance since it involves cost factor. Best idea is to increase the virtual memory size allocation. But also remember that allocating more virtual memory doesn’t increase the system speed drastically but you can see so some good performance.
As said above the size of the virtual memory is set depending upon the size of the RAM. There is some limit beyond which you should not increase your virtual memory size. Make sure that your virtual memory size is allocated between the one(minimum) to three(maximum) times the size of the RAM installed on your PC. Without much delay let’s see how to change virtual memory allocation size in Windows.
Change Virtual Memory Allocation Size in Windows
Just follow the below simple steps for successful virtual memory allocation on your Windows PC.
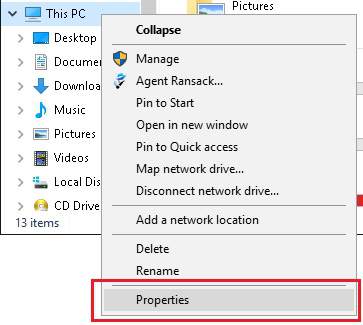
- Open the file explorer or My Computer by using the Start button or by pressing the Win+E shortcut key.
- Right-click on the file explorer and select Properties option.

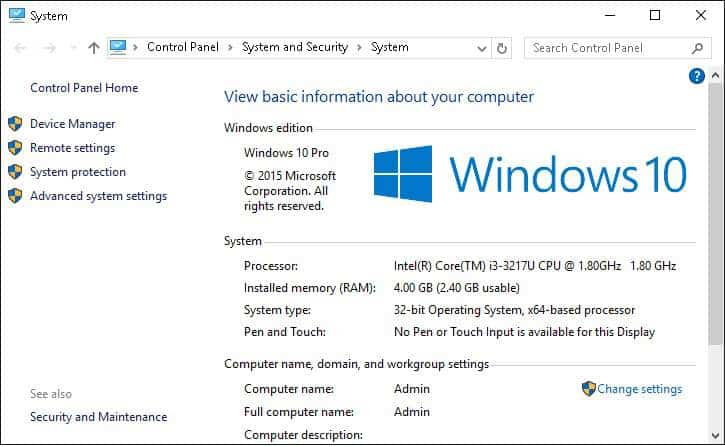
- System window will appear on the screen. Click on Advanced system settings options in the left pane of the system window.

- System properties window will appear on the screen. Select the Advanced tab and click on the Settings buttons under the Performance.

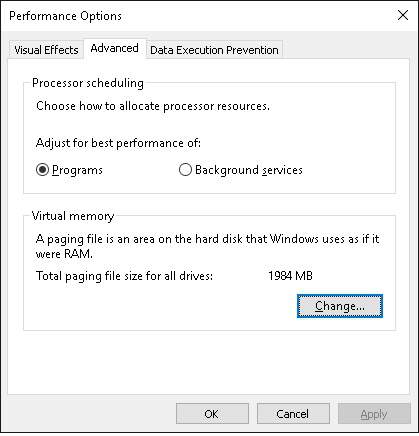
- Click the Advanced tab in Performance option window and then, under Virtual memory, click on Change button.

- Uncheck the Automatically manage paging file size for all drives check box.
- Select the drive under which you want to change the virtual memory size.
- Click on Custom size radio button and enter the Initial size or Maximum size of the memory to be allocated in Megabytes.

- Then, click on Set and OK button. Now restart your computer for the settings to reflect.
That’s it. Isn’t it simple?
If you find this tutorial useful, do share it with your friends. Let us know your suggestions in the below comments section.
