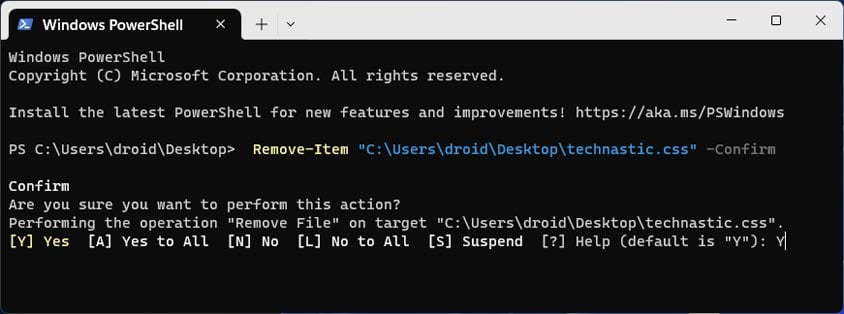
Deleting multiple files or entire folders, specific files from specific folders, or all files in a folder manually may be time-consuming. PowerShell can be very useful in managing files and folders in Windows. In this detailed tutorial, we’ll see how to delete files and folders using PowerShell commands or scripts on Windows 10 and 11.
To delete files or folders using commands, you’ll need to mention the file or folder path in the command window.
Deleting Files via PowerShell
To delete files using a PowerShell command, one must first navigate to the desired location in the CMD or PowerShell window. Using the Remove-Item cmdlet followed by the name and path of the target file, you can delete files in Windows.
Note: You are supposed to replace “File-Path” and “Folder-Path” (highlighted in blue) in the PowerShell commands with the full path of your target file or folder.
A Specific File
Open a PowerShell window on your PC. You can do that by right-clicking and selecting the Open in Terminal option from the context menu.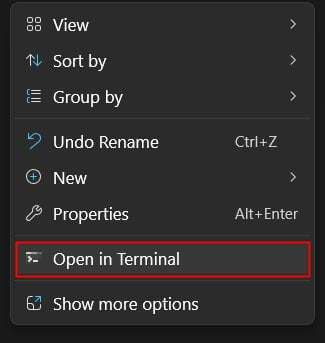
Then execute the following command:
Remove-Item File-Path
Replace the ‘file-path’ in the above cmdlet with the location of the file you want to delete. For example, if you want to delete a file named ‘technastic.css‘ located on your desktop, go to the file, right-click on it, and select the ‘Copy as path‘ option from the context menu.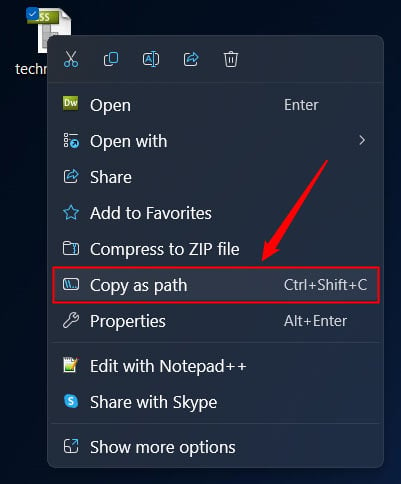
Now, paste the copied file path after the Remove-Item cmdlet as shown below and hit the Enter key to execute the command.
The file will be deleted instantly. Please note that files deleted using this command don’t go to the Recycle Bin.
After Confirmation Prompt
So, if you want PowerShell to prompt you for confirmation before deleting the file permanently, you can add the -Confirm parameter to the above command.
Remove-Item File-Path -Confirm
Hidden and Read-only File
If you want to delete a file that is hidden and read-only, you won’t be able to delete it without adding the -Force parameter the PowerShell command.
Remove-Item File-Path -Force
To see hidden files and folders in Windows, open File Explorer, and click on View > Show > Hidden items.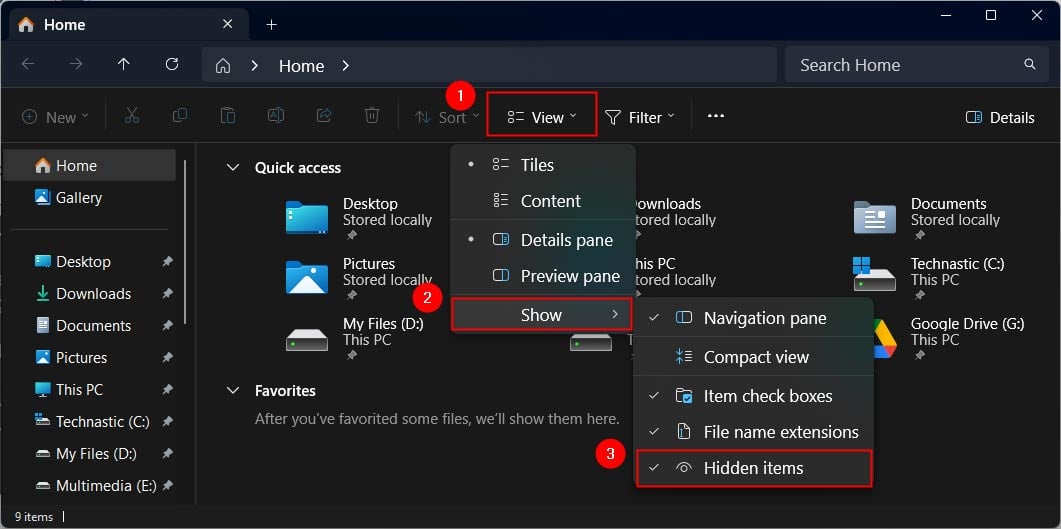
You can then navigate to the location where the hidden file or folder exists.
Multiple Files
The Remove-Item lets you delete multiple files at the same time. To do so, you’ll need to add the paths of the target files separated by commas as shown below.
Remove-Item File1-Path, File2-Path, File3-Path
Thus, if you have to delete 3 files, technastic.png, technastic.jpg, and technastic.txt, you need to mention the paths of all 3 files as follows:
You can also use -Confirm and -Force parameters with the above command.
If a file has a very long name and you can’t delete it, you should use the Del command instead. Here is how to delete files with very long names using PowerShell.
Files Larger or Smaller than a Certain Size
You can easily delete files in a folder by file size with commands. For example, if you want to delete all files (in a folder) larger than a certain size, you can use the following command.
Get-ChildItem -Path Folder-Path -Recurse -File | Where-Object { $_.Length -GT $limit } | Remove-Item
or
Get-ChildItem -Path Folder-Path | Where-Object {$_.Length -GT $limit} | Remove-Item
Tips:
-GT= Greater than
-LT= Lesser than
$limit = File size
For example, to delete all files larger than 100 MB from a folder, you can use the following command:
Get-ChildItem -Path Folder-path -Recurse -File | Where-Object { $_.Length -GT 100MB } | Remove-Item
Similarly, to delete all files that are smaller than 500KB, you can execute the following command:
Get-ChildItem -Path Folder-path -Recurse -File | Where-Object { $_.Length -LT 500KB } | Remove-Item
Certain File Types
Using wild cards, we can include or exclude files in a folder according to their file types or size. If there is a folder that contains various file types (JPG, PNG, Doc, PDF, MP4, MP3, etc.) and you want to delete only PNG files but keep other file types, use the following command:
Get-ChildItem Folder-Path -Recurse -Force -Include *.png | Remove-Item -Force
For example, if you have a folder named ‘Technastic Images ‘ and you want to delete the PNG files only, try this:
Similarly, if you want to delete all file types from a folder but keep files with a certain extension, you can use the -Exclude filter along with a wildcard. For example, to keep all PNG files in a folder but delete files with all other extensions, use the following command in PowerShell:
Get-ChildItem Folder-Path -Recurse -Force -Exclude *.png | Remove-Item -Force
Files Older than XX Days
The Remove-Item cmdlet enables users to add parameters and use custom filters such as the number of days considered ‘old’, specific directories or file extensions to target, and even exclude certain files from deletion based on user-defined criteria. You can set a threshold value denoted by ‘XX days’ to target files that have surpassed their expiration date.
For example, if you want to delete files older than 30 days using PowerShell, you can use the following command:
Get-ChildItem -Path Folder-Path -Recurse -Force | Where-Object { !$_.PSIsContainer -and $_.CreationTime -lt (Get-Date).AddDays(-30) } | Remove-Item -Force -Recurse
Deleting Folders Using PowerShell
By leveraging PowerShell commands, you can eliminate unwanted or obsolete folders. To initiate the process, begin by opening a PowerShell window directly within a directory where the target folder is located. You can then use the Remove-Item cmdlet followed by the location of the desired folder to execute folder deletion commands. Once executed, the command will delete all subfolders and files within that specific folder.
A Specific Folder
To delete a specific folder in Windows 10 or 11 using a PowerShell command, do as follows.
Navigate to the directory where the target folder is located and launch a PowerShell window from the Windows Context Menu. To delete a specific folder with all its files, execute the following command in the Terminal window:
Remove-Item Folder-Path
For example, if you want to delete a folder named ‘Duplicate Photos’ located in the E Drive, go to the folder and open a PowerShell window from the context menu. Then right-click on the target folder and select the Copy as path option. Now, paste the folder path after the Remove-Item cmdlet.
Remove-Item "E:\Duplicate Photos"
Hit Enter, and the folder will be deleted instantly if it’s empty. However, if the folder has sub-folders, you’ll need to type ‘Y‘ when prompted to confirm the deletion of the folder along with all files and sub-folders within it.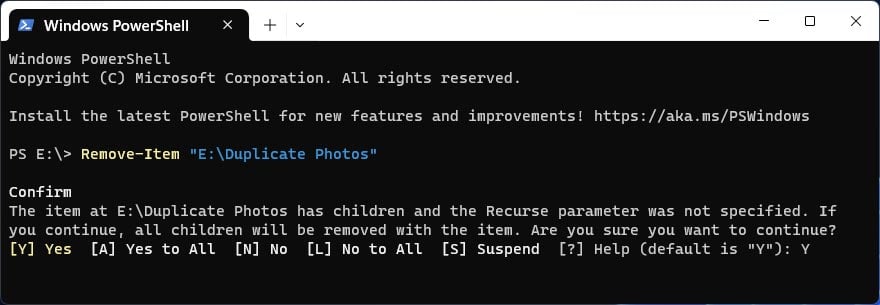
Multiple Folders
You can also delete several folders using PowerShell commands.
Remove-Item Folder1-Path, Folder2-Path, Folder3-Path
For example, if you want to delete a folder named ‘Technastic’ located on your Desktop, a folder named ‘Old Files’ on the D Drive, and another folder named ‘Duplicate Photos’ located on the E Drive, use the command as shown below:
Remove-Item "C:\Users\droid\Desktop\Technastic", "E:\Duplicate Photos", "D:\Old Files"
All Files in a Folder
If you want to delete all files present in a folder but keep the folder, you’ll need to add a wildcard (\*.*) to the Remove-Item command to do that. This wild card instructs the command to include all files with any extension during the deletion.
Remove-Item Folder-Path\*.*
Thus, if the target folder’s path is “E:\Duplicate Photos“, insert “\*.*” right before the closing inverted commas as shown below.
Remove-Item "E:\Duplicate Photos\*.*"
All Files and Subfolders
One of the most common needs when deleting files and folders is to delete an entire folder with all its subfolders and files. With PowerShell, you can easily achieve this using the Remove-Item command with the -Recurse and -Include parameters.
For example, if you want to delete a folder named “Documents” located in your C Drive, along with all its subfolders and files, you can use the following command:
Remove-Item Folder-Path -Recurse -Include *.*
For example, if you want to delete all contents within the ‘Documents’ folder without prompting for confirmation, you can use the above command as follows:
Remove-Item "C:\Users\droid\Documents" -Recurse -Include *.*
All Empty Folders
By using the Get-ChildItem command in conjunction with the Remove-Item cmdlet and filters, you can delete all empty folders with no content. Use the command given below to do that:
Get-ChildItem -Recurse Directory-Path | where { $_.PSISContainer -and @( $_ | Get-ChildItem ).Count -eq 0 } | Remove-Item
That’s all for now! I hope this tutorial will help you delete files and folders using PowerShell commands like a pro and manage your files more efficiently.
Read Next: How to Enable God Mode in Windows 10 and 11
Source: Microsoft

