With the grand release of Microsoft’s latest Windows, ideas and evolutions in the minds of the makers of Windows have evolved. To compete with the growing competition such as with Chromebooks, and Android tablets, Windows had to drop down some options and settings by default to be able to make the most out of Windows 10. One such powerful feature that it had to disable by default is System Restore.
The reason behind this is that Microsoft wanted to preload Windows 10 on devices sporting as little as 16 Gigs of onboard storage. And, System Restore, as we all know requires some 5-10 Gigs of storage itself to be able to make backups, and restore them in case of emergency. While you won’t be able to enable System Restore on such devices, the part where Microsoft tripped was disabling it on most of the Windows 10 machines, whether it had 16 Gigs of storage, or was backed up by Terabytes of data.
If your Windows 10 machine is suffering from such a problem, follow our definite guide below to enable System Restore on your Windows 10 computer/laptop/tablet. Let’s start.
Enable System Restore on Windows 10
Enabling System Restore on your Windows 10 device will once again act as a source of backup, in case something goes wrong, and your system decides to stop functioning properly ever again. However, many Windows 10 users try to find the option using the new Settings application, but that would do no good. To find the option, you have to use the classic Control Panel or the Windows Search option from the start menu. We will be using the latter option.
- First, click the Windows button to let the Start Menu emerge.
- From there, start typing the following keyword – ‘Restore’.
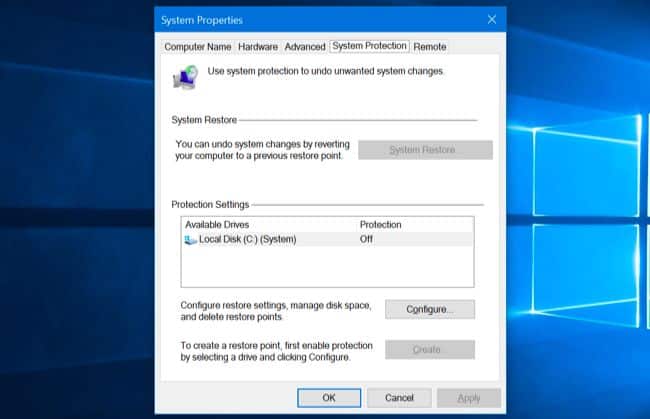
- Wait for a moment, before the ‘Create a Restore Point‘ option appears in the search results. Click it to hop into the System Restore settings.
- Inside the little window, under the tab ‘Protection Settings’, you will see that Protection has been disabled, or it is simply ‘Off’.
- To find the option to enable it back, click on ‘Configure‘.

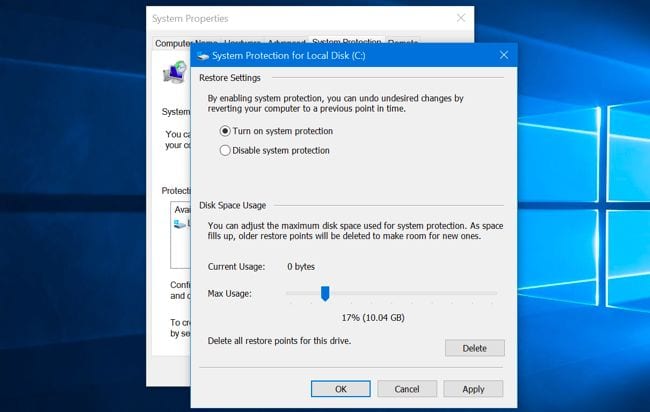
- Under Restore Settings, click the radio button which reads ‘Turn on system protection‘.

- Finally, you need to provide System Restore with the amount of space it can use. Remember, more is better here. The less space you choose, the worse the chances are of your files disappearing. Ideally, you can provide it with 10 Gigs.
This ensures that you have enabled System Restore on Windows 10, and have called it a day. But, it is much more than that. If, anytime in the future, you accidentally delete a system file or a personal user file, you can use the same option to revert to the original state. If you think we’ve helped you with today’s guide, feel free to surf around our space for more tips and tricks.
