Using the Windows Registry Editor or Regedit, advanced users can make system or UI-level changes in the OS. In this tutorial, you’ll find a big collection of Windows 10 Registry Editor mods, tweaks, and settings that can improve performance, add or remove a feature, and customize your Windows PC to enrich your experience. Many of these Registry hacks also work in Windows 11 as well.
We have already discussed some Windows Registry Editor hacks that allow you to install Windows 11 on any PC with unsupported CPUs or TPM, enable or disable news and interests in the taskbar, and replace PowerShell with Command Prompt.
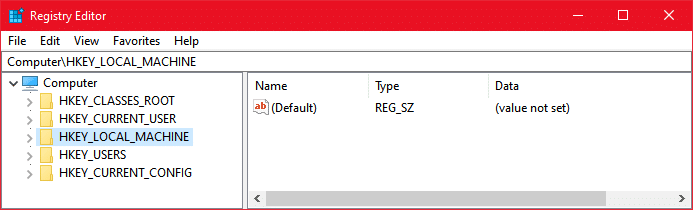
The Registry is a database of sensitive and low-level configurations on Windows PCs. All the settings and options found in the Windows OS and the installed apps are contained in the keys and subkeys, and their values are placed hierarchically under the root keys. When it comes to Windows 10, there are 5 types of root keys you’ll find in the Registry Editor.
- HKEY_CLASSES_ROOT or HKCR
- HKEY_CURRENT_USER or HKCU
- HKEY_LOCAL_MACHINE or HKLM
- HKEY_USERS or HKU
- HKEY_CURRENT_CONFIG or HKCC
These root keys store the database of keys and subkeys under separate folders that are arranged in hierarchical order. We can customize our Windows computer by making changes in certain Registry keys or changing their values.
Warning: As I already said Windows Registry is a very sensitive thing. Messing with it without proper understanding An incorrect change in the keys, subkeys, or their values, may have serious consequences. Please follow this guide carefully.
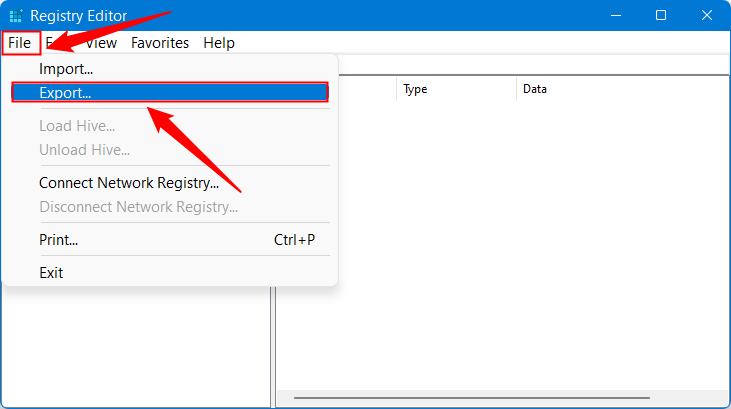
Taking a Backup of the Registry Editor
- Open the Registry Editor, click File, and select Export.

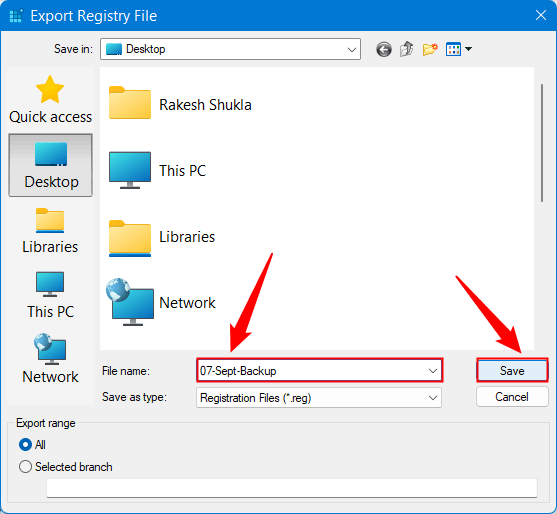
- Now, assign a name to the backup file, choose a location to save it, and click the Save button.

Anyway, without any further ado, let’s check out the Windows 10 Registry Editor tweaks. Did you know that you can access all the settings of your PC easily in one location? Yes, you can do that by enabling the God Mode folder on your Windows 10 or 11 PC.
1. Install Windows 11 with Unsupported CPU & TPM
Do you have an old PC that does not meet the minimum hardware requirements to install Windows 11? A simple Registry hack can make the Windows 11 installer skip checking for the required CPU and TPM 2.0.
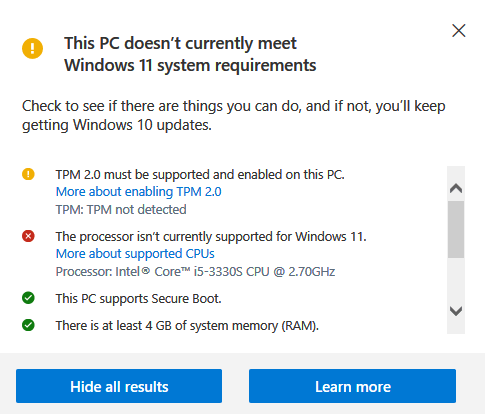
I used this Registry tweak to install Windows 11 on my 8-year-old Dell All-in-One PC and HP laptop with Intell Core i3 CPU. Just follow the steps given below.
- Open the Registry Editor and go to the following path or paste the following address in the Registry Editor address bar:
HKEY_LOCAL_MACHINE\SYSTEM\Setup\MoSetup
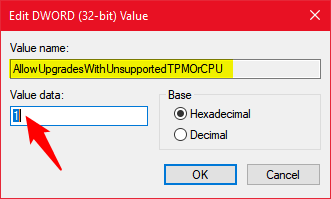
- Now, right-click on MoSetup and select New > DWORD (32-bit) Value from the context menu.
- Rename the newly created entry to AllowUpgradesWithUnsupportedTPMOrCPU.
- Then double-click this file and change the Value data to 1.

- Now, click OK to save it.
You are all set to install Windows 11 on your old laptop or desktop with unsupported hardware. Just open the Windows 11 ISO in File Explorer, double-click the setup.exe, to launch the installer, and follow the on-screen instructions.
If the above trick doesn’t work, head to our exhaustive tutorial describing 5 ways to install Windows 11 on old PCs with unsupported hardware for more details.
2. Add an App to the Desktop Context Menu
There is another cool Registry hack using which you can add an app shortcut to the desktop context menu. The trick works well in Windows 10 and 11. Besides this registry hack, there are some more ways to customize the Windows 10 context menu as well.
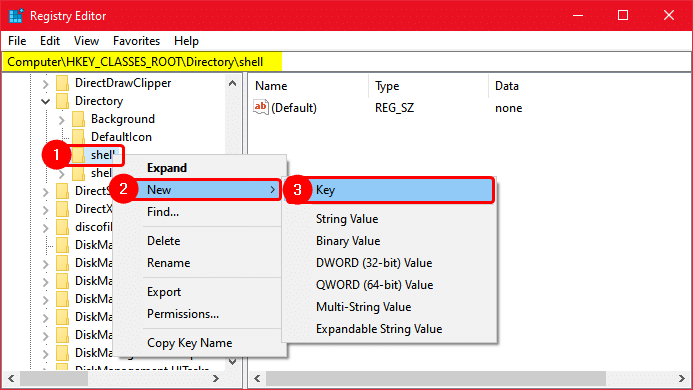
- Open the Registry Editor and navigate to the following path:
HKEY_CLASSES_ROOT\Directory\Background\shell
- Right-click on the shell sub-folder, and choose New > Key.

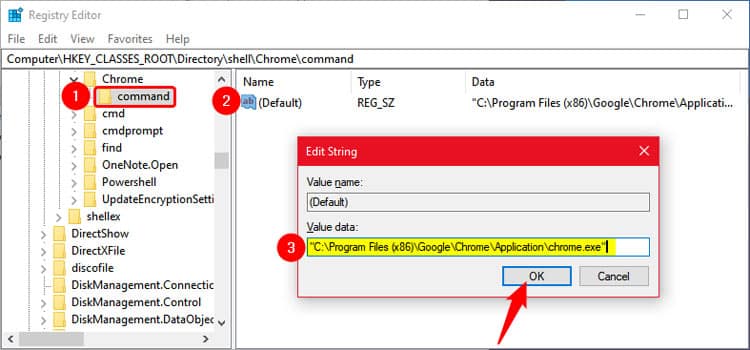
- Now, assign a name to the newly-created Key. The name must correspond to the app name you want to add to the desktop context menu. I want to add Chrome.

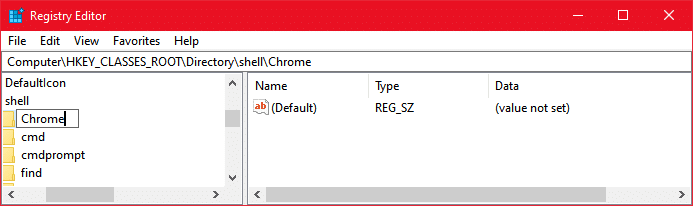
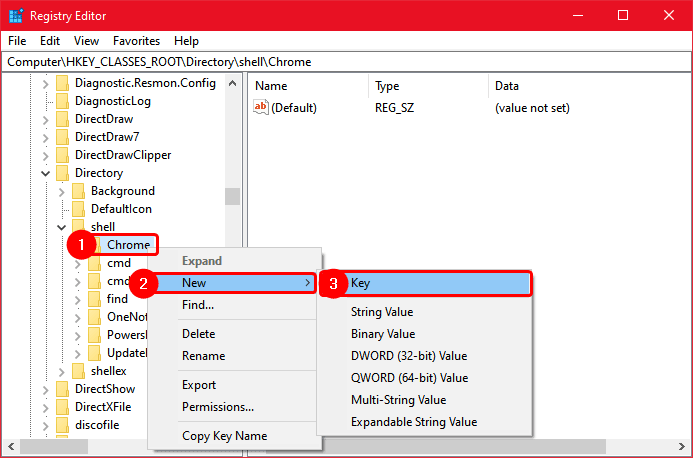
- Now, right-click on the Chrome key and choose New > Key.

- When the new key is created under Chrome, rename it to ‘command‘.
- Then double-click on the (Default) key and paste the full path of the chrome.exe in the Value data field as shown below. To copy the full path of the Chrome executable file, navigate to ‘C:\Program Files (x86)\Google\Application\chrome.exe‘. Select ‘chrome.exe‘, press Shift + Right-Click, and choose the Copy as Path option from the context menu.

- Finally, click OK to save the changes you made. Chrome will be added to your desktop context menu.
3. Secure the Virtual Memory on Your PC
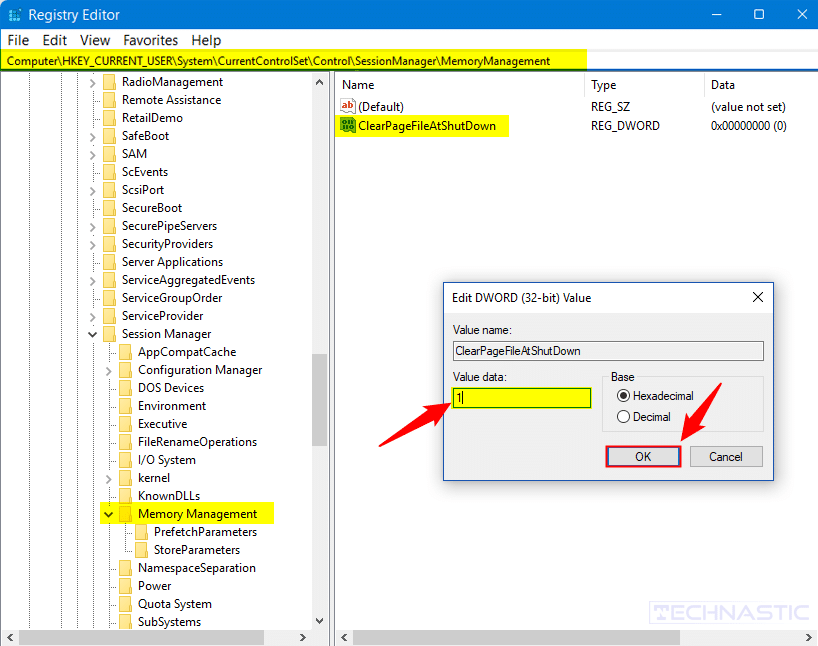
We all know that computers use RAM to perform tasks. When your PC requires more memory, it makes use of a part of the hard disk as virtual memory. This process is controlled by a system paging file that contains important information sent to it by RAM. The paging file stays in the computer when after it’s shut down. A hacker with access to your PC might access that information and analyze the contents of the paging file.
By configuring the paging file-clearing rule in the Registry Editor, you can enhance the security of the virtual memory on your Windows 10 PC.
- Navigate to the following path in the Registry Editor.
HKEY_CURRENT_USER\System\CurrentControlSet\Control\SessionManager\MemoryManagement
- Click on Memory Management and then double-click on ClearPageFileAtShutDown on the right-hand pane.
- Change the Value from ‘0‘ to ‘1‘.

- Click OK to save the changes and restart your computer. From now on, your Windows 10 PC will clear the paging file every time you shut it down.
4. Enable Verbose Mode
Like other operating systems, Windows too has a Verbose Mode that displays status messages related to the processes of the Windows system. When enabled, the Verbose mode displays the background operations while starting, shutting down, restarting, etc. Below are some examples of Verbose status messages to give you a clear idea of what they are.
- Starting Windows
- Applying your personal settings
- Please wait for the User profile to load
- Preparing your Desktop
- Shutting down application
- Shutting Down
- Windows is preparing to shut down the computer
If you want to enable these status messages so that you can learn about system progress while it performs background tasks, you can do that using the following Windows 10 registry hack.
- Launch the Registry Editor and navigate to the following path:
HKEY_LOCAL_MACHINE\SOFTWARE\WOW6432Node\Microsoft
- Now, right-click on Microsoft and choose New > DWORD (32-bit).
- Assign “VerboseStatus” as a name to this new entry.
- Having renamed it, double-click VerboseStatus and change its value to 32.
Verbose Mode will be enabled after you restart your PC.
5. Boost your Network Connection Speed
The following Registry tweak would help you boost the speed of your Internet connection.
- Open the Registry Editor and go to the following path:
HKEY_LOCAL_MACHINE\SYSTEM\CurrentControlSet\Services\LanmanServer\Parameters
- Right-click on Parameters and choose New > DWORD (32-bit) from the context menu.
- Name this new entry “IRPStackSize“.
- Now double-click IRPStackSize, change its value to 32. and click OK to save the changes.
- That’s it. Just restart your computer and you will experience a noticeable boost in your network speed.
6. Enable Dark Mode
While it’s very easy to turn on the Dark Mode through Windows personalization settings, you can also do it through the Registry Editor. To enable the Dark Mode in Windows, follow the quick steps given below.
- Launch the Registry Editor.
- Navigate to the following location:
HKEY_CURRENT_USER\SOFTWARE\Microsoft\Windows\CurrentVersion\Themes\Personalize
- Right-click on Personalize and create a New > DWORD (32-bit) 32 key.
- Name this new key “SystemUsesLightTheme“.
- Now double-click this key and set its Value to o (zero).
- Finally, reboot your PC.
7. Disable Action Center in Windows 10 via Registry
Microsoft introduced a dedicated notification center which is known as Action Center. Some people might find this feature useful. However, if you don’t want to be bugged by notification pop-ups, you can simply disable the Action Center using the Registry hack given below.
- In the Registry Editor, go to the following address:
HKEY_CURRENT_USER\Software\Policies\Microsoft\Windows
- Right-click on Windows and then choose New > Key.
- Rename this new key to “Explorer“.
- Now, right-click on Explorer and select New > DWORD (32-bit).
- Name this new DWORD entry “DisableNotificationCenter“.
- Double-click DisableNotificationCenter and change the Value to 1.
Done! Just restart your computer and the notification pop-ups from the Action Center won’t bother you anymore.
8. Make Taskbar Transparent
Windows 10 comes with a host of personalization settings to change the look and feel of the UI. It does offer an option to add color tint and transparency effect to the Windows Explorer and desktop elements. However, there is nothing you can do to make the Windows 10 taskbar transparent. Fortunately, there’s a Windows 10 taskbar registry tweak that can make the taskbar more transparent.
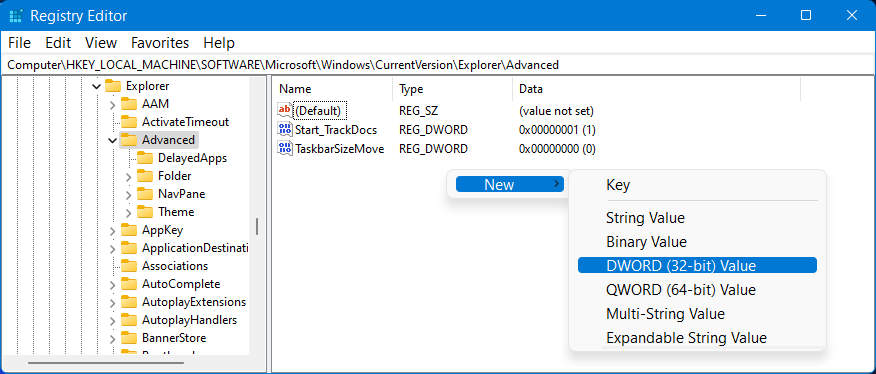
- Open the Registry Editor and navigate to the following path:
HKEY_LOCAL_MACHINE\SOFTWARE\Microsoft\Windows\CurrentVersion\Explorer\Advanced
- Now, right-click on an empty area in the right-hand pane of the window and select New > DWORD (32-bit) Value.

- Assign “UseOLEDTaskbarTransparency” as a name to this new value.
- After that, right-click on UseOLEDTaskbarTransparency, choose Modify from the context menu, and change its Value to ‘1‘.
- Close the Registry Editor window, right-click on the desktop, go to Personalization > Color, and click the toggle button next to Transparency effects to turn transparency off for a moment and then turn it on again. That’s it!
Alternatively, you can also use an app named Translucent TB to make the taskbar transparent in Windows 10 and 11.
9. Hide Default Folders in This PC Window
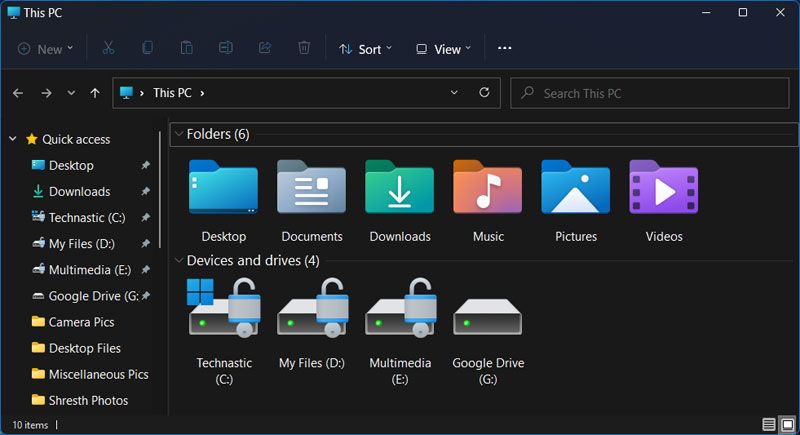
You must have seen system folders like Desktop, Documents, Downloads, Music, Pictures, and Videos in This PC window. These folders are mostly useless and serve only as clutter. If you want a cleaner File Explorer, there is a way to keep them hidden using a Registry Editor hack.
- Head over to the following path in the Registry Editor.
HKEY_LOCAL_MACHINE\SOFTWARE\Microsoft\Windows\CurrentVersion\Explorer\FolderDescriptions
- Since each of these folders in This PC has a unique GUID, you’ll have to either look for the following GUIDs or just paste them after FolderDescriptions to find them directly.
- Desktop:
{B4BFCC3A-DB2C-424C-B029-7FE99A87C641} - Documents:
{f42ee2d3-909f-4907-8871-4c22fc0bf756} - Downloads:
{7d83ee9b-2244-4e70-b1f5-5393042af1e4} - Music:
{a0c69a99-21c8-4671-8703-7934162fcf1d} - Pictures:
{0ddd015d-b06c-45d5-8c4c-f59713854639} - Videos:
{35286a68-3c57-41a1-bbb1-0eae73d76c95}
- Desktop:
- You’ll see a key named PropertyBag under each of these keys. Click on it and you will see ThisPCPolicy.
- By default, the value of the ThisPCPolicy for the folder is Show, so that it’s visible in This PC.
- Double-click ThisPCPolicy and replace ‘Show‘ with ‘Hide‘.

- Click OK.
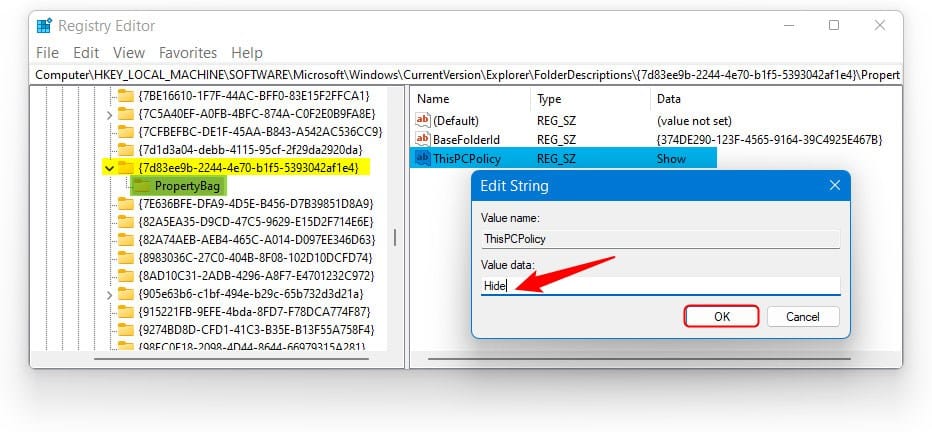
You can follow the same steps to hide other folders as well.
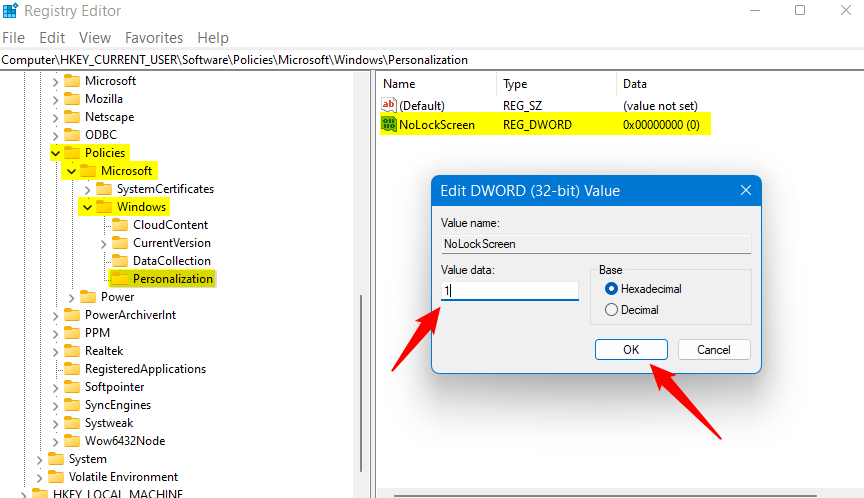
10. Disable Windows 10 Lockscreen
Whether it’s a smartphone or computer, the lock screen works as a primary layer of security. One needs to enter a PIN or password to get past the lock screen and access the device. However, if you use your Windows PC in a secured environment where you can do without the lock screen, you can disable it using the Registry Editor hack mentioned below.
- Open the Registry Editor and go to the following path.
HKEY_LOCAL_MACHINE\SOFTWARE\Policies\Microsoft\Windows
- Right-click on Windows and choose New > Key from the context menu.
- Name this new key “Personalization” and press the Enter key.
- Now, right-click on Personalization and choose New > DWORD (32-bit) Value.
- Name this DWORD entry “NoLockScreen“.
- Double-click NoLockScreen and change its Value data from ‘0‘ to ‘1‘.

- Finally, click on the OK button and reboot your PC.
11. Enable Balloon Notifications
Windows 10 shows toast notifications by default. If you want to try a different look, you can have your notifications in balloon form. You can use the following Registry Editor tweaks to change toast notifications to balloon ones.
- Open Registry Editor and go to the following location:
HKEY_CURRENT_USER\Software\Policies\Microsoft\Windows\Explorer
- In the right-hand side pane, right-click on a blank space and choose New > DOWRD (32-bit) Value.
- Name the newly-created DWORD “EnableLegacyBalloonNotifications“.
- Now, double-click EnableLegacyBalloonNotifications and change the Value to ‘1‘.

- Click OK and then restart your PC.

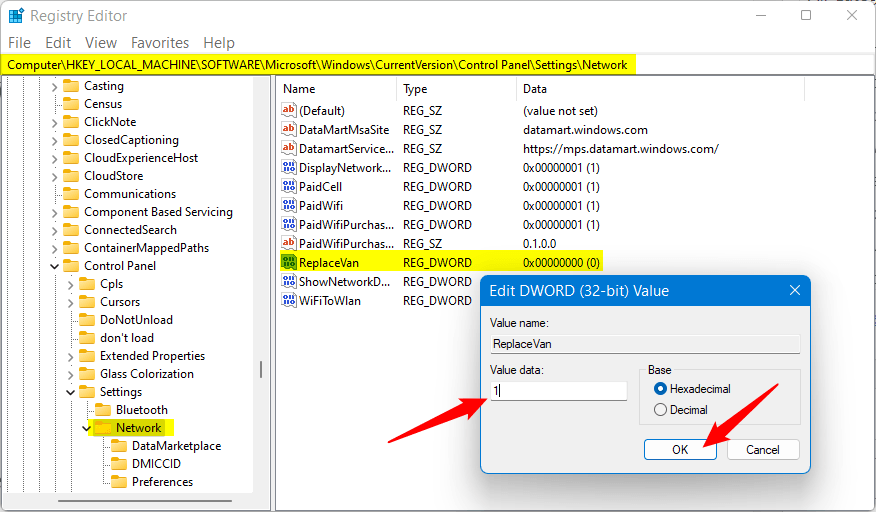
12. Disable Network Fly-out UI
Windows 10 comes with a new network fly-out user interface. If you think that the network fly-out UI in Windows 7 or Windows 8 sidebar was better, you can get the older UI of your choice in Windows 10 using a little Registry Editor tweak.
- Open the Registry Editor and go to the following location.
HKEY_LOCAL_MACHINE\SOFTWARE\Microsoft\Windows\CurrentVersion\Control Panel\Settings\Network
- Right-click on the Network directory, select Permissions, and take ownership of the Registry key.
- Having taken ownership of the Network key, right-click on the ReplaceVan DWORD key in the right panel of the window and select Modify.
- Depending on your choice, change the Value data to 0, 1, or 2.
- 0: Default Windows 10 fly-out.
- 1: Open the Network settings window.
- 2: Windows 8-style sidebar.
- Click on the OK button and reboot your machine.

13. Enable Jump List
Jump list is a Windows-specific feature. It pops up when a user performs a right-click on a taskbar or Start menu item. The list provides quick links related to a program. It’s a really useful feature and if you don’t have it on your Windows 10 PC, you can enable it with a little Registry Editor tweak.
- Go to the following path in Registry Editor.
HKEY_CURRENT_USER\SOFTWARE\Microsoft\Windows\CurrentVersion\Explorer\Advanced
- Right-click on the Advanced directory and create a new key by choosing New > DWORD (32-bit) Value.
- Rename this new DWORD file to “EnableXamlJumpView“.
- Now, right-click on EnableXamlJumpView and set the Value data to ‘1‘.
- Restart your PC for the changes to take effect.
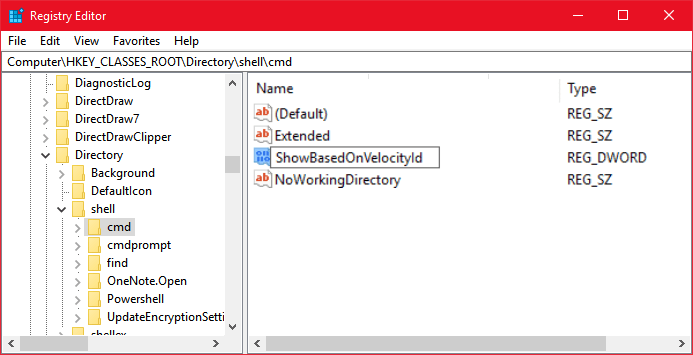
14. Add Command Prompt to Context Menu
Windows 10 build 14791 update replaced the Command Prompt with PowerShell as the default terminal app. If you want to add the good old CMD to the Windows context menu, it can be done using the Registry Editor hack described below. This way, you can always launch the Command Prompt with a file or folder path without manually typing a file’s location.
- Navigate to the following location in the Registry Editor:
HKEY_CLASSES_ROOT\Directory\shell\cmd
- Now, you’ll need to rake ownership of the “cmd” key. If you don’t know how you can take ownership of a registry key, read our detailed tutorial.
- Having taken ownership of “cmd“, right-click “HideBasedOnVelocityId” and choose the Rename option.
- Then rename it to “ShowBasedOnVelocityId“.

- Just restart your Windows PC and you should be able to see the “Open command prompt window here“option in the right-click context menu.
15. Replace Photos App with Windows Photo Viewer
Microsoft replaced the Windows Photo Viewer app with the Photos app with the Windows 10 update. The Photos app is a bit slow as you have to wait for a few seconds before it displays an image. The Windows Photo Viewer seems to have been removed from Windows 10 and 11, but it’s still present in the OS as ‘photoviewer.dll’. All you need to do is to make some changes to specific registry keys so that the Photo Viewer app can be associated with all known image formats like BMP, DIB, JFIF, JPE, JPEG, JPG, PNG, TIFF, WEBP, etc.
You can either install the Registry mod file provided below or create it manually and then apply it.
- Download restore_photo_viewer_win_10_11.zip and unzip it using a Zip extractor.
- Open the extracted folder and double-click the ‘.reg‘ file.
- A User Account Control window will pop up. Select Yes to install the Registry mod.
- That’s it. You can now right-click any image file, select the ‘Open with‘ option, and select Windows Photo Viewer as the default program to open image files.
Alternatively, you can create the above Registry Editor mod file manually. Just follow the steps given below.
- Open the Notepad app on your PC.
- Now, paste the following code to the blank Notepad file.
Windows Registry Editor Version 5.00 [HKEY_LOCAL_MACHINE\SOFTWARE\RegisteredApplications] "Windows Photo Viewer"="Software\\Microsoft\\Windows Photo Viewer\\Capabilities" [HKEY_LOCAL_MACHINE\SOFTWARE\Microsoft\Windows Photo Viewer\Capabilities] "ApplicationDescription"="@%ProgramFiles%\\Windows Photo Viewer\\photoviewer.dll,-3069" "ApplicationName"="@%ProgramFiles%\\Windows Photo Viewer\\photoviewer.dll,-3009" [HKEY_LOCAL_MACHINE\SOFTWARE\Microsoft\Windows Photo Viewer\Capabilities\FileAssociations] ".bmp"="PhotoViewer.FileAssoc.Bitmap" ".dib"="PhotoViewer.FileAssoc.Bitmap" ".gif"="PhotoViewer.FileAssoc.Tiff" ".jfif"="PhotoViewer.FileAssoc.JFIF" ".jpe"="PhotoViewer.FileAssoc.Jpeg" ".jpeg"="PhotoViewer.FileAssoc.Jpeg" ".jpg"="PhotoViewer.FileAssoc.Jpeg" ".png"="PhotoViewer.FileAssoc.Png" ".tif"="PhotoViewer.FileAssoc.Tiff" ".tiff"="PhotoViewer.FileAssoc.Tiff" ".wdp"="PhotoViewer.FileAssoc.Wdp" ".webp"="PhotoViewer.FileAssoc.Jpeg" [HKEY_LOCAL_MACHINE\SOFTWARE\Classes\PhotoViewer.FileAssoc.Bitmap] "ImageOptionFlags"=dword:00000001 "FriendlyTypeName"=hex(2):40,00,25,00,50,00,72,00,6f,00,67,00,72,00,61,00,6d,\ 00,46,00,69,00,6c,00,65,00,73,00,25,00,5c,00,57,00,69,00,6e,00,64,00,6f,00,\ 77,00,73,00,20,00,50,00,68,00,6f,00,74,00,6f,00,20,00,56,00,69,00,65,00,77,\ 00,65,00,72,00,5c,00,50,00,68,00,6f,00,74,00,6f,00,56,00,69,00,65,00,77,00,\ 65,00,72,00,2e,00,64,00,6c,00,6c,00,2c,00,2d,00,33,00,30,00,35,00,36,00,00,\ 00 [HKEY_LOCAL_MACHINE\SOFTWARE\Classes\PhotoViewer.FileAssoc.Bitmap\DefaultIcon] @="%SystemRoot%\\System32\\imageres.dll,-70" [HKEY_LOCAL_MACHINE\SOFTWARE\Classes\PhotoViewer.FileAssoc.Bitmap\shell\open\command] @=hex(2):25,00,53,00,79,00,73,00,74,00,65,00,6d,00,52,00,6f,00,6f,00,74,00,25,\ 00,5c,00,53,00,79,00,73,00,74,00,65,00,6d,00,33,00,32,00,5c,00,72,00,75,00,\ 6e,00,64,00,6c,00,6c,00,33,00,32,00,2e,00,65,00,78,00,65,00,20,00,22,00,25,\ 00,50,00,72,00,6f,00,67,00,72,00,61,00,6d,00,46,00,69,00,6c,00,65,00,73,00,\ 25,00,5c,00,57,00,69,00,6e,00,64,00,6f,00,77,00,73,00,20,00,50,00,68,00,6f,\ 00,74,00,6f,00,20,00,56,00,69,00,65,00,77,00,65,00,72,00,5c,00,50,00,68,00,\ 6f,00,74,00,6f,00,56,00,69,00,65,00,77,00,65,00,72,00,2e,00,64,00,6c,00,6c,\ 00,22,00,2c,00,20,00,49,00,6d,00,61,00,67,00,65,00,56,00,69,00,65,00,77,00,\ 5f,00,46,00,75,00,6c,00,6c,00,73,00,63,00,72,00,65,00,65,00,6e,00,20,00,25,\ 00,31,00,00,00 [HKEY_LOCAL_MACHINE\SOFTWARE\Classes\PhotoViewer.FileAssoc.Bitmap\shell\open\DropTarget] "Clsid"="{FFE2A43C-56B9-4bf5-9A79-CC6D4285608A}" [HKEY_LOCAL_MACHINE\SOFTWARE\Classes\PhotoViewer.FileAssoc.JFIF] "EditFlags"=dword:00010000 "ImageOptionFlags"=dword:00000001 "FriendlyTypeName"=hex(2):40,00,25,00,50,00,72,00,6f,00,67,00,72,00,61,00,6d,\ 00,46,00,69,00,6c,00,65,00,73,00,25,00,5c,00,57,00,69,00,6e,00,64,00,6f,00,\ 77,00,73,00,20,00,50,00,68,00,6f,00,74,00,6f,00,20,00,56,00,69,00,65,00,77,\ 00,65,00,72,00,5c,00,50,00,68,00,6f,00,74,00,6f,00,56,00,69,00,65,00,77,00,\ 65,00,72,00,2e,00,64,00,6c,00,6c,00,2c,00,2d,00,33,00,30,00,35,00,35,00,00,\ 00 [HKEY_LOCAL_MACHINE\SOFTWARE\Classes\PhotoViewer.FileAssoc.JFIF\DefaultIcon] @="%SystemRoot%\\System32\\imageres.dll,-72" [HKEY_LOCAL_MACHINE\SOFTWARE\Classes\PhotoViewer.FileAssoc.JFIF\shell\open] "MuiVerb"=hex(2):40,00,25,00,50,00,72,00,6f,00,67,00,72,00,61,00,6d,00,46,00,\ 69,00,6c,00,65,00,73,00,25,00,5c,00,57,00,69,00,6e,00,64,00,6f,00,77,00,73,\ 00,20,00,50,00,68,00,6f,00,74,00,6f,00,20,00,56,00,69,00,65,00,77,00,65,00,\ 72,00,5c,00,70,00,68,00,6f,00,74,00,6f,00,76,00,69,00,65,00,77,00,65,00,72,\ 00,2e,00,64,00,6c,00,6c,00,2c,00,2d,00,33,00,30,00,34,00,33,00,00,00 [HKEY_LOCAL_MACHINE\SOFTWARE\Classes\PhotoViewer.FileAssoc.JFIF\shell\open\command] @=hex(2):25,00,53,00,79,00,73,00,74,00,65,00,6d,00,52,00,6f,00,6f,00,74,00,25,\ 00,5c,00,53,00,79,00,73,00,74,00,65,00,6d,00,33,00,32,00,5c,00,72,00,75,00,\ 6e,00,64,00,6c,00,6c,00,33,00,32,00,2e,00,65,00,78,00,65,00,20,00,22,00,25,\ 00,50,00,72,00,6f,00,67,00,72,00,61,00,6d,00,46,00,69,00,6c,00,65,00,73,00,\ 25,00,5c,00,57,00,69,00,6e,00,64,00,6f,00,77,00,73,00,20,00,50,00,68,00,6f,\ 00,74,00,6f,00,20,00,56,00,69,00,65,00,77,00,65,00,72,00,5c,00,50,00,68,00,\ 6f,00,74,00,6f,00,56,00,69,00,65,00,77,00,65,00,72,00,2e,00,64,00,6c,00,6c,\ 00,22,00,2c,00,20,00,49,00,6d,00,61,00,67,00,65,00,56,00,69,00,65,00,77,00,\ 5f,00,46,00,75,00,6c,00,6c,00,73,00,63,00,72,00,65,00,65,00,6e,00,20,00,25,\ 00,31,00,00,00 [HKEY_LOCAL_MACHINE\SOFTWARE\Classes\PhotoViewer.FileAssoc.JFIF\shell\open\DropTarget] "Clsid"="{FFE2A43C-56B9-4bf5-9A79-CC6D4285608A}" [HKEY_LOCAL_MACHINE\SOFTWARE\Classes\PhotoViewer.FileAssoc.Jpeg] "EditFlags"=dword:00010000 "ImageOptionFlags"=dword:00000001 "FriendlyTypeName"=hex(2):40,00,25,00,50,00,72,00,6f,00,67,00,72,00,61,00,6d,\ 00,46,00,69,00,6c,00,65,00,73,00,25,00,5c,00,57,00,69,00,6e,00,64,00,6f,00,\ 77,00,73,00,20,00,50,00,68,00,6f,00,74,00,6f,00,20,00,56,00,69,00,65,00,77,\ 00,65,00,72,00,5c,00,50,00,68,00,6f,00,74,00,6f,00,56,00,69,00,65,00,77,00,\ 65,00,72,00,2e,00,64,00,6c,00,6c,00,2c,00,2d,00,33,00,30,00,35,00,35,00,00,\ 00 [HKEY_LOCAL_MACHINE\SOFTWARE\Classes\PhotoViewer.FileAssoc.Jpeg\DefaultIcon] @="%SystemRoot%\\System32\\imageres.dll,-72" [HKEY_LOCAL_MACHINE\SOFTWARE\Classes\PhotoViewer.FileAssoc.Jpeg\shell\open] "MuiVerb"=hex(2):40,00,25,00,50,00,72,00,6f,00,67,00,72,00,61,00,6d,00,46,00,\ 69,00,6c,00,65,00,73,00,25,00,5c,00,57,00,69,00,6e,00,64,00,6f,00,77,00,73,\ 00,20,00,50,00,68,00,6f,00,74,00,6f,00,20,00,56,00,69,00,65,00,77,00,65,00,\ 72,00,5c,00,70,00,68,00,6f,00,74,00,6f,00,76,00,69,00,65,00,77,00,65,00,72,\ 00,2e,00,64,00,6c,00,6c,00,2c,00,2d,00,33,00,30,00,34,00,33,00,00,00 [HKEY_LOCAL_MACHINE\SOFTWARE\Classes\PhotoViewer.FileAssoc.Jpeg\shell\open\command] @=hex(2):25,00,53,00,79,00,73,00,74,00,65,00,6d,00,52,00,6f,00,6f,00,74,00,25,\ 00,5c,00,53,00,79,00,73,00,74,00,65,00,6d,00,33,00,32,00,5c,00,72,00,75,00,\ 6e,00,64,00,6c,00,6c,00,33,00,32,00,2e,00,65,00,78,00,65,00,20,00,22,00,25,\ 00,50,00,72,00,6f,00,67,00,72,00,61,00,6d,00,46,00,69,00,6c,00,65,00,73,00,\ 25,00,5c,00,57,00,69,00,6e,00,64,00,6f,00,77,00,73,00,20,00,50,00,68,00,6f,\ 00,74,00,6f,00,20,00,56,00,69,00,65,00,77,00,65,00,72,00,5c,00,50,00,68,00,\ 6f,00,74,00,6f,00,56,00,69,00,65,00,77,00,65,00,72,00,2e,00,64,00,6c,00,6c,\ 00,22,00,2c,00,20,00,49,00,6d,00,61,00,67,00,65,00,56,00,69,00,65,00,77,00,\ 5f,00,46,00,75,00,6c,00,6c,00,73,00,63,00,72,00,65,00,65,00,6e,00,20,00,25,\ 00,31,00,00,00 [HKEY_LOCAL_MACHINE\SOFTWARE\Classes\PhotoViewer.FileAssoc.Jpeg\shell\open\DropTarget] "Clsid"="{FFE2A43C-56B9-4bf5-9A79-CC6D4285608A}" [HKEY_LOCAL_MACHINE\SOFTWARE\Classes\PhotoViewer.FileAssoc.Png] "ImageOptionFlags"=dword:00000001 "FriendlyTypeName"=hex(2):40,00,25,00,50,00,72,00,6f,00,67,00,72,00,61,00,6d,\ 00,46,00,69,00,6c,00,65,00,73,00,25,00,5c,00,57,00,69,00,6e,00,64,00,6f,00,\ 77,00,73,00,20,00,50,00,68,00,6f,00,74,00,6f,00,20,00,56,00,69,00,65,00,77,\ 00,65,00,72,00,5c,00,50,00,68,00,6f,00,74,00,6f,00,56,00,69,00,65,00,77,00,\ 65,00,72,00,2e,00,64,00,6c,00,6c,00,2c,00,2d,00,33,00,30,00,35,00,37,00,00,\ 00 [HKEY_LOCAL_MACHINE\SOFTWARE\Classes\PhotoViewer.FileAssoc.Png\DefaultIcon] @="%SystemRoot%\\System32\\imageres.dll,-71" [HKEY_LOCAL_MACHINE\SOFTWARE\Classes\PhotoViewer.FileAssoc.Png\shell\open\command] @=hex(2):25,00,53,00,79,00,73,00,74,00,65,00,6d,00,52,00,6f,00,6f,00,74,00,25,\ 00,5c,00,53,00,79,00,73,00,74,00,65,00,6d,00,33,00,32,00,5c,00,72,00,75,00,\ 6e,00,64,00,6c,00,6c,00,33,00,32,00,2e,00,65,00,78,00,65,00,20,00,22,00,25,\ 00,50,00,72,00,6f,00,67,00,72,00,61,00,6d,00,46,00,69,00,6c,00,65,00,73,00,\ 25,00,5c,00,57,00,69,00,6e,00,64,00,6f,00,77,00,73,00,20,00,50,00,68,00,6f,\ 00,74,00,6f,00,20,00,56,00,69,00,65,00,77,00,65,00,72,00,5c,00,50,00,68,00,\ 6f,00,74,00,6f,00,56,00,69,00,65,00,77,00,65,00,72,00,2e,00,64,00,6c,00,6c,\ 00,22,00,2c,00,20,00,49,00,6d,00,61,00,67,00,65,00,56,00,69,00,65,00,77,00,\ 5f,00,46,00,75,00,6c,00,6c,00,73,00,63,00,72,00,65,00,65,00,6e,00,20,00,25,\ 00,31,00,00,00 [HKEY_LOCAL_MACHINE\SOFTWARE\Classes\PhotoViewer.FileAssoc.Png\shell\open\DropTarget] "Clsid"="{FFE2A43C-56B9-4bf5-9A79-CC6D4285608A}" [HKEY_LOCAL_MACHINE\SOFTWARE\Classes\PhotoViewer.FileAssoc.Wdp] "EditFlags"=dword:00010000 "ImageOptionFlags"=dword:00000001 [HKEY_LOCAL_MACHINE\SOFTWARE\Classes\PhotoViewer.FileAssoc.Wdp\DefaultIcon] @="%SystemRoot%\\System32\\wmphoto.dll,-400" [HKEY_LOCAL_MACHINE\SOFTWARE\Classes\PhotoViewer.FileAssoc.Wdp\shell\open] "MuiVerb"=hex(2):40,00,25,00,50,00,72,00,6f,00,67,00,72,00,61,00,6d,00,46,00,\ 69,00,6c,00,65,00,73,00,25,00,5c,00,57,00,69,00,6e,00,64,00,6f,00,77,00,73,\ 00,20,00,50,00,68,00,6f,00,74,00,6f,00,20,00,56,00,69,00,65,00,77,00,65,00,\ 72,00,5c,00,70,00,68,00,6f,00,74,00,6f,00,76,00,69,00,65,00,77,00,65,00,72,\ 00,2e,00,64,00,6c,00,6c,00,2c,00,2d,00,33,00,30,00,34,00,33,00,00,00 [HKEY_LOCAL_MACHINE\SOFTWARE\Classes\PhotoViewer.FileAssoc.Wdp\shell\open\command] @=hex(2):25,00,53,00,79,00,73,00,74,00,65,00,6d,00,52,00,6f,00,6f,00,74,00,25,\ 00,5c,00,53,00,79,00,73,00,74,00,65,00,6d,00,33,00,32,00,5c,00,72,00,75,00,\ 6e,00,64,00,6c,00,6c,00,33,00,32,00,2e,00,65,00,78,00,65,00,20,00,22,00,25,\ 00,50,00,72,00,6f,00,67,00,72,00,61,00,6d,00,46,00,69,00,6c,00,65,00,73,00,\ 25,00,5c,00,57,00,69,00,6e,00,64,00,6f,00,77,00,73,00,20,00,50,00,68,00,6f,\ 00,74,00,6f,00,20,00,56,00,69,00,65,00,77,00,65,00,72,00,5c,00,50,00,68,00,\ 6f,00,74,00,6f,00,56,00,69,00,65,00,77,00,65,00,72,00,2e,00,64,00,6c,00,6c,\ 00,22,00,2c,00,20,00,49,00,6d,00,61,00,67,00,65,00,56,00,69,00,65,00,77,00,\ 5f,00,46,00,75,00,6c,00,6c,00,73,00,63,00,72,00,65,00,65,00,6e,00,20,00,25,\ 00,31,00,00,00 [HKEY_LOCAL_MACHINE\SOFTWARE\Classes\PhotoViewer.FileAssoc.Wdp\shell\open\DropTarget] "Clsid"="{FFE2A43C-56B9-4bf5-9A79-CC6D4285608A}" [HKEY_LOCAL_MACHINE\SOFTWARE\Classes\Applications\photoviewer.dll\shell\open] "MuiVerb"="@photoviewer.dll,-3043" [HKEY_LOCAL_MACHINE\SOFTWARE\Classes\Applications\photoviewer.dll\shell\open\command] @=hex(2):25,00,53,00,79,00,73,00,74,00,65,00,6d,00,52,00,6f,00,6f,00,74,00,25,\ 00,5c,00,53,00,79,00,73,00,74,00,65,00,6d,00,33,00,32,00,5c,00,72,00,75,00,\ 6e,00,64,00,6c,00,6c,00,33,00,32,00,2e,00,65,00,78,00,65,00,20,00,22,00,25,\ 00,50,00,72,00,6f,00,67,00,72,00,61,00,6d,00,46,00,69,00,6c,00,65,00,73,00,\ 25,00,5c,00,57,00,69,00,6e,00,64,00,6f,00,77,00,73,00,20,00,50,00,68,00,6f,\ 00,74,00,6f,00,20,00,56,00,69,00,65,00,77,00,65,00,72,00,5c,00,50,00,68,00,\ 6f,00,74,00,6f,00,56,00,69,00,65,00,77,00,65,00,72,00,2e,00,64,00,6c,00,6c,\ 00,22,00,2c,00,20,00,49,00,6d,00,61,00,67,00,65,00,56,00,69,00,65,00,77,00,\ 5f,00,46,00,75,00,6c,00,6c,00,73,00,63,00,72,00,65,00,65,00,6e,00,20,00,25,\ 00,31,00,00,00 [HKEY_LOCAL_MACHINE\SOFTWARE\Classes\Applications\photoviewer.dll\shell\open\DropTarget] "Clsid"="{FFE2A43C-56B9-4bf5-9A79-CC6D4285608A}" [HKEY_LOCAL_MACHINE\SOFTWARE\Classes\Applications\photoviewer.dll\shell\print\command] @=hex(2):25,00,53,00,79,00,73,00,74,00,65,00,6d,00,52,00,6f,00,6f,00,74,00,25,\ 00,5c,00,53,00,79,00,73,00,74,00,65,00,6d,00,33,00,32,00,5c,00,72,00,75,00,\ 6e,00,64,00,6c,00,6c,00,33,00,32,00,2e,00,65,00,78,00,65,00,20,00,22,00,25,\ 00,50,00,72,00,6f,00,67,00,72,00,61,00,6d,00,46,00,69,00,6c,00,65,00,73,00,\ 25,00,5c,00,57,00,69,00,6e,00,64,00,6f,00,77,00,73,00,20,00,50,00,68,00,6f,\ 00,74,00,6f,00,20,00,56,00,69,00,65,00,77,00,65,00,72,00,5c,00,50,00,68,00,\ 6f,00,74,00,6f,00,56,00,69,00,65,00,77,00,65,00,72,00,2e,00,64,00,6c,00,6c,\ 00,22,00,2c,00,20,00,49,00,6d,00,61,00,67,00,65,00,56,00,69,00,65,00,77,00,\ 5f,00,46,00,75,00,6c,00,6c,00,73,00,63,00,72,00,65,00,65,00,6e,00,20,00,25,\ 00,31,00,00,00 [HKEY_LOCAL_MACHINE\SOFTWARE\Classes\Applications\photoviewer.dll\shell\print\DropTarget] "Clsid"="{60fd46de-f830-4894-a628-6fa81bc0190d}" - Click on File > Save as and save the Notepad file as “restore_photo_viewer_win_10_11.reg“
- Now, double-click this file to apply the Registry settings.
16. Adjust Windows Menu Animations
The menu animations in Windows add to the better user experience but, at the same time, they make the system slower as they consume more RAM. You can enjoy a faster performance by adjusting the menu animations on your PC. Moreover, there’s also a way to get rid of animations completely. Let’s check out the Registry tweak given below.
- Go to
HKEY_CURRENT_USER\Control Panel\Desktopin the Registry Editor. - Look for an entry named “MenuShowDelay” in the right-hand side panel.
- Double-click MenuShowDelay. By default, its value is set to 400 (milliseconds). Change this value to 200, 150, or 100 (milliseconds) to reduce the level of animation.
- Finally, restart your computer.
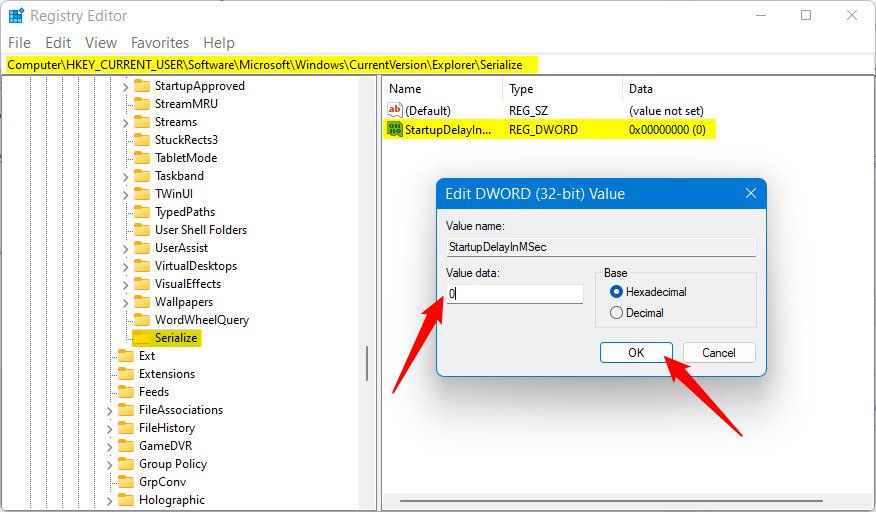
17. Reduce Startup Delay
You must have experienced a delay when your Windows 10 PC starts up. This delay is caused because the OS tries to get the start-up apps and processes ready. The duration of the delay is noticeable especially when you have many start-up apps installed. Fortunately, there’s a Registry Editor hack that you can use to disable the start-up delay to enjoy a faster startup.
- Navigate to the following path in the Registry Editor.
HKEY_CURRENT_USER\Software\Microsoft\Windows\CurrentVersion\Explorer
- Right-click on Explorer and create a new key by selecting New > Key.
- Name this newly-created key “Serialize“.
- Now, right-click on the Serialize directory and select New > DWORD (32-bit) Value, and name it “StartupDelayInMSec“.
- Just double-click StartupDelayInMSec and ensure that its Value data is set to ‘0‘.
- Restart your PC for the changes to take effect and you’ll notice that your Windows PC is booting faster.
With this tip, it’s time to wind up this collection of Windows 10 registry hacks, tweaks, mods, and settings. If you have any tips that we can include in the guide, please let us know via comments.