In the Windows 10 Anniversary update, Microsoft has added a big new feature to its Windows 10 operating system. Microsoft and Canonical collaboration has helped us to get a Windows operating system that is capable of running the Bash shell. It is just a toolset but not a complete Linux system a virtual machine or Cygwin software. Windows-based bash shell is based on one of Microsoft’s projects Astoria which was used for running Android apps on the Windows operating system.
This new feature has the same environment as in Linux and can be used to run Linux commands directly on Windows. You can also run bash shell scripts which depend on the Linux command line utilities. All the command line utilities are similar to the native Linux environment. So, you can also access the Windows file system from the bash shell. Since it is still a beta version, you can get all the things to work out well at this stage. There are a few limitations out here. The bash shell won’t work with graphic software and servers as well. Also, note that you cannot launch the Bash commands via the Windows command line or vice versa. Let’s see how to run the bash shell on Windows 10.
Enable Bash Shell on Windows 10
Sorry Windows 10 32bit users you are out of the league. You need a 64-bit Windows 10 operating system to use Bash shell. If you are on the 64-bit operating system, then follow the below steps to enable the bash shell.
- Click on the Start button on the bottom left corner of the screen or press the Windows key to open the Start menu.
- Select the Settings option in the Start menu. The settings window will appear on the screen.

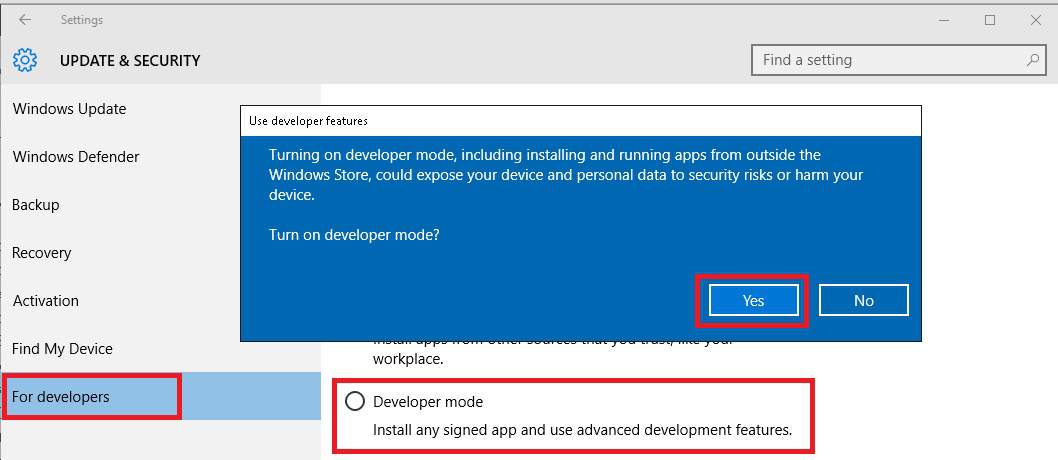
- Click on the Update & Security icon in the Settings window. Click on For developers in the left side pane and select the Developer mode by clicking on the radio button next to it.
- A confirmation window will open on the screen. Click on the Yes button to enable the developer mode.

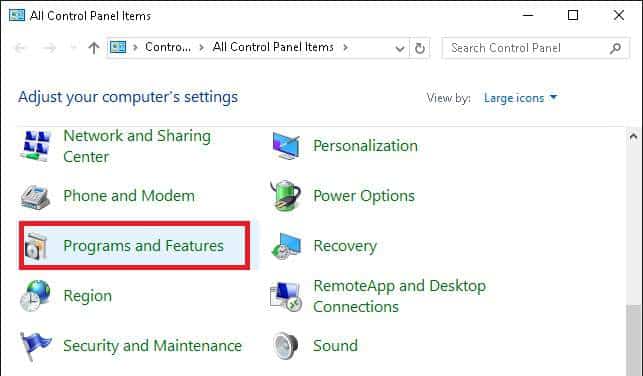
- Now, open Control panel > Programs and Features and click on the Turn Windows features on or off.

- Tick the check box to enable the Windows Subsystem for Linux (Beta) option from the list of Windows features. and click on the OK button.
- Click on the Restart Now button to restart the PC. Once your PC is restarted, click on the Start button, type bash, and hit the enter key.
If you are running the bash.exe file for the first time, then you will be prompted to accept the terms of service. Once it is accepted “Bash on Ubuntu on Windows” application will be automatically downloaded.
How to Use Bash Shell on Windows 10
Now you have successfully enabled the bash shell on your Windows 10 PC. As said above this feature has utilities similar to that of Linux environment. So you most of the Linux commands will work here and you can also access all the commands in line software. Let’s see how to use the bash shell in Windows 10.
- Click on the Start button, type bash, and hit the enter key.
- By default, you will be given a root shell and will have administrator permissions on Windows. You can now use the Linux commands and start using the bash shell.
- Here are some of the apt-get commands to install and to do some updates to the Ubuntu environment.
- sudo apt-get update: To download the package lists from the repositories and display the updated information.
- sudo apt-get install packagename: To install an application package.
- sudo apt-get remove packagename: To uninstall an application package.
- sudo apt-cache search word: To search for available application packages with a given word.
- sudo apt-get upgrade: To upgrade installed application packages to the latest versions.
- Once you have successfully installed an application package, you can launch it by entering the package name and hitting the enter key.
That’s it.
If you find this tutorial useful, do share it with your friends. Let us know your suggestions in the below comments section.
