Increasing privacy concerns are making users adopt some drastic security measures. These include choosing a strong password, enabling two-factor authentication, and other related features. In this guide, we will show you how to turn on one such measure, albeit for your Windows laptop. We will be entailing the steps to enable aSecure Sign-In feature in your Windows 10 PC.
This option adds an extra layer of security to your login screen. Until and unless you hit a pre-defined set of keys (Ctrl+Alt+Delete), Windows won’t show you the login screen altogether. This nullifies many malicious apps that cleverly spoof the login screen and store your login credentials as you enter it. With that said, here are the steps to enable the Secure Sign-in option in Windows 10.
Enable Secure Sign-In in Windows 10
There exist three different methods through which you could enable the Secure Sign-in option in Windows 10. The first involves executing the steps from the User Accounts section. The next in the hierarchy involves editing the Local Security Policy. The third and final method involves your utmost attention as it requires dealing with the Registry Editor. All these three methods do the same job. It’s up to you to decide which one you’ll opt for.
Method 1: Via the User Accounts Section
- Open the Run Command. You could take the help of the Windows + R shortcut.
- Enter the netplwiz command and click OK.
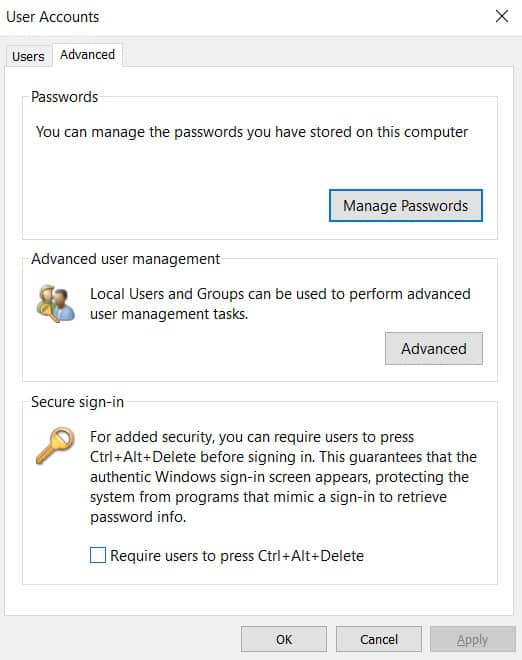
- User Accounts section will now appear. Head to its Advanced section.
- Tick mark the Require users to press Ctrl+Alt+Delete present under the Secure sign-in section.
- Finally, click Apply > OK. This is the first method of enabling the Secure Sign-In option on your Windows 10 PC. Let’s turn our attention to the second method of doing so.
Don’t Miss: 5 Best Ways to Speed Up your Windows PC
Method 2: Enable Secure Sign-In using the Local Security Policy
This method to enable Secure Sign-in only works for Windows Pro, Education, and Enterprise Edition, and not for Windows 10 Home Edition. For the later OS users, choose the first or the third method.
- Launch the Run window via the Windows+R shortcut.
- Type in the secpol.msc command. Doing so will take you to the Local Security Policy.
- Now from the left-hand side of the menu, click Local Policies > Security Options.
- On the right side of the screen, open the Interactive logon: Do not require CTRL+ALT+DEL option.
- The above option’s Properties section will now open. Under Local Security Setting, select the Enabled option, and click Apply > OK.
Also Read: Find Lost Windows 10 Devices with Find my device
Method 3: Enable Secure Sign-In in Windows 10 from Registry Editor
This is probably the toughest of the three methods to enable the Secure Sign-in feature in Windows 10. Make sure you follow all the steps in the same manner as mentioned below.
- In the Run dialog box, enter regedit and click OK.
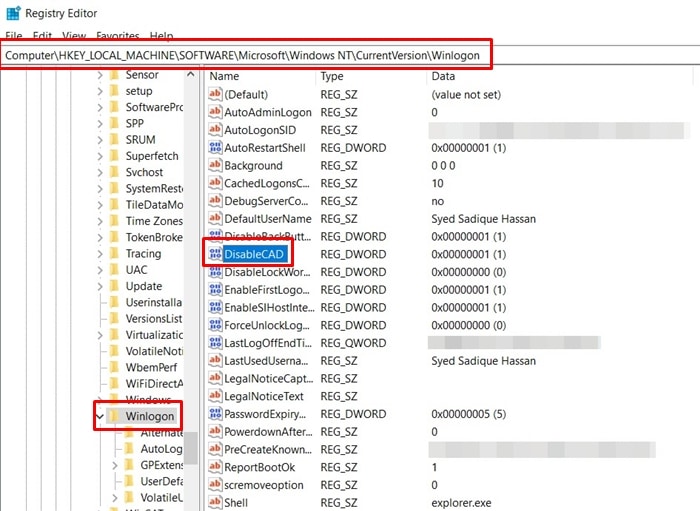
- Next inside the Registry Editor window, navigate to:
HKEY_LOCAL_MACHINE > SOFTWARE > Microsoft > Windows NT > CurrentVersion
- Under Currentversion, select the Winlogon folder. This will open its content on the right-hand side.
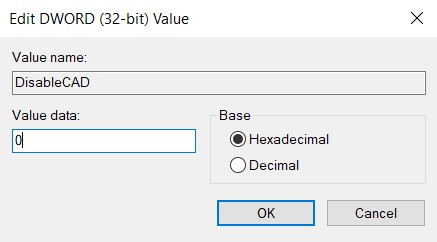
- Double-click the DisableCad file, and change the Value Data to 0 to enable it. Make sure that the Base is set to Hexadecimal.

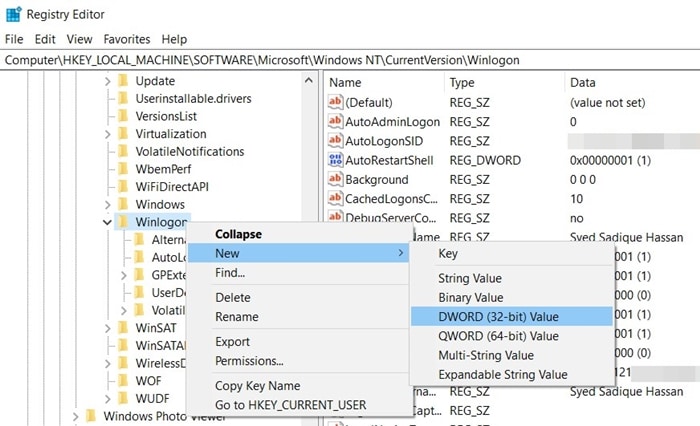
- If you can’t find the DisableCad file, right-click on Winlogon, click New > DWORD (32-bit) Value, and name this DWORD file as DisableCAD. Then change the value to 0.

- Finally, restart your PC for the changes to take place. Make sure to save all your opened documents or any important tabs in Chrome or other web browsers.
If you wish to disable this option, head to Secure sign-in and untick the Require users to press Ctrl +Alt + Delete option. You could also do the same by choosing Disabled under the Interactive logon: Do not require CTRL+ALT+DEL option. Or a much longer route involves going to the DisableCad section and entering the Value Data as 1.
Read next: Tips to Use Windows 10 Your Phone App

