If you are a Samsung Galaxy owner looking to upgrade your device’s firmware, you can easily do that using the Odin Flash Tool. But wait, are you a Linux user and feel left out of the loop because Odin doesn’t support Linux? A leak from Lapsus$ has confirmed that Odin is officially available for Linux computers. Now you can flash firmware onto your phone, upgrade or downgrade software versions, and flash TWRP recovery with Samsung Odin for Linux. Read this detailed tutorial to learn how to use Odin4 on a Linux machine.
This means that you no longer need to struggle with the outdated version of Heimdall or JOdin3 for Linux which has been deprecated. Also, if you had to dual-boot Windows and Linux or set up a Windows virtual machine via VirtualBox to use Odin, you can now use the official Odin v4 for Linux. In this guide, we’ll take a deep dive into using Samsung Odin on Linux and show you how easy it is to get started. So buckle up and get ready for some serious smartphone tinkering!
Table of Contents
Download Official Odin v4 1.2.1 for Linux
Download the Samsung Odin flash tool v4 1.2.1-dc05e3ea for Linux from below. Odin4 works on almost all distributions of Linux including Kali Linux, Fedora, Debian, Ubuntu, Arch Linux, CentOS, Elementary OS, Deepin OS, RHEL, etc.
Odin4-Linux.zip | Google Drive Mirror
Unlike Samsung Odin for Windows is not an executable portable software. Neither does it have a GUI and that’s why, you have to avail its functionalities through command lines. You now need to add the path of the folder to the Terminal so that you can use the commands to use Odin4 on Linux. Follow the steps given below to do that.
- Once you have downloaded the zip, extract it.
- Now, copy the ‘odin4‘ file from the zip to the Downloads directory on your computer.
- Open the Terminal, use the following command, and hit Enter.
sudo su
- You’ll be prompted to enter your computer’s password. Type the password and press the Enter key.
- Now, change the directory path by executing the command given below. Don’t forget to replace ‘username‘ with your username.
cd /home/username/Downloads - Then type the following command and hit the Enter key.
ls
- After that, use the
cdcommand to copy Odin4 and create an exact image of the file on the disk.cd odin4 /usr/local/bin or cd /usr/local/bin/odin4
- Finally, press the Enter key and you’ll be all set to use Odin4 on your system. You should also install ADB and Fastboot on Linux. so that you can easily boot into the Samsung Download mode using the adb reboot download command.
- Download Samsung firmware on Linux using Samloader. Extract the downloaded zip file to get 5 firmware binaries namely BL, AP, CP, CSC, and Home CSC. Copy the firmware files to the same directory where you saved Odin4.
You can now proceed to the next section describing the method to set up the USB connection on Linux.
Setting up USB Connection on Linux
Follow the steps below to make your Linux computer recognize your Samsung Galaxy phone or Tab as a USB device. If you don’t disable the cdc_acm module on your Linux computer, you’ll get the ‘ioctl bulk read Fail: Connection timed out 110′ error.
- Navigate to /etc/udev/rules.d/51-android.rules on your system and add the following line to the file:
SUBSYSTEM=="usb", ATTR{idVendor}=="04e8", MODE="0666", GROUP="plugdev" - After that, open the Linux Terminal and execute the following Bash command which unloads the ‘cdc_acm‘ module. You can later load it by executing
insmod cdc_acmcommand in the Terminal.sudo rmmod cdc_acm
- Alternatively, you can unload the ‘cdc_acm‘ module using the following Bash command.
echo "blacklist cdc_acm" > /etc/modprobe.d/cdc_acm-blacklist.conf
The Linux host on your computer should now detect and connect to your Samsung device without any issues. If your computer still can’t recognize your Samsung device, try the following in the Bash Terminal:
modprobe -r cdc_acm

cd /etc/modprobe.d/

ls
You should get one of the following files in the output from ls: ‘dkms.conf” or ‘blacklist.conf’
Now, run the command given below. You’re supposed to replace ‘filename.conf’ with the name of the file you got in the output from ls.
sudo nano filename.conf
Then add the following line to the file.
blacklist cdc_acm
Finally, save your changes using the Ctrl+X,Y + Enter keyboard shortcut for Linux.
How to Use Samsung Odin4 on Linux
While the latest Odin for Windows is v3.14.1, the version available for Linux is Samsung Odin v4 1.2.1-dc05e3ea. Odin for Linux is official but is not available to the public just like the Windows version of this firmware flash tool.
Now that you have downloaded Odin4 for Linux, let’s get familiar with some commands you can use to perform various tasks. You can use the odin -h command in the Linux Terminal to get the complete list of Odin4 functions.
odin4 -v➡ Show the Odin versionodin4 -w➡ Show licenseodin4 -b➡ Add the BL file (BL_XXXX.tar.md5)odin4 -a➡ Add AP image file (BL_XXXX.tar.md5)odin4 -c➡ Add CP image file (BL_XXXX.tar.md5odin4 -s➡ Add CSC or Home CSC file (BL_XXXX.tar.md5)odin4 -u➡ Add UMS fileodin4 -e➡ Enable the Nand erase option in Odinodin4 -v➡ Home binary validation check with pit fileodin4 -d➡ Set a device pathodin4 -l➡ Show the downloadable device’s pathodin4 --reboot➡ Reboot the device into normal modeodin4 --redownload➡ Reboot the device into download mode
If you want to flash all 4 Samsung firmware files namely BL, AP, CP, and CSC, use the following command.
sudo ./odin4 -b BL_XXXX.tar.md5 -a AP_XXXX.tar.md5 -c CP_XXXX.tar.md5 -s CSC_XXXX.tar.md5
Similarly, if you want to flash firmware and perform a Nand erase during the process, use the following command in the Terminal.
sudo odin4 -b BL_XXXX.tar.md5 -a AP_XXXX.tar.md5 -c CP_XXXX.tar.md5 -c CSC_XXXX.tar.md5 -e
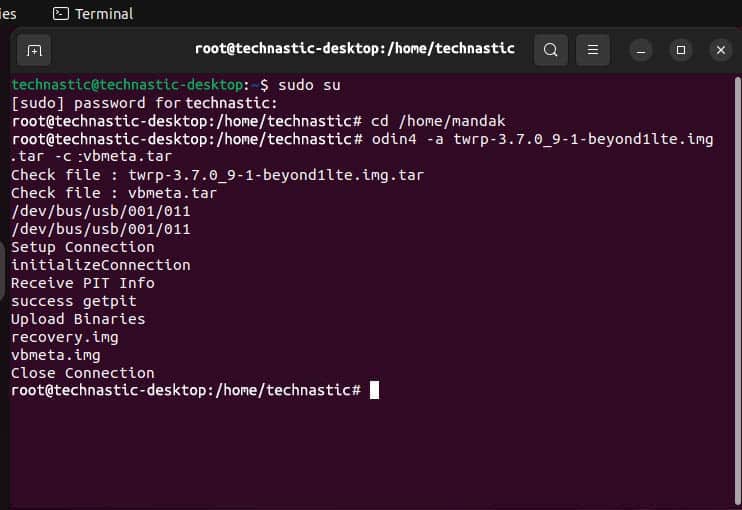
For example, if you want to flash the TWRP recovery image, use the command in the following format.
sudo ./odin4 -a fastbootd-recovery.tar
You’ll also need to vbmeta.tar file along with TWRP. In that case, try the following command.
sudo ./odin4 -a fastbootd-recovery.tar -c vbmeta.tar
In the same way, if you want to flash the stock firmware binaries on your Samsung Galaxy device with Odin4 for Linux, your command will look as shown below.
sudo ./odin4 -b BL_S918BXXU1AWBD_S918BXXU1AWBD_MQB62300606_REV00_user_low_ship_MULTI_CERT.tar.md5 -a AP_S918BXXU1AWBD_S918BXXU1AWBD_MQB62300606_REV00_user_low_ship_MULTI_CERT_meta_OS13.tar.md5 -c CP_S918BXXU1AWBD_CP23738904_MQB62300606_REV00_user_low_ship_MULTI_CERT.tar.md5 -s CSC_OXM_S918BOXM1AWBD_MQB62300606_REV00_user_low_ship_MULTI_CERT.tar.md5
Odin4 detects the device path automatically by default. However, if multiple Samsung devices are connected to your computer and you want to set the path of the device manually, you can use the following command mentioned below.
First, use the following command to find the path of the connected devices.
sudo ./odin4 -l
When you have the path, use the following command:
sudo ./odin4 -b BL_XXXX.tar.md5 -a AP_XXXX.tar.md5 -c CP_XXXX.tar.md5 -s CSC_XXXX.tar.md5 -d PATH_OF_DEVICE_A
The screenshot attached below shows the result of flashing only the AP firmware binary.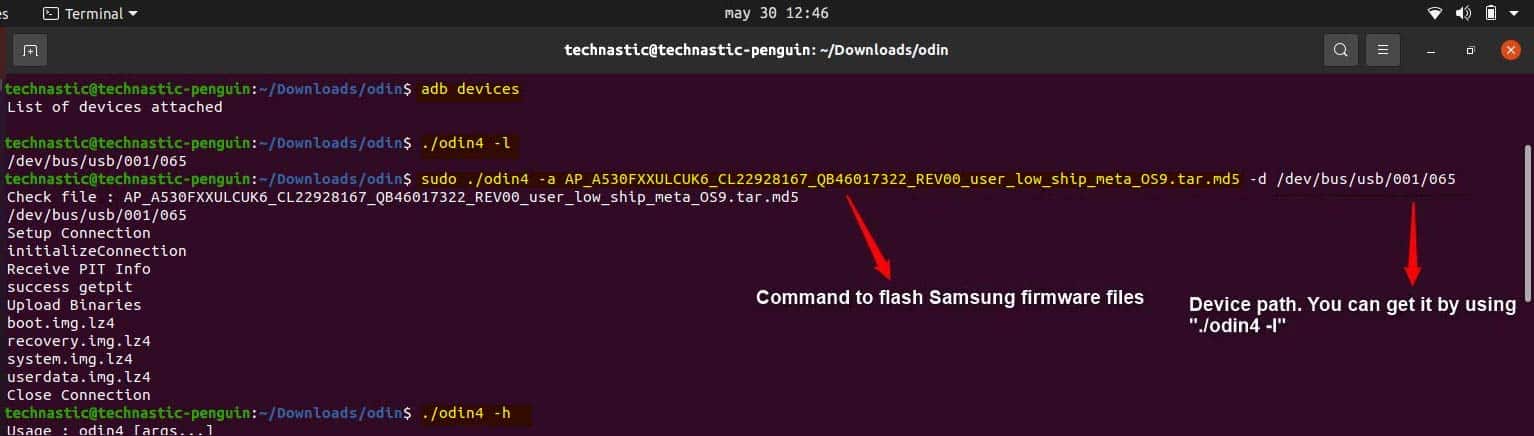
Below is the output of a successful firmware flash on Samsung Galaxy S23 Ultra with Odin4 in the Linux Terminal.
./odin4 -b BL_S918BXXU1AWBD_S918BXXU1AWBD_MQB62300606_REV00_user_low_ship_MULTI_CERT.tar.md5 -a AP_S918BXXU1AWBD_S918BXXU1AWBD_MQB62300606_REV00_user_low_ship_MULTI_CERT_meta_OS13.tar.md5 -c CP_S918BXXU1AWBD_CP23738904_MQB62300606_REV00_user_low_ship_MULTI_CERT.tar.md5 -s CSC_OXM_S918BOXM1AWBD_MQB62300606_REV00_user_low_ship_MULTI_CERT.tar.md5 -d /dev/bus/usb/001/012
Check file : BL_S918BXXU1AWBD_S918BXXU1AWBD_MQB62300606_REV00_user_low_ship_MULTI_CERT.tar.md5
Check file : AP_S918BXXU1AWBD_S918BXXU1AWBD_MQB62300606_REV00_user_low_ship_MULTI_CERT_meta_OS13.tar.md5
Check file : CP_S918BXXU1AWBD_CP23738904_MQB62300606_REV00_user_low_ship_MULTI_CERT.tar.md5
Check file : CSC_OXM_S918BOXM1AWBD_MQB62300606_REV00_user_low_ship_MULTI_CERT.tar.md5
/dev/bus/usb/001/012
Setup Connection
initializeConnection
Set Partition
Receive PIT Info
success getpit
Upload Binaries
sboot.bin.lz4
param.bin.lz4
up_param.bin.lz4
cm.bin.lz4
keystorage.bin.lz4
boot.img.lz4
recovery.img.lz4
system.img.lz4
vendor.img.lz4
dqmdbg.img.lz4
userdata.img.lz4
modem.bin.lz4
modem_debug.bin.lz4
cache.img.lz4
omr.img.lz4
odm.img.lz4
hidden.img.lz4
Close Connection
Linux is the OS for tech-savvy people. I hope this tutorial helps you flash Samsung firmware using Odin for Linux. If the method given in this tutorial didn’t work for you, you should try to use Odin on Linux via Windows VM.
Read Next: 4 Methods to Change CSC on Samsung Devices
Credits: TheAirBlow


