Drive letters are one of the two ways to identify a drive on your Windows computer. The other is the Drive name. Since Windows lets users easily rename drives, it isn’t the most reliable way to identify drives. Therefore, drive letters are very important. You can still change the drive letter in the Windows 10 file explorer, however. Windows also lets you assign a new drive letter to a drive that doesn’t have one. Also, you can hide a drive on Windows 10 entirely from prying eyes.
Note
Let’s imagine a scenario where the drive name was the only way to identify a drive. Now imagine you install a program in the programs folder, located in a drive named ProgramDrive. On Windows, you can simply right-click and select rename to change the name of a drive. This means many users might often do it or sometimes even accidentally. But when you change the name of the drive to NewProgramDrive, the programs installed in the programs folder may stop working. Because the default install path they’ve set up is now not there. You can follow another guide I wrote some time ago to install programs on external storage on Windows 10.
This is what makes drive letters so important on Windows. Instead of identifying a drive by its name, Windows does this via drive letters. The names are just for the convenience of the user. But the same logic also applies to drive letters. Windows does let you change the drive letter or assign a new one. However, if you change the drive letter for a drive where Windows or another program is installed, it may cause problems.
We recommend that you shouldn’t change the drive letter of such a drive.
Steps to Assign or Change Drive Letter in Windows 10 Explorer
This can be done from the Disk Management console. There are several ways to launch it. On Windows 10, the easiest way to do that is to right-click on the Start menu and select Disk Management.
- In the disk management window, you can find all your drives near the bottom.

- You can see all your drives listed in the top half of the Disk Management window. It also shows the disks in a more graphical representation at the bottom half of the window.
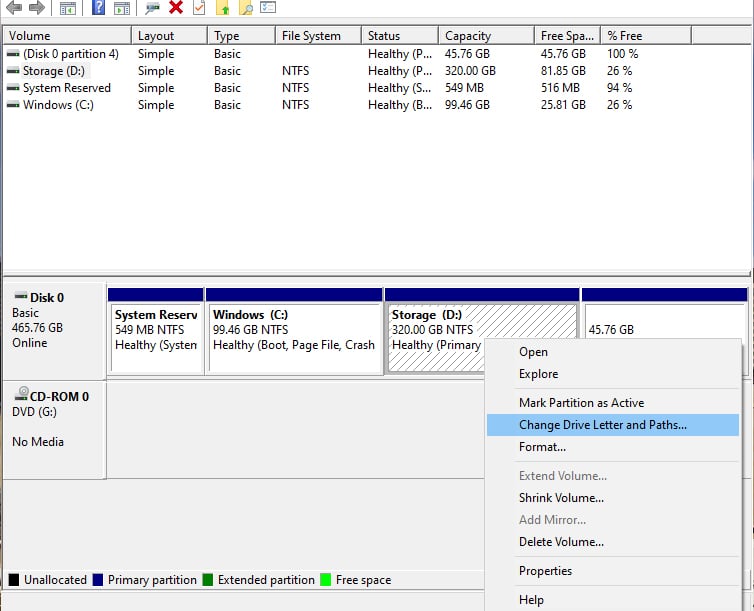
- Right-click on the drive that doesn’t have a letter or the drive that you want to change the drive letter for.

- From the context menu, select the Change Drive Letter and Paths… option.
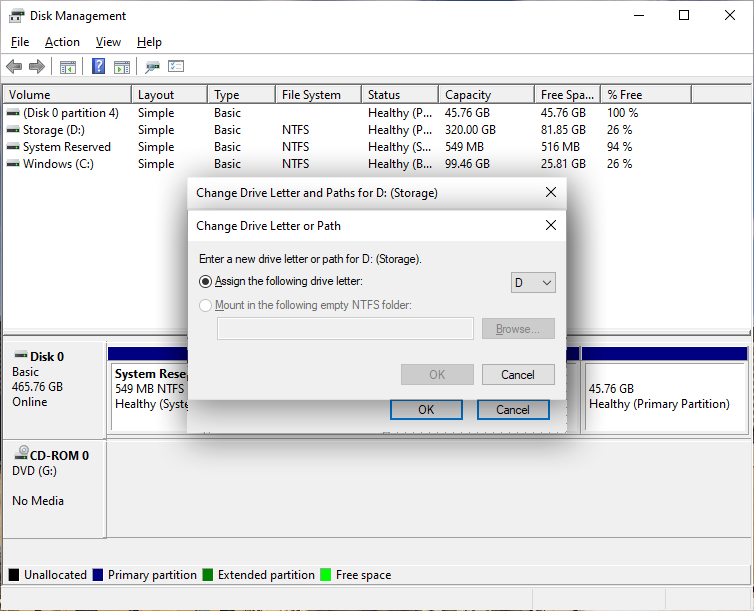
- Click on the Change… button on the new pop-up window that appears.
- If the Drive does not already have a letter assigned, click on the Add button.
- You can then assign a new drive letter to the drive similarly as mentioned below.
- Another popup dialog appears where you can select one of the available drive letters from a drop-down menu.
- Click OK and then click Yes on the warning dialog that appears.


The drive letter will be changed once you do that. However, Windows will still keep using the previous drive letter to keep programs running. If you install any new programs in that drive, they will also be installed using the old drive letter. This is fixed once you restart Windows. And yes, if you notice that your Windows PC takes a long time to boot up, you can follow these tips to make Windows 10 boot faster.
Read Next: How to Enable and Use Windows Sandbox