If you are anywhere into video making, or production, you must have come across a situation wherein you had to forcefully reduce the quality of the video file you needed. Might it be that your graphic card just doesn’t support 2K or 4K, or that your client’s PC doesn’t. Whatever might be the case, the outcome is similar, and at the end of the day, you have to reduce the quality of your hand-made videos.
However, you might say that just reducing the quality of a video will make it work, but, it is much more than that. Even if your video has been powered down to 10% of its original quality, the resolution would be the same, and this wouldn’t eradicate the problem. So, all you need is a way to reduce the resolution of your video, and then call it a day. Experimentally, I found one of the best software by which you can do the same, and it is totally free of cost.
Meet HandBrake, the guys who saved not only mine but a ton of other people’s day, by making a higher-resolution clip to be able to be played on most of the systems. In this little tutorial, we’ll be having a look on how you can reduce the resolution of a video using HandBrake. This software is available for Windows, Mac, and Linux, while we will be demonstrating this on a Windows 10 machine.
[mks_button size=”large” title=”Download Handbrake” style=”squared” url=”https://handbrake.fr/” target=”_blank” bg_color=”#db4141″ txt_color=”#FFFFFF” icon=”fa-arrow-circle-o-down” icon_type=”fa”]
Reduce Resolution Of Videos Using HandBrake
- First of all, use our shortcode from above to head over to their website, and grab the version suitable to your workstation.
- Next up, acquire the desired video file, and place it in a convenient place, just to make its search faster and easier.
- Install HandBrake using their great and fast installation wizard, and launch the application once done.
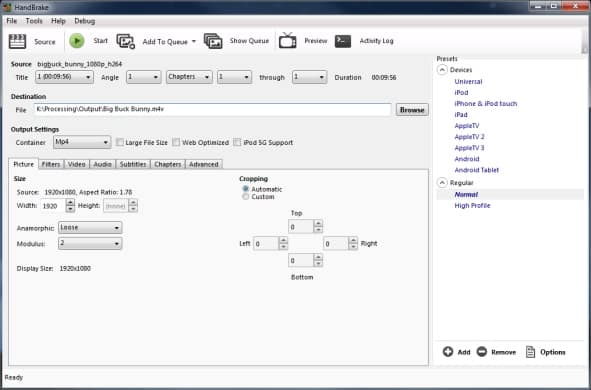
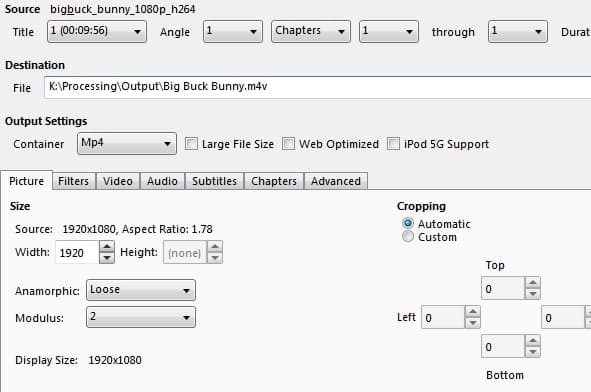
- Click on the big ‘Source‘ button you see on the top, and select the video file you desire.

- Next up, select the destination folder to be able to easily find your produced file.
- This is the important part. From the big module down, under the tab named ‘Picture‘, type in the resolution of the video you need at the end. For example, if you need a Full HD version of your 4K video, fill in the width box with 1920, and the height box with 1080. Most of the times, the application sets the height for you, to resolve any confusions.

- Once you’re done having set your options, click on the big ‘Start‘ button on the top, and wait till the video has finished production.
Good going! Without any hassle, you’ve successfully reduced the resolution of a video file. If you think we’ve missed something, that’s why the comments section’s for. If you think our article has saved your day too, then share the love using one of the buttons below. Stay tuned for more geeky stuff as such!