Millions of devices are running on Windows 10 operating system which includes both touchscreen and non-touchscreen laptops, desktops, tablets etc. Windows 10 is not the only OS which supports touchscreen, but its predecessor Windows 8 was of that first kind. Windows 8 operating system was designed much in view of touchscreen support which creating major problems in non-touchscreen devices.
Well, lock screen in Windows 8, 10 is one of its kind of problem which most of the users find irritating. Whenever you restart your PC, you will be greeted by a lock screen which needs to be swiped away to log in into Windows. Even though Windows 10 has recovered from few of the drawbacks in Windows 8 but still you can find some of the remnants. Let’s see how to disable lock screen in Windows 10 in a different way as it doesn’t have a quick and easiest setting to tweak the lock screen from appearing.
Disable Windows 10 Lock Screen
You can the disable the lock screen in Windows 10 by using any of the two ways either by using a group policy editor or a registry editor. Let’s see one by one clearly to make it simpler.
1. Using Group Policy Editor
Group Policy editor method is one of the easiest and simplest methods to disable the lock screen in Windows 10, but may or may not work in some Windows editions.
- Launch the Run dialog box in your PC by pressing either the keyboard shortcut key “Windows +R” or by searching for Run program in the Start menu.
- Once the Run dialog box is launched, type “gpedit.msc” in the text box and click on OK button. If you are lucky, Group Policy Editor window popup will appear on the screen else continue with the second method, if you experience any error.

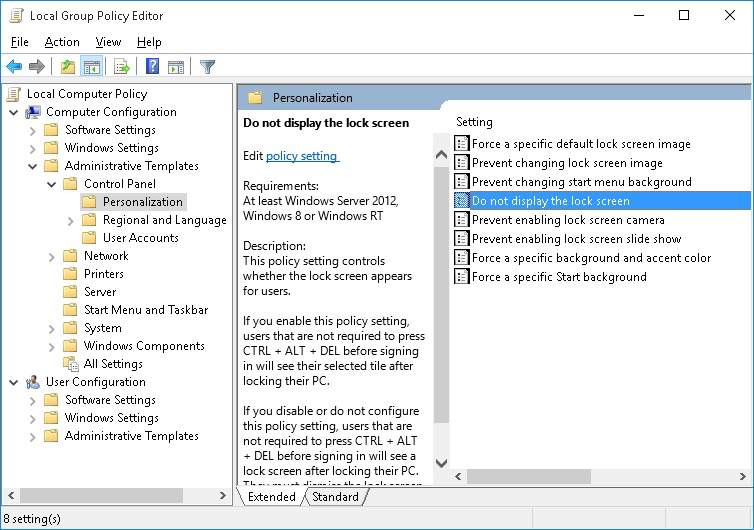
- In the Group Policy Editor window, expand the Computer Configuration tree in the left pane of the window.
- Under the Computer configuration tree, expand Administrative Templates › Control Panel and select Personalization subfolder.
- In the right pane of the window, you will find many options under the settings. Double click on the “Do not display the lock screen” option.

- Do not display the lock screen window will appear on the screen. Select the Enable option on the left side and click on OK button.


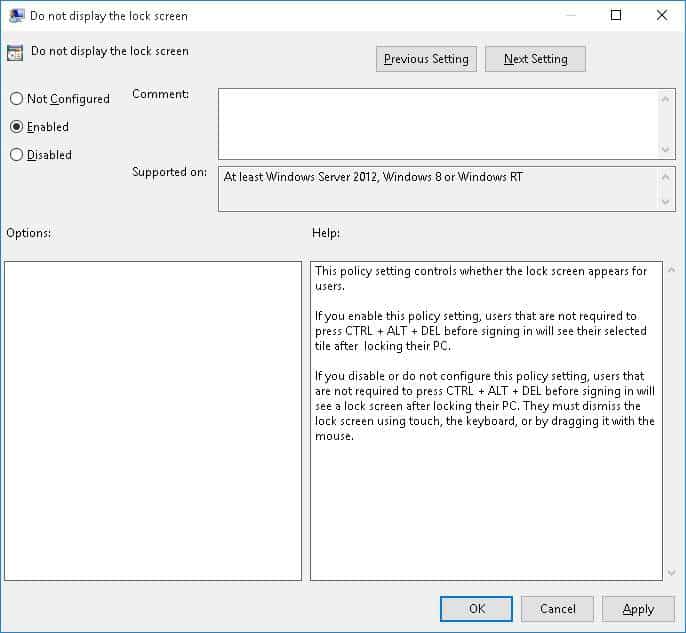
That’s it. Now reboot your PC and then the lock screen won’t appear after startup.
2. Using Registry Editor
You can disable the lock screen on any Windows version using this method.
- Launch the Run dialog box in your PC by pressing either the keyboard shortcut key “Windows +R” or by searching for Run program in the Start menu.
- Once the Run dialog box is launched, type “regedit” in the text box and click on OK button. Make sure you have administrator privileges before starting this method else you can change the registry values.

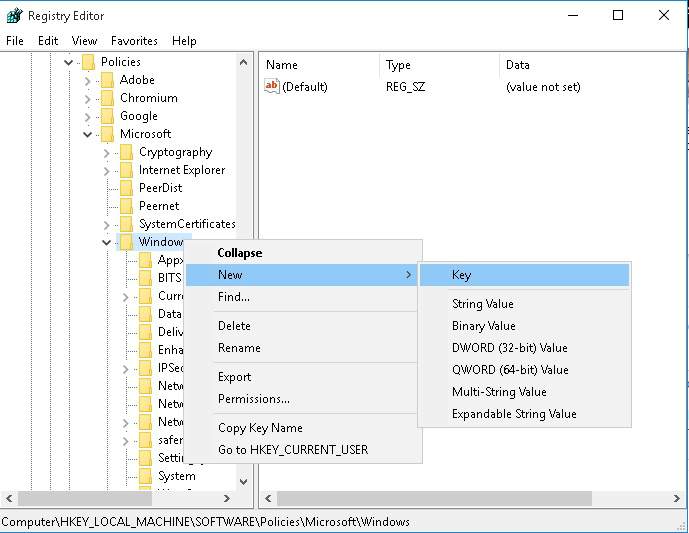
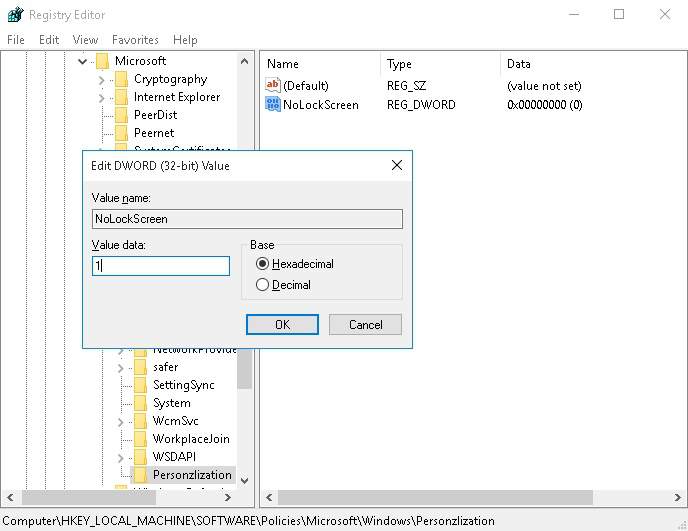
- In the Registry Editor window, navigate to HKEY_LOCAL_MACHINE\SOFTWARE\Policies\Microsoft\Windows.
- Right click on the Windows folder and select New › Key from the options. Noe rename this newly created key as Personalization.

- Select the newly created Personalization key and in the right pane of the window, right-click on the empty space. Select New › DWORD (32-bit) Value.

- Now rename the newly create DWORD as “NoLockScreen“. Double click on the NoLockScreen and enter the value as 1 under the Value Data.

- Now click on OK button and restart your PC. After the startup, you will not find the lock screen.


That’s it. So, how did you disable your lock screen?
Do let us know your valuable suggestions and ideas in the below comments section.