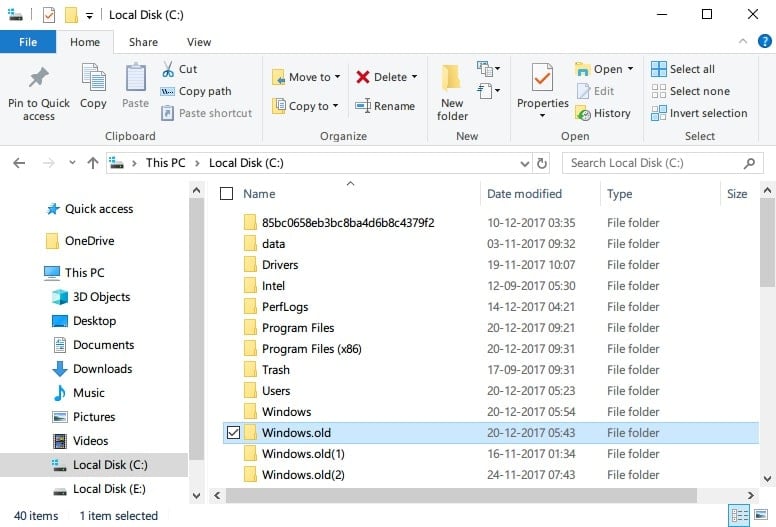
If you’re here, you’ve most probably already discovered a folder named Windows.old sitting nicely on your Windows 10 installation drive. You may also have noticed it is quite large. Large enough for you to want to remove it and clear up some space. This folder appears right after you update your Windows PC. You may have just upgraded to Windows 10 or you’ve installed the latest Fall Creator’s Update. Or even if you’re an Insider upgrading to the latest Insider Preview, you’d find this folder on your C:\ drive. You’re here so you may also have tried to delete it only to find out that you can’t. Because you can’t delete Windows.old folder on Windows 10 via traditional means.
Before you assume anything, let’s make it clear that this is probably for the better. Whenever a user upgrades Windows without deleting the previous version, the installer wizard backups the old copy in a folder named Windows.old. This is done as a precaution, like every other backup you’ve ever heard of. In case something goes wrong during the upgrade process, the backup files can be used to roll back the changes.
Windows 10 keeps these files around because it gives you the ability to roll back to the previous version within a month of upgrading. It is similar to rolling back drivers on a Windows 10 PC. But maybe you’ve made up your mind and don’t want to go back or you just need that space for something else. Me? I just don’t like seeing a red bar under my C:\ drive, or any drive for that matter.
How to delete Windows.old folder
So just a warning, only go through with deleting this folder if you are a hundred percent sure that you want to. If you’ve just upgraded, it will probably be a better idea to use the computer for a few days first and make sure everything is working. You won’t want to delete the old copy and then wish you hadn’t later. If you want to get rid of it, here’s how you can.
- Go to This PC on the left pane in the File Explorer and right-click on your C:\ drive. This is usually the drive where the Windows.old folder is created unless you have your Windows installed on a different drive. In which case right-click on that drive.
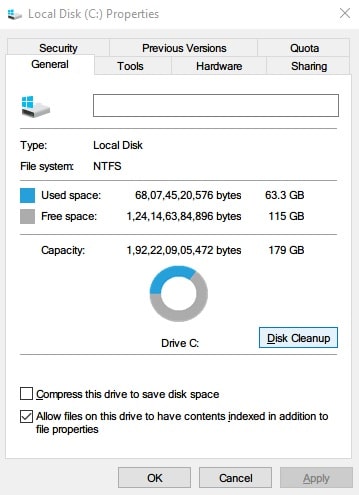
- From the right-click context menu, select Properties, and then click on the Disk Cleanup button.

- Alternatively, you can hit the Windows key and type “Disk” at which point you should already see Disk Cleanup as the first search result. Click on it and select the drive on which your Windows is installed via the drop-down menu and click OK.

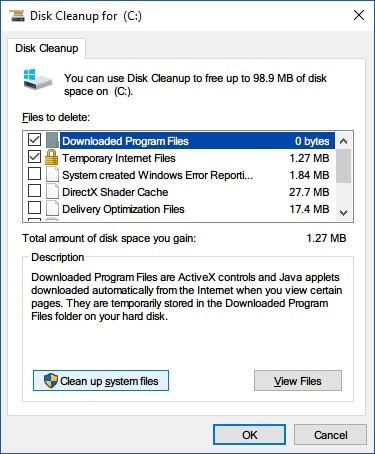
- In the Disk Cleanup window click on the Clean up system files button located towards the bottom.

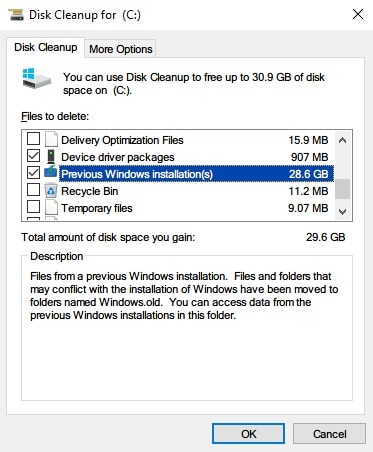
- Now select the Previous Windows Installation(s) option under Disk Cleanup.

- You can also choose to delete other system files that you can’t normally delete. These include other installation-related files including Windows upgrade log files and Temporary Windows installation files. These files can take up several gigabytes of space as well. Try not to select anything that you aren’t entirely sure about.
- When you’re ready, click on OK.
- Click Delete Files on the pop-up dialog then click Yes on the Disk Cleanup warning to confirm the delete process.

Should you delete it?
Once the cleanup is done you’ll find the Windows.old folder is no longer on your Windows installation drive. While extremely useful when things go wrong, these files are just a waste of storage space once the installation has successfully completed. Especially on devices with lower storage space. If you are sure you don’t want to roll back to the previous Windows version it is better to just get rid of them. While it is safe to delete the Windows.old folder and other installation-related files, it isn’t always practical. If you have a PC with a lot of storage space it’d be better to just let them hang around, just in case you ever need them.